Summary
In a previous blog an Asus X202E netbook was upgraded to Ubuntu Mate, however following the latest updates the netbook appeared to slow for specific tasks such as web browsing. For a comparative test the laptop was changed to Lubuntu. |
| Asus X202E |
To create the installation USB drive, under Windows 10, the well known software package Rufus 2.18 was utilised.
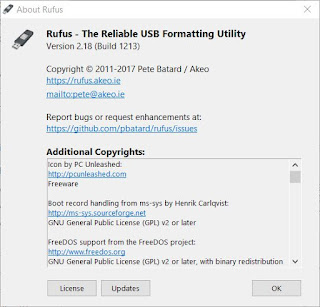 |
| About Rufus 2.18 |
The Lubuntu ISO was downloaded from from the downloads section of the Lubuntu site. Specifically the Lubuntu 17.10.01 AMD 64 ISO release was used.
 |
| Rufus Settings |
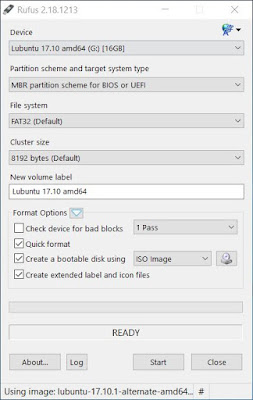
With a USB drive installed, Rufus was opened. The Device selected was the USB drive as shown in the above capture.
For the partition type either "MBR partition scheme for BIOS or UEFI" or "MBR partition scheme for UEFI" were suitable for use with the Asus BIOS.
After configuring the File System for FAT32 the downloaded ISO file "lubuntu-17.10.1-alternate-amd64" was selected.
The start button was then selected to begin the USB drive creation process.
 |
| Rufus ISO Hybrid |
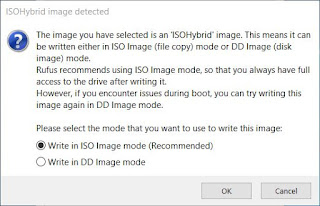
Rufus did download some additional files then displayed a window, as shown above, regarding the ISO image and how it is written to the USB drive. The recommended setting were used.
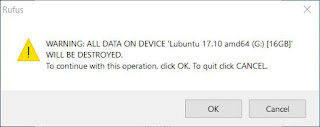 |
| Rufus Erase USB |
Lastly was the obligatory erase drive confirmation message before the disk creation process was started.
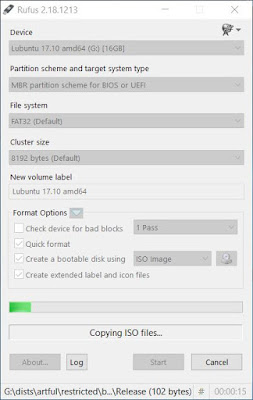 |
| Rufus Copying ISO Files |
Once the process was completed, it was over to perform the operating system change to the Asus netbook.
As mentioned in the previous blog while upgrading an Asus X202E netbook to Ubuntu Mate, the USB with the Linux file system format will not boot with the default BIOS settings. Original details for BIOS configuration and, originally for a Mac install, can be found at this thread www.tonymaxx86.com
In summary the changes that were required with this model X202E are listed below.
1. The Lubuntu USB drive was installed into the netbook while it was unpowered. BIOS was then activated by firstly pressing the F2 key then pressing the power button. The F2 key was only released when the BIOS was displayed on the netbook. Original reference in Asus website FAQ.
2. First change to the BIOS was under the 'Advanced' menu. USB Legacy support was enabled to ensure booting from the external drive was possible. XHCI pre-boot was also disabled.
3. Next in the 'Boot' menu settings, Fast Boot and Launch CSM were disabled.
4. Additionally the boot priorities were changed so that the Lubuntu USB was the first boot device.
6. Lastly the BIOS changes were saved and the X202E allowed to reboot with the installed Lubuntu USB drive connected to the netbook.
Installing Lubuntu
Lubuntu booted with the well know GNU Grub bootloader.
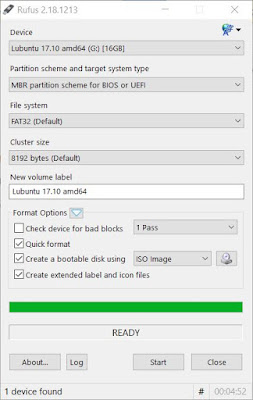 |
| Rufus Completed Lubuntu USB |
Netbook BIOS Changes to Boot with USB Install Disk
In summary the changes that were required with this model X202E are listed below.
1. The Lubuntu USB drive was installed into the netbook while it was unpowered. BIOS was then activated by firstly pressing the F2 key then pressing the power button. The F2 key was only released when the BIOS was displayed on the netbook. Original reference in Asus website FAQ.
2. First change to the BIOS was under the 'Advanced' menu. USB Legacy support was enabled to ensure booting from the external drive was possible. XHCI pre-boot was also disabled.
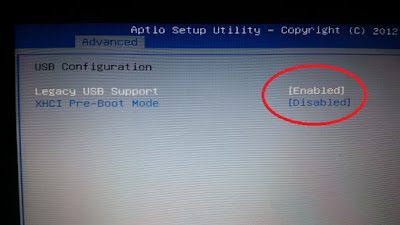 |
| X202E BIOS Legacy USB Activation |
| X202E BIOS Boot Settings |
4. Additionally the boot priorities were changed so that the Lubuntu USB was the first boot device.
| X202E BIOS Boot Priority |
5. Moving to the BIOS 'Security' menu, the Secure Boot was disabled to allow non-Windows drives to boot.
| X202E BIOS Secure Boot Settings |
6. Lastly the BIOS changes were saved and the X202E allowed to reboot with the installed Lubuntu USB drive connected to the netbook.
Lubuntu booted with the well know GNU Grub bootloader.
| Lubuntu Grub Start |
The language option was then presented by the installer.
The Country was then selected.
Benchmarks
xxx@xxx-X202EP:~$ phoronix-test-suite
\PHP Fatal error: Class ambient_temp cannot extend from interface phodevi_sensor in /usr/share/phoronix-test-suite/pts-core/objects/phodevi/sensors/ambient_temp.php on line 23
| Lubuntu Language |
The Country was then selected.
| Lubuntu Country |
For the subsequent step, which was keyboard setup, the automatic detection was tried by pressing keys specified by the installer. This did not appear to work and was not actually required as the netbook keyboard worked without issues after the installation was complete.
| Lubuntu Keyboard Detection |
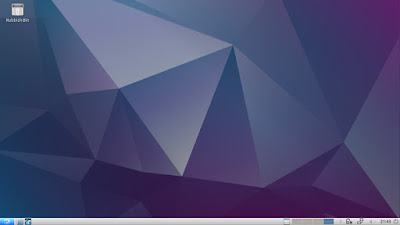
After the reboot, Lubuntu booted to the screen as captured above.
Performance - Lubuntu vs Ubuntu Mate
Performance - Lubuntu vs Ubuntu Mate
The primary reason for changing between operating systems was to determine if a performance gain could be noticed. Shown below are the differences between the two operating systems using Hardinfo.
Computer
|
|
Processor
|
Intel(R) Celeron(R)
CPU 847 @ 1.10GHz
|
Memory
|
1857MB (351MB used)
|
Machine Type
|
Notebook
|
Operating System
|
Ubuntu 17.10
|
Computer
|
|
Processor
|
2x Intel(R)
Celeron(R) CPU 847 @ 1.10GHz
|
Memory
|
1860MB (423MB used)
|
Operating System
|
Ubuntu 16.10
|
For bench marking the built-in application Hardinfo was used. Relevant performance metrics for the two operating systems can be seen below. Note the higher scores denoting better performance in green. Looking at the results below Linux Mint mostly outperforms Lubuntu, for this Asus X202E and the setup used.
Benchmarks
CPU Blowfish
CPU Blowfish
Lubuntu - Intel(R) Celeron(R) CPU 847 @ 1.10GHz
2x 1100.00 MHz
18.411
Linux Mint - This
Machine
1100 MHz
16.396
CPU CryptoHash
CPU CryptoHash
Lubuntu - Intel(R)
Celeron(R) CPU 847 @ 1.10GHz
2x 1100.00 MHz
82.704
Linux Mint - This
Machine
1100 MHz
91.171
CPU Fibonacci
CPU Fibonacci
Lubuntu - Intel(R)
Celeron(R) CPU 847 @ 1.10GHz
2x 1100.00 MHz
1.835
Linux Mint - This
Machine
1100 MHz
4.906
CPU N-Queens
CPU N-Queens
Lubuntu - Intel(R)
Celeron(R) CPU 847 @ 1.10GHz
2x 1100.00 MHz
13.559
Linux Mint - This
Machine
1100 MHz
19.652
CPU Zlib
CPU Zlib
Lubuntu - Intel(R)
Celeron(R) CPU 847 @ 1.10GHz
2x 1100.00 MHz
0.147
Linux Mint – Not
Tested
FPU FFT
FPU FFT
Lubuntu - Intel(R)
Celeron(R) CPU 847 @ 1.10GHz
2x 1100.00 MHz
7.430
Linux Mint - This
Machine
1100 MHz
5.927
FPU Raytracing
FPU Raytracing
Lubuntu - Intel(R)
Celeron(R) CPU 847 @ 1.10GHz
2x 1100.00 MHz
9.457
Linux Mint - This
Machine
1100 MHz
12.788
GPU Drawing
GPU Drawing
Lubuntu - Intel(R)
Celeron(R) CPU 847 @ 1.10GHz
2x 1100.00 MHz
2003.950
Linux Mint – Not tested
CPU Blowfish
CPU Blowfish
Lubuntu - Intel(R) Celeron(R) CPU 847 @ 1.10GHz
2x 1100.00 MHz
18.411
Linux Mint - This
Machine
1100 MHz
16.396
CPU CryptoHash
CPU CryptoHash
Lubuntu - Intel(R)
Celeron(R) CPU 847 @ 1.10GHz
2x 1100.00 MHz
82.704
Linux Mint - This
Machine
1100 MHz
91.171
CPU Fibonacci
CPU Fibonacci
Lubuntu - Intel(R)
Celeron(R) CPU 847 @ 1.10GHz
2x 1100.00 MHz
1.835
Linux Mint - This
Machine
1100 MHz
4.906
CPU N-Queens
CPU N-Queens
Lubuntu - Intel(R)
Celeron(R) CPU 847 @ 1.10GHz
2x 1100.00 MHz
13.559
Linux Mint - This
Machine
1100 MHz
19.652
CPU Zlib
CPU Zlib
Lubuntu - Intel(R)
Celeron(R) CPU 847 @ 1.10GHz
2x 1100.00 MHz
0.147
Linux Mint – Not
Tested
FPU FFT
FPU FFT
Lubuntu - Intel(R)
Celeron(R) CPU 847 @ 1.10GHz
2x 1100.00 MHz
7.430
Linux Mint - This
Machine
1100 MHz
5.927
FPU Raytracing
FPU Raytracing
Lubuntu - Intel(R)
Celeron(R) CPU 847 @ 1.10GHz
2x 1100.00 MHz
9.457
Linux Mint - This
Machine
1100 MHz
12.788
GPU Drawing
GPU Drawing
Lubuntu - Intel(R)
Celeron(R) CPU 847 @ 1.10GHz
2x 1100.00 MHz
2003.950
Linux Mint – Not tested
System Monitor
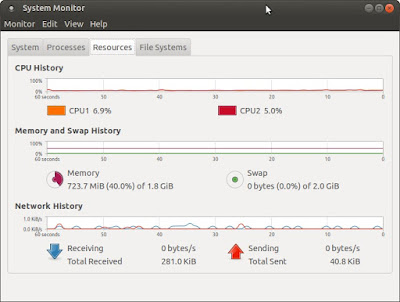
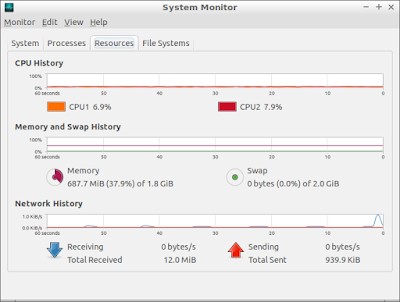
The System Monitor for both operating system was captured just after restart. No additional software or updates had been applied to either of the operating systems.
The System Monitor for both operating system was captured just after restart. No additional software or updates had been applied to either of the operating systems.
 |
| Ubuntu Mate System Monitor |
 |
| Lubuntu System Monitor |
Summary
Additional testing was performed with the Phoronix Test Suite. Phoronix was unable to run on Ubuntu Mate even after some gentle massaging. The error listed below was persistent.
Additional testing was performed with the Phoronix Test Suite. Phoronix was unable to run on Ubuntu Mate even after some gentle massaging. The error listed below was persistent.
\PHP Fatal error: Class ambient_temp cannot extend from interface phodevi_sensor in /usr/share/phoronix-test-suite/pts-core/objects/phodevi/sensors/ambient_temp.php on line 23
Some of the test results for Phoronix with Lubuntu are available in PDF at the link below.
 |
| Phoronix Lubuntu Test Summary |
At the end of of the comparison the test results turned out to be incomplete, therefore testing was inconclusive.
For day to day operation Lubuntu with the LXDE desktop, in my personal opinion, does feel more responsive and visually cleaner than Ubuntu Mate with default install settings. There however are more tests and metrics that are outstanding for a complete comparison.

