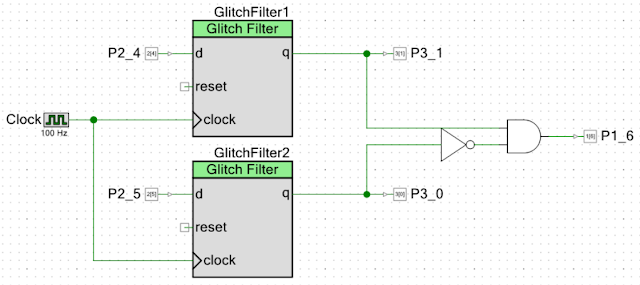
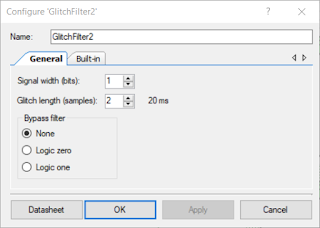
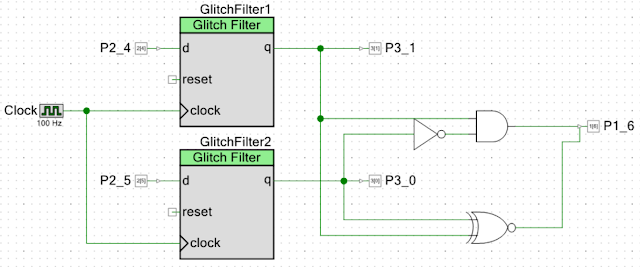
This post illustrates how a single pole switch contact can be monitored using a microcontroller which provides a pulsing output and corresponding monitor input. Similar to a previous post, multipole switch debounce, a PSoC CY8CKIT-049 42xx development board was utilised with an external switch.
| Single Pole Switch Pulsed Output / Input |
Manufacturers of safety equipment such as Pilz, Leuze and Honeywell use more comprehensive redundancy and self-checking techniques which use a variant of the pulsing output. Additional reading relating to the pulsing implemented by safety equipment manufacturers is available in technical documentation such as that from NHP, Allen-Bradley or even National Instruments to name a few.
The technique implemented in this post is an example for the hobbyist. For more advanced safety implementation, a dedicated safety PLC or External Device Monitoring (EDM) solution should be considered.
Monitoring
Monitored inputs are commonly found in safety critical components or systems however these are rarely used in hobbyist designs. The hardware used by a hobbyist, as with any device, is prone to mechanical failure or wiring issues. Assuredly providing basic signal monitoring can assist in fault diagnosis. For this blog, shorts between cables carrying signals and power rails can be detected using pulsed signals. Furthermore false activation in such a failure is significantly lessened.
Pulsing Described
In this example pulsing refers to a fixed frequency, series of pulses with a predefined duty cycle. For ease in generating those pulses in an electronic circuit, the shape of the pulse usually represents rapid changes between two potentials as shown below.
| Pulsing Signal Example |
Output Implementation
Regardless of the processor type, implementing a pulsing output is usually a novel task using a timer. For the PSoC processor a PWM component was utilised to generate the pulsing output.
Regardless of the processor type, implementing a pulsing output is usually a novel task using a timer. For the PSoC processor a PWM component was utilised to generate the pulsing output.
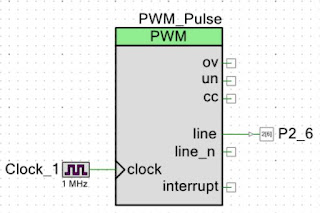 |
| PSoC PWM Component |
The PWM component was configured to produce a 50% duty cycle output. Shown below is the waveform produced at the output pin (P2_6).
 |
| PSoC PWM Component Output |
Input Implementation
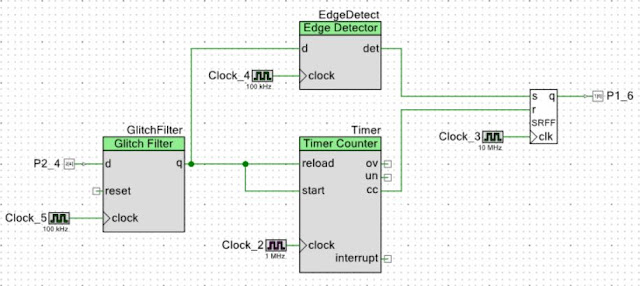
For debouncing and verifying the input pulse, a number of active components were used in the design although there are other solutions which may achieve a similar result.
For debouncing and verifying the input pulse, a number of active components were used in the design although there are other solutions which may achieve a similar result.
 |
| Debounce and Pulse Detection |
The input pin (P2_4), which would usually be driven from the pulsed output, is passed through a glitch filter for the purposes of removing any unwanted noise or signal bounce. The filtered signal is then output to two components, an edge detector and a timer.
Using the edge detector a rising edge pulse generates a short pulse to drive the set pin of a SR flip flop. The flip flop output then remains true until the reset input is activated.
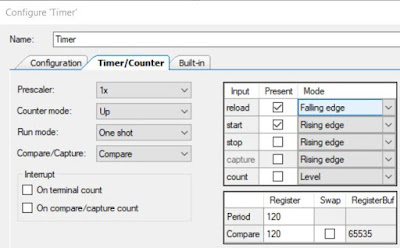
The timer is configured so a rising edge starts the timer counting and a falling edge reloads the timer count value. With the timer count value being greater than the input pulse width, the one shot timer is constantly reset when connected to a pulsing signal. When the pulsing signal is removed the timer expires and reset the flip flop.
 |
| Timer Configuration |
If the input signal is not pulsing the SR flip flop may be triggered from a bouncing signal but is subsequently reset. The reset of the flip flop is a result of the timer expiring, caused by the timer not being reloaded on a falling edge.
Input Signal (Pulsing)
Shown in the image below are the typical signals when the pulsing output is first connected to the input.
The yellow trace (CH1) displays the input pin with the 50us high, 50us low signal.
Shown in the pink trace (CH4) is the output of the glitch filter. As the input signal is without any bounce the input pulse passes through glitch filter with the delay defined in the component which in this design was 40us.
When a valid rising edge has been detected after the glitch filter the edge detector generated a short 10us pulse, as shown in the green trace (CH2).
The blue trace (CH3) is the output of the timer compare which is not active due to the pulsing signal being active.
Input Signal (Non-Pulsing)
Shown in the image below are the typical signals when a non-pulsing signal is first connected to the input.
The yellow trace (CH1) shows when a voltage was applied to the input.
Some 50us later the glitch filter provides its output as shown in the pink trace (CH4).
A valid rising edge is detected from the glitch filter as shown in the green trace (CH2).
After the rising edge from the glitch filter starts the timer there is no subsequent falling edge to reload the timer. As a result the timer expires, as shown in the blue trace (CH3) causing the flip flop to reset.
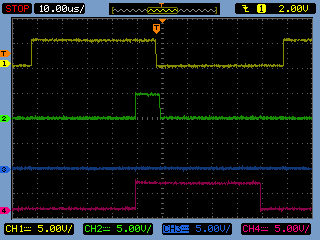
Input Signal (Pulsing)
Shown in the image below are the typical signals when the pulsing output is first connected to the input.
The yellow trace (CH1) displays the input pin with the 50us high, 50us low signal.
Shown in the pink trace (CH4) is the output of the glitch filter. As the input signal is without any bounce the input pulse passes through glitch filter with the delay defined in the component which in this design was 40us.
When a valid rising edge has been detected after the glitch filter the edge detector generated a short 10us pulse, as shown in the green trace (CH2).
The blue trace (CH3) is the output of the timer compare which is not active due to the pulsing signal being active.
 |
| Waveforms for Pulsing Input Signal |
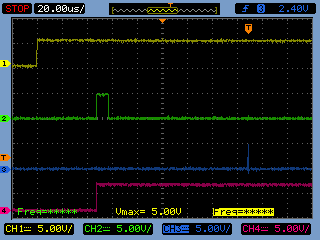
Input Signal (Non-Pulsing)
Shown in the image below are the typical signals when a non-pulsing signal is first connected to the input.
The yellow trace (CH1) shows when a voltage was applied to the input.
Some 50us later the glitch filter provides its output as shown in the pink trace (CH4).
A valid rising edge is detected from the glitch filter as shown in the green trace (CH2).
After the rising edge from the glitch filter starts the timer there is no subsequent falling edge to reload the timer. As a result the timer expires, as shown in the blue trace (CH3) causing the flip flop to reset.
 |
| Waveforms for Non-Pulsing Input Signal |
Final Thoughts
The example provided in this blog is by no means ideal, however it is an example of what can be achieved with a smattering of logic components and a timer.
False triggering resulting in a latched output is possible in this example using a non-pulsed signal. Other solutions may benefit from less or no false triggering although the reaction time may be slower. As always, the importance of each factor is part of the design consideration.
On the matter of device resources, the example implementation for the Cypress PSoC requires around 20% of the UDB resources making for heavy device utilisation. Certainly a component such as the glitch filter could be implemented outside the PSoC with passives and a Schmitt trigger.
Downloads
The PSoC Creator 4.2 project for the example in this blog was saved as a minimal archive.
 |
| Single Pole Switch Monitoring PSoC Creator 4.2 Project |


