Thursday 25 April 2019

ARP -SCAN for MAC Address Lookup

Summary
This post highlights how the arp (Win) or arp-scan (Linux) commands can be used in conjunction with online MAC address lookup tools, to assist in hardware identification of Ethernet devices.

Predicament
For a software development project a boxed cluster of Single Board Computers (SBC) was provided. The SBC cluster contained systems configured with static and dynamic IP addressing. No issue I mused, each SBC could be powered individually, the SBC that needed to be upgraded could then be identified. The real issue then presented itself, the cluster was boxed hardware and could not be opened and individual boards could not be powered or unpowered. One of the solutions that came to mind was the sometimes overlooked ARP command.

ARP Command (Windows)
Using ARP in the Windows command line may not be the most operator friendly solution, especially if a GUI based application is more your flavour. There are plenty of Windows applications such as the well-known Angry IP Scanner, Nmap or Free IP Scanner which will do a similar task. Some of these applications detail the OEM or hardware manufacturer in the scan results.

For testing with ARP, the SBC box was powered and networked directly to a development computer.

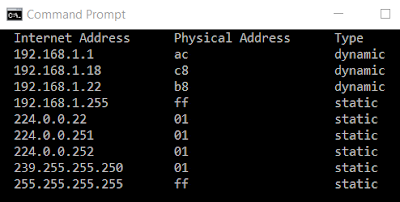
The arp -a command was issued from the Windows command line.

ARP Results
ARP Results
A doctored copy of the results from the arp are shown above. A few dynamic devices were listed. 

The first six characters of the MAC address were used to identify the vendors.


ARP Scan Command (Linux)
The arp-scan command used in Linux terminal produces similar results, usually including the hardware vendor.


ARP Scan Results
ARP Scan Results

MAC Lookup
For this SBC project the AskApache website was utilised for identification of the hardware vendor using the MAC addresses. A Google search will throw up numerous sites with similar search functionality, such as MAC Vendor Lookup.

On the AskApache site, the MAC address starting with b8 yielded the target SBC.


AskApache MAC Address Lookup
Results from the website show the target SBC was a Raspberry Pi.


AskApache MAC Address Lookup Result
Using the command line serves as handy reminder to the tools available in most operating systems.


Thursday 11 April 2019

Diode charging supercap solar battery

Summary
This post investigates the ideal diode my Maxim Integrated, part MAX40203, as a possible replacement for low forward voltage diodes.


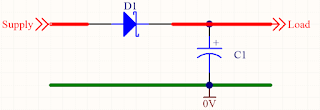
Example Diode SuperCapacitor Charger
Forward Voltage
When deciding on a suitable diode for a circuit, such as the basic diode supercapacitor charger shown above, a Schottky is a usual choice. The lower forward voltage of the Schottky diode is more beneficial to ensure that the load operating voltage is closer to the supply voltage. There is also the benefit of lower losses as a result of the lower forward voltage.

Some examples of different Schottky diodes include the Toshiba CUS10S30 with a voltage drop of 230mV at 100mA, the Panasonic DB2S30800L has a drop of 420mV at 100mA or the Nexperia PMEG10020 with a drop of 500mV at 100mA.

Ideal Diode
Released in the middle of 2018 the MAX40203 is targeted as a replacement for the Schottky diode and it does not disappoint in regards to forward voltage.


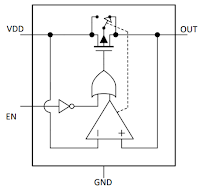
MAX40203
MAX40203 - Courtesy Maxim Integrated
Diode Testing (Reverse leakage)
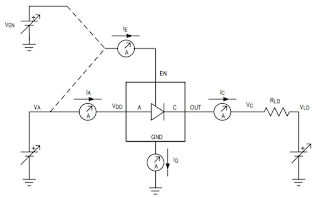
To begin the tests, reverse leakage was measured. The MAX40203 was bench tested against two general Schottky diodes, the Nexperia PMEG10020 and an ST STPS2L40U. To perform tests with the Schottky diodes, the devices were connected in reverse bias with a 100k resistor. The MAX40203 leakage test was performed with 100k resistors to measure leakage through Anode and GND as shown in the device datasheet.


MAX40203 Leakage - Courtesy Maxim Integrated
Voltage measurements were made across the resistor as the supply voltage was increased in one volt increments. Since the maximum operating voltage of the Maxim part is 5.5VDC the test voltage was limited to 5V.

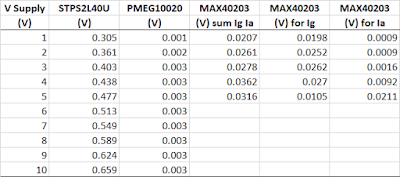
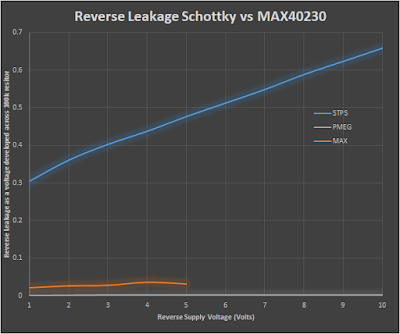
Reverse leakage Schottky vs MAX40203
Graphing the above table of results was certainly not necessary although illustrates the leakage difference between devices. Note the reverse leakage on the PMEG diode is magnitudes lower than the Maxim part. At 5V DC the PMEG diode leakage was 30nA compared to the 207nA for the Maxim part.


Graphed reverse leakage Schottky vs MAX40203
Maxim Part Enable
The MAX40203 datasheet does state that the Enable pin should be pulled high however it also states that there is an internal weak pullup.

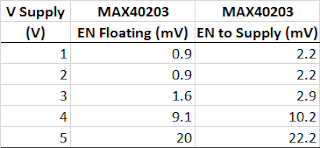
Reverse leakage tests were performed with only the Maxim device and the leakage through the Anode was measured. Once again the power supply voltage was increase in a range of 1C to 5V DC.


MAX40203 Reverse Leakage Test Setup
These tests were to replicate a circuit, such as the example above, using a solar panel.


MAX40203 Enable On/Off Reverse Leakage Measurements
Some difference in measurements was noted when the Enable input was connected to the supply. 

Diode Testing (Forward Voltage)
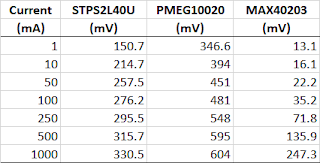
The MAX40203 was subsequently tested with the diodes from the previous test in forward bias. Resistive loads were changed with a fixed supply voltage of 5V DC to achieve test currents from 1mA to 1A.


Forward Voltage Schottky vs MAX40203
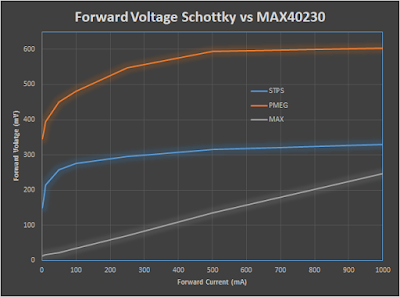
Graphing the above data illustrates the usual curves for diode forward voltage with the almost linear voltage drop against forward current across the MAX40203 internal FET.


Graphed forward voltage Schottky vs MAX40203
MAX40203 Load Testing
Measurements were taken to verify the forward voltage of the Maxim part against the device datasheet to a current of 1A. These were similar to the specifications for a room temperature of 25°C and not recorded.

For the final set of tests the MAX40203 was powered up and down with varying resistive loads with a fixed supply voltage of 5V DC. A repurposed board served as the carrier for the test device.


MAX40203 Test Setup
MAX40203 Test Setup
Tests were performed with various wirewound resistors and initially the power supply current limited to 1A. Final tests were conducted with a current limit at 2A.
MAX40203 Load Test Results
The first three tests shown in the results above were relatively normal. For the last test with a 0.1Ω resistor the power supply current limit was increased to 2A. After power was supplied to the device, it warmed considerably then the current reduced to around 180mA so power to the device was removed. The internal protection was suspected to be active. After cooling the device did not output the supply voltage of 5V, instead it was around 4V DC. Furthermore the quiescent current was 32mA which had also increased.

MAX40203 Short Testing
A new MAX40203 was placed on a new test board as the device from the prior test was suspect. In the last test the output of the device was shorted to 0V to test the short circuit protection.

After applying power the supply showed that the device was passing and holding 1A. The current limit on the supply was then increased to 2A, still ok, then 3A; after 3A the current dropped to several hundred milliamps. The device was allowed to cool but never returned to normal operation.

Comments
Testing showed that the low forward voltage drop of the MAX40203 makes it ideal for specific charging applications. For a charging current of 100mA the test Schottky's 481mV was over ten times larger than the Maxim devices 35mV.

Conversely the reverse leakage of the Schottky 30nA was significantly lower than the 316nA for the Maxim device.

Testing of the Maxim device short circuit protection was incomplete and would warrant additional further review.