This blog illustrates one possible upgrade to the Arlec 19 LED lantern torch with the aim of upgrading the LED's, using a white LED driver to make the light output more consistent as the battery voltage decreases and extracting more life from the 6V lantern battery if possible.
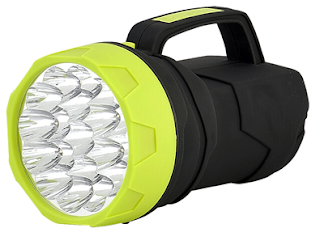 |
| Arlec LED Torch |
Sections in this blog:
- Reason For Upgrade
- Lantern Battery
- LED Circuit
- Benchmark
- Upgrading The Design
- Selecting New Components
- Schematic Design
- PCB Design
- Populated PCB
- Comparison New and Old
- Downloads
Reason For Upgrade
There is a noticeable difference in the light intensity between this Arlec model and my older single bulb style Eveready Dolphin. The LED torch does the job for illuminating items close up, certainly no complaints there. When the Arlec was initially purchased the light output was more than acceptable with the 6V battery giving it's all. After sporadic use over a few months the light intensity simply dropped off. Time to investigate why and if this can be remedied.
Lantern Battery
When the torch was purchased it is supplied with an Arlec 6V Lantern Battery. The Arlec battery follows the standard 6V 11Ah design and is comprised internally of 4 separate F size batteries. The Eveready Super Heavy Duty 6V Lantern battery datasheet can be used as a comparison as Arlec don't appear to publish a datasheet.
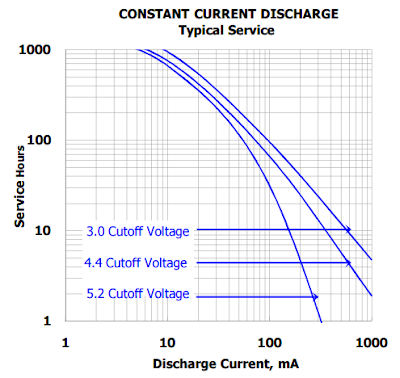 |
| Eveready Super Heavy Duty 6V Lantern Battery Discharge Curve |
Over the expected 100 hours of operation, including self-discharge, the battery voltage will gradually decrease, meaning that depending on the circuit design the life of the torch will be somewhat less. To determine how much less it's time to look at the existing circuit and the battery together.
Battery Open Circuit Voltages
Firstly is the battery itself. This is comprised of four series F size batteries which can be considered flat at 0.8V under load (industry standard). This gives a terminal voltage of 3.2V.
For a known flat 6V lantern battery the unloaded terminal voltage is 5.67V. Looks great unloaded right. Connecting the LED circuit board the battery terminal voltage drops of 2.55V almost immediately then continues to drop at a rate of 0.1V every five or so seconds, this is too flat to be useable. Again removing the load and the battery recovers to 5.5V.
LED Circuit
The LED's themselves, the current driven through the LED and importantly the forward voltage drop of the LED itself.
Unscrewing the torch allows the back of the circuit board to be seen. The circuit board, shown below, can be removed from the front housing by unscrewing four screws.
From a quick visual inspection there appears to be two LED strings across the battery (after the ON switch). Two 33R resistors limit the current to two separate LED strings, one with 9 LED's and the other with 10 LED's. For each string of LED's all devices are connected in parallel.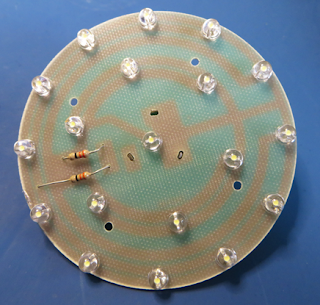 |
| Arlec LED Torch PCB |
Benchmark
To gather some metrics the LED board was powered from a benchtop power supply.
With a 6V output from the power supply the terminal voltage at the rear of the circuit board was 5.975V.
 |
| Active LED Torch PCB |
The power supply displayed 0.193A and the first string with 9 LED's in parallel had 2.86V forward voltage the second string with 10 LED's had a forward voltage of 2.83V.
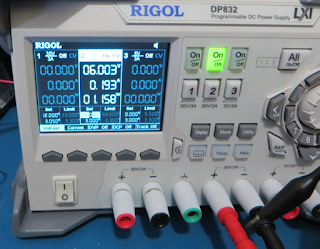 |
| Arlec PCB on Power supply |
When the power supply voltage is slowly reduced from 6V the light intensity appears just useable to 4.5V however reduced further to 3.5V this barely lights a small room.
Upgrading The Design
There are a few upgrades that can be made to the design.
- LED Driver: For the battery voltage between 4.5V and the discharged battery voltage of 3.2V there is some capacity left in the cells.
In order to use this capacity the LED's must be driven in a different manner that is not using resistors, or at least resistors that are very small in value or keep losses to a minimum.
One of the common methods for driving white LED's is by using a constant current source. There are a number of benefits by using a constant current design of which a relatively constant drive to the LED's can produce a more consistent light output over the range of the battery voltage when compared to using simply resistors. - LED Type: In the discrete LED market the big player names of CREE and Nichia will sound familiar to those in the field. There are other tier LED manufacturers such as Optek, Line-On and Everlight to name a few.
Certainly it would be surprising if the LED's used for the torch were CREE. Regardless it does not hurt to look for an LED with a better specification. - LED Viewing Angle: Be it from me to suggest that a torch should resemble a spotlight in light pattern, on the other hand why waste light on objects you are not looking at. To that effect, selecting an LED with a narrow viewing angle of 15 degrees will be more effective as a torch instead of using an LED with a 120 degree viewing angle.
- Other Smarts: There are other designs online for torch retrofits with LED's with pulse width modulation, low battery cut out or using a single higher power LED device.
Although pulsed LED's do have a higher efficiency when used with higher currents the low steady current used by torch would negate this gain. Again testing is the best way to validate this so a separate adjustable timer can be added to the design.
Selecting New Components
The constant current design for the LED's could be achieved with some discrete components and to solve the LED drive issue when the battery voltage drops, a boost converter can be used. This comes at a cost to the remaining battery capacity and no boost converter is perfect in the conversion.
Rather than build this design using discrete components a dedicated LED driver with a boost converter can be used with a handful of external parts. Chip manufacturers such as Texas Instruments (TI), Linear Technology and Micrel all have ready to solder solutions which will suit this application.
LED Driver
To select the new LED driver from the hundreds of devices found on Digikey, Mouser, Element14, RS Components and more it pays to detail a list of requirements which can be used to focus the search.
For this design the driver should have:
- Input voltage range of 3V to 7V
- Capacity to drive a number of white LED's in series (string). This relates to the output voltage that can be generated by the boost converter
- Switching current to drive a number of strings, 3 in this design, at a current of 20mA per string
- Price, current consumption of the actual LED driver and flatness of the LED driver efficiency against the actual battery voltage are other factors to also keep in mind
EDIT
The TPS61160 was initially selected and tested, however due to the LED string design in this circuit, the operation was unstable. A more expensive device was chosen which was the LT1618EMS. Essentially the white LED driver design shown in the datasheet was used with a change to the 2.49R resistor used for current limiting.
The TPS61160 was initially selected and tested, however due to the LED string design in this circuit, the operation was unstable. A more expensive device was chosen which was the LT1618EMS. Essentially the white LED driver design shown in the datasheet was used with a change to the 2.49R resistor used for current limiting.
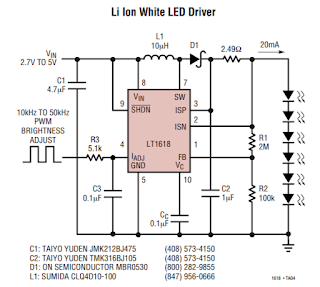 |
| LT1618 Datasheet Circuit Example (Courtesy Linear Technology) |
White LED
Sorting through supplier's websites, component suppliers and blogs can be somewhat daunting. One novel site that summarised the essentials of LED's can be found on Gizmology.
The Gizmology website contains a section on luminous intensity, which is the standard measurement for low power discrete LED's, and the conversion to luminous flux which was one of the factors used to select a replacement LED for this design.
Below is a sample of some of the comparisons made:
The Gizmology website contains a section on luminous intensity, which is the standard measurement for low power discrete LED's, and the conversion to luminous flux which was one of the factors used to select a replacement LED for this design.
Below is a sample of some of the comparisons made:
- Everlight, Part# 334-15/F1C2-1VWA, Angle 20 degrees, 14625mcd typical
- Cree, Part# C512A-WNN-CZ0B0151, Angle 25 degrees, 15850mcd typical
- Marl (Nichia), Part# NSPW500DS, Angle 20 degrees, 27000mcd typical
- Cree, Part# C503D-WAN-CCBEB151, Angle 15 degrees, 35000mcd typical
Glancing at the list item 4, Cree C503D, looks like the device to choose surely. However using an online calculator the luminous flux was calculated for beam angles giving a different result:
- Everlight, Angle 20 degrees, 14625mcd, 1.396 lumen
- Cree, Angle 25 degrees, 15850mcd, 2.360 lumen
- Marl, Angle 20 degrees, 27000mcd, 2.577 lumen
- Cree, Angle 15 degrees, 35000mcd, 1.88 lumen
No surprise that the Marl device, which was also the most expensive by 7 times compared to its closest rival, also has the highest luminous flux.
Now a twist in the selection criteria was the ranking or binning system used by most LED manufacturers. This sorts LED's by a number of physical characteristics. For the Marl (Nichia) device, which appeared to be a V ranked part, the minimum luminous intensity shows 22000mcd and maximum 31000mcd.
Listing the minimum luminous intensity and corresponding flux:
- Everlight, Angle 20 degrees, 11250mcd min, 1.074 lumen
- Cree, Angle 25 degrees, 8200mcd min, 1.221 lumen
- Marl, Angle 20 degrees, 22000mcd min, 2.099 lumen
- Cree, Angle 15 degrees, 16800mcd min, 0.903 lumen
For the limited budget of one dollar, the CREE C512A series was a cost effective option. Plenty of surface mount white LED's would outperform this thru hole LED. The usage of surface mount is a different circuit board technology (Al-Core).
The C512A CREE LED had a standard 3.2V forward voltage at a current of 20mA. Instead of retaining the 19 LED design the number of LED's was reduced to a even 18 such that split strings were able to be used. With these details the boost converter components were calculated.
The C512A CREE LED had a standard 3.2V forward voltage at a current of 20mA. Instead of retaining the 19 LED design the number of LED's was reduced to a even 18 such that split strings were able to be used. With these details the boost converter components were calculated.
Schematic Design
Added to the white LED driver design in an optional PWM circuit. It could be interesting to map out LED brightness against continuous current.
 |
| Updated LED Circuit with LT1618 |
A low power 555 timer is wired in an astable configuration with some additional diodes to give a wider control over the PWM operational range. Either a pot or resistor is fitted between the discharge and trigger pins allowing the PWM to be manually adjusted or permanently set.
PCB Design
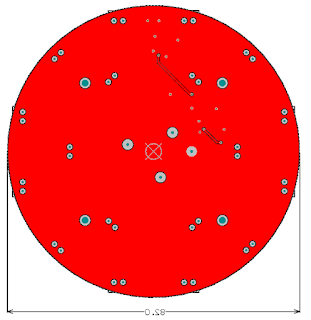
Before beginning the PCB layout the size of the board, mounting holes and LED positions are measured from the existing Arlec design.
PCB Design
Before beginning the PCB layout the size of the board, mounting holes and LED positions are measured from the existing Arlec design.
 |
| PCB Mechanical Properties |
The four mounting holes were measured, albeit rather crudely with a steel ruler and the corresponding middle LED position used to determine a radius for the outer two rings of LED's. On the PCB this detail was added to one of the mechanical layers. Individual LED positions were added as small crosses to aid in component placement.
Next the bulb connection is added and LED's which are placed at a 45 degree angles to simplify the routing.
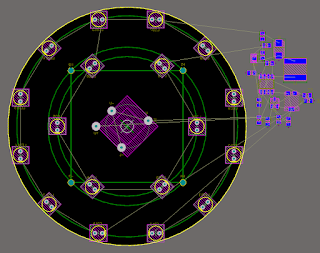 |
| PCB LED Placement |
A top layer fill was added to provide mechanical stability and routing for the LED driver.
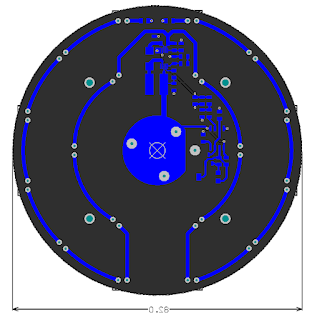 |
| PCB Bottom Layer Route |
Shown below is the board viewed from the front in 3D.
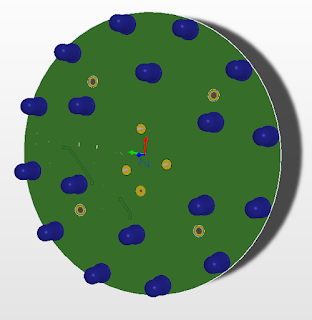 |
| PCB 3D Front View |
The rear of the PCB fully loaded with the white LED controller, optional timer and bulb mount to suit the existing torch hardware. There is a single wire connection from the tip of the bulb to a through hole pad connection on the board.
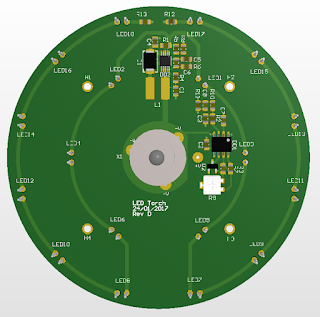 |
| PCB Final Route in 3D |
After a final component placement, board clearance and PCB design rule check the PCB is sent off to 3PCB for manufacture.
Populated PCB
Below is the populated PCB mounted on the reflector.
 |
| Populated PCB Front View (mounted on reflector) |
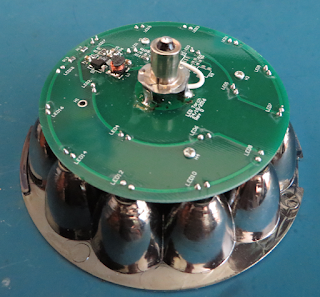 |
| Populated PCB Rear View (mounted on reflector) |
Comparison New and Old
Without having a Lux meter to compare, both boards were directed at a wall with a 1m between the boards, 1m away from the wall, with no other light sources. The reflector was not fitted to either board and the result is easily visible.
Fittingly the new board also draws less current at 6V, 160mA compared to the older board drawing 195mA. This is a saving of almost 18% although as the battery voltage drops the current drawn by the LED driver continues to increase.
The LED driver will run down to 2.6V on the bench power supply while drawing 700mA although at this time the lantern battery is probably well and truly dead!
Downloads
 |
| Comparison Improved and Original Boards (without reflector) |
Fittingly the new board also draws less current at 6V, 160mA compared to the older board drawing 195mA. This is a saving of almost 18% although as the battery voltage drops the current drawn by the LED driver continues to increase.
 |
| Comparison Original and Improved Boards (current consumption) |
The LED driver will run down to 2.6V on the bench power supply while drawing 700mA although at this time the lantern battery is probably well and truly dead!
 |
| Schematic Rev D |
 | ||||
Altium PCB File
|

