Monday 26 June 2017

Recover Mac Files Old SCSI

Summary
This blog demonstrates how a Linux PC and SCSI PCI card can be used to retrieve the files from the SCSI hard disk of a twenty year old Power Mac.

Power Mac
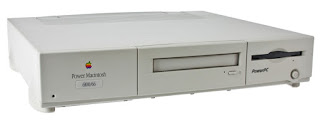
The Power Mac 6100/66 was possibly the third Mac that I had the pleasure of owning back in the day. The 'pizza box' as it was affectionately known, had 24MB of RAM, 16bit colour, a proprietary Ethernet interface and no USB connection or CD burner.


Power Mac 6100/66
Power Mac 6100/66
Somehow twenty years later, my belief was that the machine had long been retired from use, the old Mac turns out to have a family members five year old files stored on the hard drive. To make life a bit more interesting the floppy drive, similar to most of the plastic in the old Mac, has degraded to the point of failure. 
Inside a Power Mac 6100/66

Fortunately the Mac still booted verifying that the internal SCSI drive was mountable. After removing the cover from the Power Mac the non-Apple drive was easily visible at the bottom left hand corner of the above image.

SCSI Controller
After performing price comparisons between a second hand Apple Network adaptor and a replacement floppy drive, it turned out that there was alternative solution. One of the online stores was selling off some AdvanSys ABP 3922 SCSI Controllers.


AdvanSys PCI SCSI Controller
CNET had a basic specification for the ABP 3922 which indicated this card was suitable for PC or Mac. 


AdvanSys PCI SCSI Controller Rear
The online store price for the card ended up significantly cheaper than purchasing an Apple Network adaptor and also less than a suitable replacement Panasonic 1.44Mb Superdrive.
AdvanSys ABP 3922 SCSI Controller
AdvanSys ABP 3922 SCSI Controller

Linux
Fitting the SCSI Controller into an existing Linux tower running Mint, a quick check of the PCI bus using LSPCI this indicated that the card has been detected.


PCI SCSI Card Identification
With the card detected in Linux the Mac SCSI drive was hot plugged to the 50 way IDC connection and powered.


Mac Formatted SCSI Drive Connection

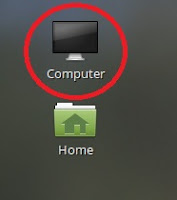
Under Linux Mint the drive auto mounted and could be located in the usual location under the Computer icon.


Linux Mint Computer Icon
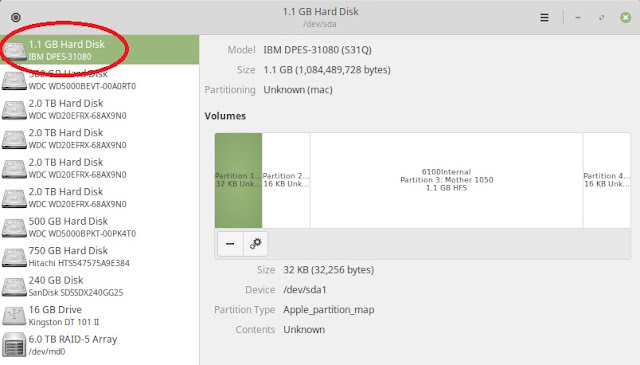
As part of basic troubleshooting, a drive that has not auto mounted could be checked in the Linux 'Disks' tool.

Linux Mint Disks with Mac Drive

Old Mac drives were formatted in HFS or HFS+ both of which Linux will commonly mount without any issues.

File Retrieval
With the SCSI drive mounted the required files could be accessed and copied off the SCSI drive. It should be noted that some specific files relating to preference files for games were not able to be copied.

Summary
Using an older model SCSI PCI card, which suits an existing motherboard together with Linux, was an inexpensive solution to retrieve files from an old Mac drive. The same methodology may even work for some of the single board computers with the addition of a USB to PCI bridge or for other platforms a suitable USB interface such as the discontinued but still available Adaptec USBXchange adaptor.

Saturday 17 June 2017

PSoC4 DC Fan Controller with I2C

Summary
This blog implements the end to end design of a temperature measurement and fan speed control project using the PSoC 4. The project utilizes the OneWire temperature sensor component for the Cypress PSoC with speed control of a DC fan using PWM, fan speed measurement and an optional communications over an I2C (SMBus) interface. 

CY8CKIT-049 - Courtesy Cypress Semiconductor
I2C connection could be implemented using another Cypress PSoC, Arduino, Raspberry Pi (RPI) or by even breaking out the internal I2C bus on a standard PC motherboard.

Most of the features mentioned in this project have already been implemented or tested as separate projects by other bloggers or in this electronics blog. More specific information regarding each feature used in this project will be linked accordingly.

Project Features

Fan Controller
- Input voltage: 6 to 30VDC
- Operation: Standalone or bus controlled

Fan Control Output
- 6 to 30VDC @ 10A
- PWM control
- Tachometer feedback

Temperature Sensor
- OneWire Bus (single sensor)

Communications
- Optional I2C (SMBus) compatible

Hardware: CY8CKIT-049
For hardware testing the OneWire interface and DC fan control functionality, the Cypress CY8CKIT-049 prototype development board was used. A previous blog showing the use of a OneWire component by Evg Pavlov for the Cypress 049 development kit was used as the template for this project.

Hardware: Comair DC Fan

The 4 wire Comair Rotron DC Fan, model CD24R7X, was used for this project. This fan includes a tacho output and a program aka 'speed control' input. When the program input connects to 0V by any resistive element, the speed of the fan can be changed within a range. The change in fan speed is from 50% to 100%.

Hardware: Temperature Sensor

The DS18B20 digital thermometer with communication over a single wire bus was used for the project. Specifically Adafruits probe MPN#381 was used.
As tested in a previous temperature sensing project, the One Wire library from Pavlov was used.

Hardware: Raspberry Pi

A Raspberry Pi (RPI) 2 Model B was used during the testing of this project. This Single Board Micro (SBC) was used to verify that the PSoC SMBus was connected. Only the address of the PSoC I2C device was read by the RPI.

Bread-boarding 
Pin headers were soldered to the bottom side of the CY8CKIT-049 kit so that the board could be plugged into 25.4mm (0.1") standard breadboard. Shown below was the preliminary setup on solderless breadboard.


DC Fan Controller
DC Fan Controller
The following is a breakdown of the coloured boxed sections shown in the image below:
Black -  Cypress CY8CKIT-049 kit
Yellow - Temperature probe (DS18B20)
Green - Comair CD24R7X DC PWM fan
Blue - Optocoupler isolation
Purple - MOSFET for DC fan

Breadboard Sectional Breakdown for PSoC DC Fan Controller
Design and Parts Selection
Optocouplers 'opto' were initially chosen to provide isolation between the PSoC digital lines and the DC fan during testing. The two signals connected to the fan are the tacho feedback (PSoC input) and the program control line 'speed' (PSoC output).

The tacho feedback from the fan is an open collector output meaning than only an on-board pullup resistor was required to drive the LED of the opto.

For control of the DC fan program input, a series current limit resistor between the PSoC and LED of the second opto was also required.

For the final design discrete components were used to provide protection for the PSoC digital lines instead of optical isolation. This aids in reducing cost and final board area.

A MOSFET, of the N channel persuasion, for controlling power to the DC fan was chosen with four criteria. Firstly a gate to source voltage below 5V DC so the device could be driven from the PSoC directly without a separate gate driver, a drain to source current above 10A and a drain to source resistance less than 20mR when the gate voltage was at 5V DC. The maximum drain to source voltage, could be considered the fourth criteria, which was selected to be well above the nominal 24V DC supply voltage.

Using the above criteria for on an online search on Digikey yielded a number of results, some 500 plus 
MOSFET's. The device that appeared interesting was the On Semiconductor - NTTFS5C673NLT although there were several other candidates such as the NTTFS5820NLT or the BSC100N06LS3. The ON Semi device has been released only three months after writing of this blog, and the footprint was a small 3.3mm square.

To drive the MOSFET during testing a 100R gate resistor was added in series with the output of the PSoC. Additionally to ensure the state of the MOSFET gate while the PSoC was starting a 220k pulldown was added between the gate and 0V.

PSoC Development
At the time of writing PSoC Creator 4.1 was earmarked for release so this project was initially developed in Creator 4.0 then migrated to 4.1 to make use of the most recent Cypress components and bug fixes.

To ensure the CY8C4245AXI-483 would have the resources available to facilitate a bootloader, One Wire bus, UART, PWM and tacho frequency measurement the project was built on the bench before proceeding with the hardware PCB design.


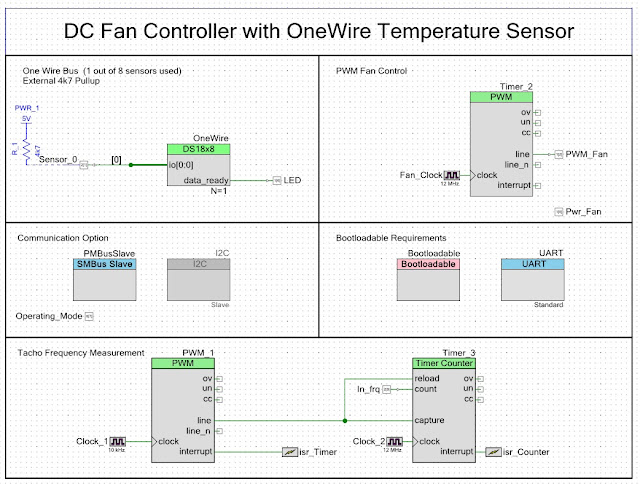
PSoC Creator DC Fan Controller

Bootloader / Bootloadable

Cypress includes both a bootloader and bootloadable component in PSoC Creator which allows the PSoC to be field programmed (upgraded) over communications interface without the need for an In Circuit Programmer (ICP) such as the MiniProg3.

This project utilised the UART component for the bootloader interface together with an external FTDI USB device. Having serial communications on the board provides an interface for debugging and initial testing.

One Wire Bus
The One Wire component, written by Evg Pavlov, was used for the communications to the external Temperature probe (DS18B20 based). Only one of the temperature sensors channels was required for this project.

Tacho Measurement

For measurement of the fan rotational speed, a time gated approach was selected. A PWM component was used to produce an output pulse of almost one second, with a very small interval between pulses, which served as the gated window for the Timer. The timer component was configured to count the number of pulses from the DC fan tacho input over the one second period. Since the DC fan produced two pulses per rotation the result was divided by two.

DC Fan Speed Control (PWM)

To control the fan speed, in the range of 50% to 100% of full speed, a PWM component was utilised. An output pin which was driven by the PWM component was configured as a strong drive in order to drive the MOSFET. This section of the PSoC Creator Schematic also included a Power pin which allowed the fan to be controlled software.

Communication (option)

For future expansion or communications interfacing with a PMBus or I2C, two components were added to the project. Testing was to be conducted with a Raspberry PI SBC so the I2C component was disabled.

Test Code
To test the temperature sensor, tacho reading and PWM fan control test code was created for the 049 kit.


//==============================================================================
//
// Thermometer controlled DC Fan
//
//==============================================================================
#include <project.h>
#include <stdio.h>
#include <stdbool.h>

/* Global Variables */
static volatile CYBIT flag_Timer    = 0;
volatile uint8 tacho_data_ready     = 0;

/* Function Prototypes */
void Initialize(void);
void ReportTemperature (void);          /* convert temperature code to deg C and send to UART */

//==============================================================================
// Timer Interrupt
//==============================================================================
CY_ISR(isr_Timer)                       /* ISR Timer to report temperature at regular intervals */
{
    flag_Timer = 1;
    isr_Timer_ClearPending();
    PWM_1_ClearInterrupt(PWM_1_INTR_MASK_CC_MATCH);
}


//==============================================================================
// Timer Interrupt
//==============================================================================
CY_ISR (isr_CounterResult) {
    tacho_data_ready = 1;      
    Timer_3_ClearInterrupt(Timer_3_INTR_MASK_CC_MATCH);
    isr_Counter_ClearPending();
}

//==============================================================================
// Init PSoC 
//==============================================================================
void Initialize(void)
{
    UART_Start();                       /* UART start */
    UART_UartPutString("Temperature sensor Maxim DS18B20:\r\n");
    OneWire_Start();                    /* OneWire start */
    if (OneWire_CheckPresence() == 0x1) {
        UART_UartPutString("Sensor detected\r\n");
    }
    Timer_2_Start();                    /* Start clock for measurement and report timing */
    isr_Timer_StartEx(isr_Timer);       /* Attach handler */  
    PWM_1_Start();                      /* One second window timer for tacho measurement */
    Timer_3_Start();                    /* Pulse counter for tacho, 2PPR */
    isr_Counter_StartEx(isr_CounterResult);
}


//==============================================================================
// Convert temperature code to degC and 
// Send result to Terminal using UART
//==============================================================================
void ReportTemperature(void) 
{
    char strMsg[80]={0};                /* output UART buffer */
    char buf[8];                        /* temp buffer */
    static uint32 counter = 0;          /* sample counter */
    float res;
    counter++; 
           
    strcat(strMsg, itoa10(counter, buf)); 
    strcat(strMsg, "\t");
    strcat(strMsg, OneWire_GetTemperatureAsString(0)); strcat(strMsg, "\r\n");
    UART_UartPutString(strMsg);
    
}


//==============================================================================
// Main
//==============================================================================
int main()
{
 uint8_t i;
 char c;
    char buf[8];
    char strMsg[20]={0};
    uint8 temp = 0;

 CyGlobalIntEnable;                  /* Enable global interrupts */
    
 while(Operating_Mode_Read());       /* Wait for button press to continue (gives time to switch to a terminal window) */
    Initialize();
    PWR_Fan_Write(true);                /* Fan ON for initial testing */
    flag_Timer = 1;                     /* Force first measurement */
    
    for(;;) 
    {     
        if(flag_Timer)                  /* read DS18B20 on timer, intervals 1sec */
     {   
            flag_Timer = 0;
            OneWire_SendTemperatureRequest();
        }
        
        if (OneWire_DataReady)          /* DS18 completed temperature measurement - begin read data */
     {   
            OneWire_ReadTemperature();
            ReportTemperature();
        }
        
        if (tacho_data_ready == 1) {
            temp = Timer_3_ReadCaptureBuf(); /* Divide by 2; */
            sprintf(buf, "%03d ", temp);
            UART_UartPutString(buf);
            tacho_data_ready = 0;
        }
    }  
}

/* [] END OF FILE */


Testing
With most of the interfaces to the Cypress PSoC previously tested, any MOSFET losses at full load were of most interest. The datasheet for the MOSFET shows that the drain to source resistance is 13.3mR for a 4.5V gate drive.

Instead of testing with the fan and needing to handle the commutation caused by the fan itself, a 1R 1% resistor was used in place of the fan. The current limit on the power supply was set to 1.2A and the voltage measured across the 1R resistor, approximately 2.22V and across the MOSFET 0.056V. Gate voltage was 2.50V.

For the 0.056V drop across the MOSFET the resistance drain to source was around 47mR. No issue with heat dissipation at such low current through the device.

Schematic Design
For the controllers power supply, a Texas Instruments LMR14203 was used for the 5V supply. The switch mode device was set for 5V rather than a lower voltage so that MOSFET controlling power to the DC fan could be driven directly from the PSoC.

A last minute addition to the design was an optional voltage monitor for the input supply (24V). Monitoring of the input supply could be achieved using the ADC in the PSoC.


DC Power Supply
DC Power Supply
The PSoC used in the schematic was the same as the development board, a CY8C4245AXI-483. Using the Design Wide Resources window from PSoC Creator as a reference connections were drafted in the schematic.
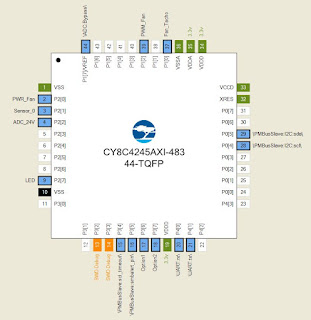

PSoC Creator Design Wide Resources for DC Fan Controller

Connections to the PSoC are shown in the capture below.
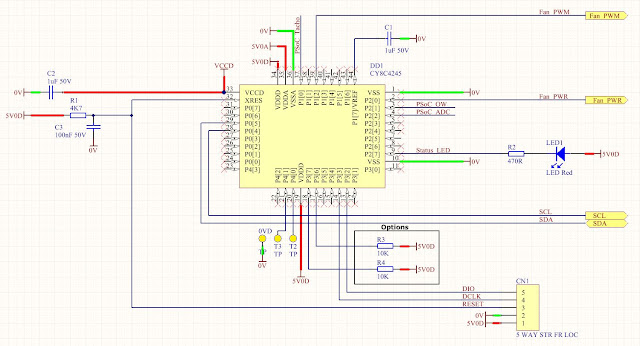

PSoC Connections
PSoC Connections
The above image shows the connections for the digital and analogue power, programming header for a MiniProg and option resistors.
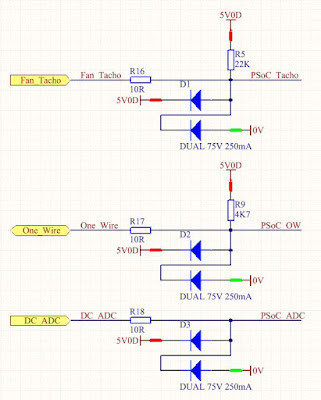

PSoC Input Protection
For the prototype board some basic input protection was added by means of a series 10R resistor and rail to rail steering diodes as shown in the above capture.
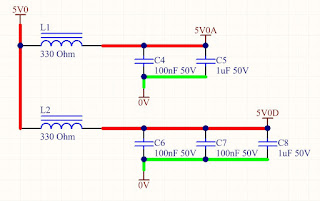
PSoC Filtered Power
PSoC Filtered Power
To complete the PSoC portion of the design, the capture above shows the filtered 5VDC power for the digital and analogue supplies. This type of filtering and decoupling of the main supply is essential considering that a switch mode is being used for the main 5V supply rail.
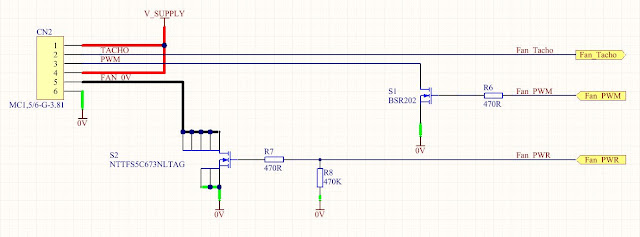

Comair Fan Connections
The above capture shows the external connections for the Comair Rotron DC fan. Pins 1 and 6 are the main 24VDC power supplying the controller board and the remaining pins 2 to 5 are the connections to the Comair fan. There is a reason that the 0VDC for the fan and the main 0V supply are side by side on the connector which has to do with the routing of the circuit board.
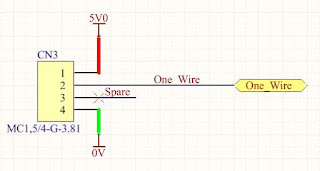
One Wire Connection
One Wire Connection
One Wire connection is shown in the capture above.
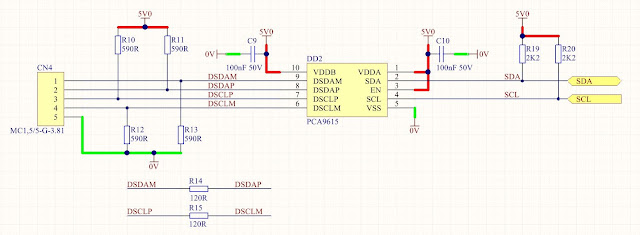
I2C Bus Driver Connection
I2C connections is optional on this design and the capture above is a datasheet implementation for testing. Protection could be added to the line facing side of the PCA9615 by means of TVS diodes and even small series resistance.
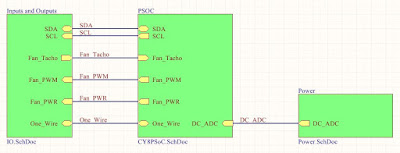
Schematic Top Sheet
Schematic Top Sheet
Finally for this Altium design, which uses a top sheet to connect all lower level sheets, the capture above illustrates the connections between sheets with power connections being global to all sheets.

Controller Enclosure
In selecting an enclosure for the controller the two requirements were the price and size, cheap and small as possible.
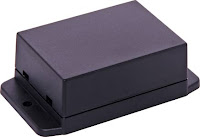

Altronics enclosure H9404
A supplier, Altronics, has some very affordable snap together enclosures and out of this selection the H9404 model looked fit for the purpose. Inside the enclosure are four posts to mount the controller circuit board then the removable lid snaps back on. 

PCB Design
Beginning with a blank layout in the PCB layout software, the datasheet for the plastic enclosure was consulted to determine the dimensions of the circuit board to be mounted inside. Instead of using the actual dimensions specified by the datasheet, the circuit board was reduced in size in both dimensions by 1mm to account for changes in the enclosure during manufacturing or inaccuracies when the circuit board is cut, although the latter is rare for most manufacturers.
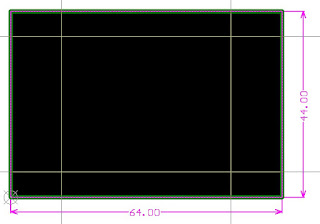

Circuit board dimensions with guides
The above capture shows the circuit board with dimensions of 64 x 44 mm and work guides for setting the mounting post locations. For such as small circuit board work guides are hardly required, however if they are available in the circuit board layout software it can be good practice to use guides.
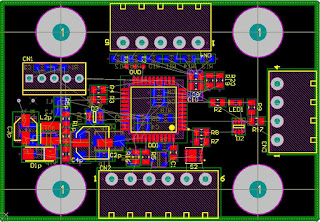

Circuit board unrouted with double sided placement
To simplify the part placement on the controller circuit board the design was made double sided. The spread of components between top and bottom layer follows a rule often applied to double reflow designs which is one side for heavy components and the opposite side for light. Use of this layout may be suitable for home reflow ovens.
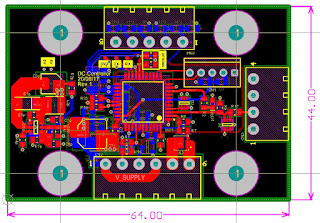
Circuit board routed with double sided placement
Shown above is the routed four layer prototype board. The top and bottom are the signal layers with the two middle planes utilised for power.

PCB Population
Back from manufacture at PCBWay the unpopulated circuit board is shown below.
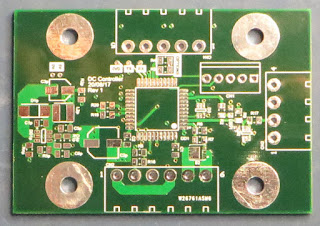

Blank DC fan controller board
To begin with, only the power supply section was fitted to the board to ensure the 5VDC supply was stable.
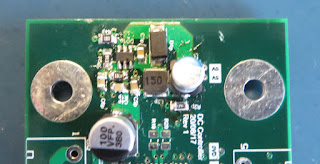

Fan DC power supply section
After powering up the board to 25VDC the on-board supply was confirmed to be working at 5.05VDC.

The Cypress PSoC and associated components were fitted to the board for initial testing with the One Wire sensor. Utilising a circuit board holder is an efficient tool well when board under test required probing on either side.
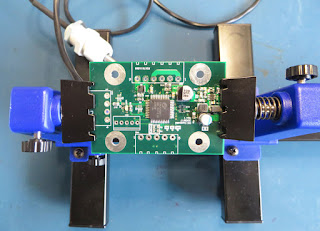

DC fan controller bench testing
Draft Code
With the OneWire code tested, a first draft of the controllers code was compiled and programmed. Initially a lower temperature was set to trigger the fan. The draft code is listed below.


//==============================================================================
//
// OneWite temperature controlled DC Fan
// 10/10/2017    Greg L      Initial write for functionality testing
//
//==============================================================================


#include <project.h>
#include <stdio.h>                                  /* Required for sprintf */
#include <stdbool.h>


/* Global Defines */
#define debug                           1           /* Debug via serial port */
#define Fan_Hyst_Compare                60u
#define Temp_Low_Thres                  2700u       /* Temperature deg C div 100u */
#define Temp_High_Thres                 2900u       /* Temperature deg C div 100u */


/* Global Variables */
static volatile CYBIT flag_Timer        = false;
volatile uint8 tacho_data_ready         = false;    /* Tacho data ready flag - modified by ISR make volatile */
volatile uint16 Tacho_Counts            = 0;        /* Made global to share with ReportData function */
uint16 Last_Temp_Read                   = 0;


/* Structure */
struct {
    uint8
    Fan_run                             : 1,        /* Start after power cycle */
    Over_temp_trig                      : 1,        /* Over temp triggered */
    Fan_array_full                      : 1,        /* Fan array of measured spped is loaded */
    Fan_sample_fast                     : 1;        /* Fan samples fast at 500msec, if off 10 sec */
} System;                               


/* ISR Prototypes */
CY_ISR_PROTO(isr_Timer);
CY_ISR_PROTO(isr_CounterResult);


/* Function Prototypes */
void Initialize(void);
void ReportData(void);                  /* Temperature to deg C and fan speed send thru UART */


//==============================================================================
// Timer Interrupt
//==============================================================================
CY_ISR(isr_Timer)                       /* ISR Timer to report temperature at regular intervals */
{
    flag_Timer = true;
    isr_Timer_ClearPending();
    PWM_1_ClearInterrupt(PWM_1_INTR_MASK_CC_MATCH);
}


//==============================================================================
// Timer Interrupt
//==============================================================================
CY_ISR (isr_CounterResult) 
{
    tacho_data_ready = true;
    Timer_3_ClearInterrupt(Timer_3_INTR_MASK_CC_MATCH);
    isr_Counter_ClearPending();
}


//==============================================================================
// Init PSoC 
//==============================================================================
void Initialize(void)
{
    UART_Start();                       /* UART start */
    OneWire_Start();                    /* OneWire start */
    #ifdef debug
        UART_UartPutString("\033[2J\033[HTemperature sensor Maxim DS18B20:\r\n"); /* Clear screen and cursor home */
        if (OneWire_CheckPresence() == 0x1) {
            UART_UartPutString("Sensor detected\r\n");
        }
    #endif
    isr_Timer_StartEx(isr_Timer);       /* Attach handler */  
    PWM_1_Start();                      /* One second window timer for tacho measurement */
    Timer_3_Start();                    /* Pulse counter for tacho, 2PPR */
    isr_Counter_StartEx(isr_CounterResult);
    System.Fan_sample_fast = true;      /* Set fan samples to fast */
    if (System.Fan_run == false) {
        PWR_Fan_Write(true);
        Timer_2_WriteCompare(0x2000);   /* Max PWM */
        Timer_2_Start();                /* Fan PWM control */
        CyDelay(5000);                  /* Run fan on start */
        PWR_Fan_Write(false);
        Timer_2_Stop();
    }
}


//==============================================================================
// Convert temperature code to degC and 
// Send result to Terminal using UART
//==============================================================================
void ReportData(void) 
{
    char buf[8] = {0};
                     
    sprintf(buf, "\033[3;0H%d.%02d\t", Last_Temp_Read/100, Last_Temp_Read%100); /* Reset cursor to start of third line */
    UART_UartPutString(buf);
    sprintf(buf, "%04d ", Tacho_Counts);
    UART_UartPutString(buf);            /* Output UART buffer */
}


//==============================================================================
// Main
//==============================================================================
int main()
{
    const uint16 Fan_Time_Hyst          = 300u;     /* Time in seconds temp must be outside of thresholds */
    const uint16 Fan_Time_Max           = 600u;     /* Time in seconds for max continuous fan run time */  
    uint32 Tmr2_Comp_Value              = 200u;
    uint16 Fan_Hyst_Counter             = 0;
    uint16 Fan_Run_Counter              = 0;
    uint16 Fan_Speed[10];                           /* Record mutliple fan readings to average */
    uint32 Fan_Speed_Temp               = 0;        /* Working fan speed temp register */
    uint8 Fan_Speed_Index               = 0;        /* Index for the array */
    uint8 Index_Temp                    = 0;
 CyGlobalIntEnable;                  /* Enable global interrupts */
    Initialize();
    
    for(;;) 
    {     
        if(flag_Timer)                  /* read DS18B20 on timer, interval of 1sec */
     {   
            flag_Timer = false;
            OneWire_SendTemperatureRequest();
            /* Normal state, no alarm, rising temperature */
            if  ((System.Over_temp_trig == false) && (Last_Temp_Read > Temp_High_Thres)) {
                Fan_Hyst_Counter++;
            }
            /* Alarm state, falling temperature */
            if ((System.Over_temp_trig == true) && (Last_Temp_Read < Temp_Low_Thres)) {
                Fan_Hyst_Counter--;
            }
            /* Alarm state, rising temperature */
            if ((System.Over_temp_trig == true) && (Last_Temp_Read > Temp_High_Thres)) {
                Fan_Run_Counter++;
            }
        }
        
        if (OneWire_DataReady) {        /* DS18xx completed temperature measurement - begin read data */
            OneWire_ReadTemperature();
            Last_Temp_Read = OneWire_GetTemperatureAsInt100(0);
        }
                  
        /* Handle temperature */
        /* Exceeded the overtemp for more than specified duration */
        if (Fan_Hyst_Counter >= Fan_Time_Hyst) {           
            System.Over_temp_trig = true;
            PWR_Fan_Write(true);                
        }
        
         /* Exceeded the over time for more than specified duration */
        if ((Fan_Run_Counter >= Fan_Time_Max) && (System.Over_temp_trig = true)) {             
            System.Over_temp_trig = false;
            Fan_Run_Counter = 0;
            Fan_Hyst_Counter = 0;
            PWR_Fan_Write(false);
            Timer_2_WriteCompare(0u);
            Timer_2_Stop();
        }
        
        /* Exceeded the undertemp for more than specified duration */
        if (Fan_Hyst_Counter == 0u) {                           
            System.Over_temp_trig = false;
            PWR_Fan_Write(false);
            Fan_Run_Counter = 0;
            Timer_2_WriteCompare(0u);
            Timer_2_Stop();
        }
        
        /* Handle fan PWM */
        /* Fan speed is adjustable from 50% to 100% using PWM over a range of 1 to 10deg C */
        if (System.Over_temp_trig == true) {
            if (Last_Temp_Read > Temp_Low_Thres) {
                Tmr2_Comp_Value = (Last_Temp_Read - Temp_Low_Thres) * 2;  /* Scale result for PWM */
                if (Tmr2_Comp_Value > 2000u) {
                    Tmr2_Comp_Value = 2000u;    /* Timer 2 total period can't be exceeded */
                }
                Timer_2_Start();
                Timer_2_WriteCompare(Tmr2_Comp_Value);
            }
        }
        /* Handle tacho feedback (reporting only) for sample period - indicative measurement */
        if ((tacho_data_ready == true) && (System.Fan_sample_fast == true)) {
            Tacho_Counts = (Timer_3_ReadCaptureBuf())*30u;                /* Read counts over 1sec, Hz to RPM, 2 pulses per rotation */
            tacho_data_ready = false;
            #ifdef debug
                ReportData();
            #endif
        }
        
        /* Handle tacho feedback (reporting only) for slow sampling (Untested code) */
        if ((tacho_data_ready == true) && (System.Fan_sample_fast == false)) {
            Fan_Speed[Fan_Speed_Index] = Timer_3_ReadCaptureBuf();
            Fan_Speed_Index++;
            if ((Fan_Speed_Index < 10u) && (System.Fan_array_full == false)) {
                Fan_Speed_Index = 0;
                System.Fan_array_full = true;
                for (Index_Temp = 0; Index_Temp < Fan_Speed_Index; Index_Temp++) {
                    Fan_Speed_Temp += Fan_Speed[Index_Temp];  
                }
                Fan_Speed_Temp = Fan_Speed_Temp / Fan_Speed_Index;
            }
            if ((Fan_Speed_Index < 10u) && (System.Fan_array_full == true)) {
                Fan_Speed_Index = 0;
                for (Index_Temp = 0; Index_Temp < 11; Index_Temp++) {
                Fan_Speed_Temp += Fan_Speed[Index_Temp];  
                }
                Fan_Speed_Temp = Fan_Speed_Temp / 10;
            }
            Tacho_Counts = Fan_Speed_Temp * 30u;
            tacho_data_ready = false;
            #ifdef debug
                ReportData();
            #endif
        }
    }  
}


/* END */

Fan Installation
In order to collect some operational data, the fan and the associated controller was earmarked for installation in a hot environment such as a vehicle garage.
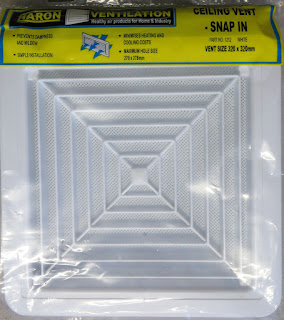

Haron 320mm sq vent
Haron 320mm sq vent
A 320mm square vent from a local supplier was selected for use with the fan, no round vents with the required diameter were available at the time so the project ended up becoming a proverbial round fan in a square hole. The manufacturer (importer) of the fan was Haron International.


Instead of using plasterboard, 12mm plywood was utilised. This wood was cut to size including the vent cut out, sealed using sealer binder then coated with ceiling white. The vent and temperature sensor were mounted in the plywood.
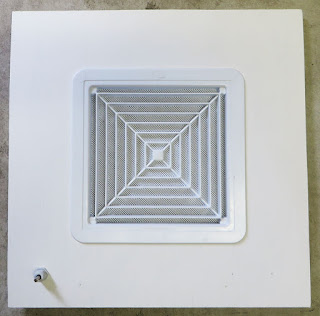


Haron vent mounting in plywood
The plastic spacer, provided for mounting on the read of the vent, was modified by removing the mounting posts. This allowed the spacer to mount flat on the rear of the vent. A suitable hole for the Comair Rotron fan was fashioned with a die grinder.
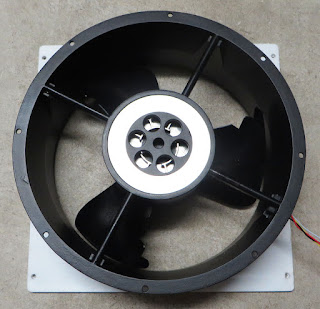
Mounted Comair Rotron DC fan
To secure the fan all eight mounting holes were used to attach to the plastic spacer plate. All bolts were given a treatment of Loctite 222 threadlocker.
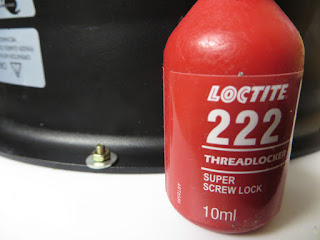
Comair Rotron DC fan mounting bolts
To mount the plastic spacer plate with fan onto the vent a generous application of clear silicone and four bolts were used.
Plastic plate mounting to vent
In the image above the retaining clips for the vent can be seen with the fan and plastic plated mounted above.


Mounted controller
Mounted controller
With the controller mounted and wired to power and the temperature sensor, data was collected on a warm day. The fan was disabled while data was collected.


Logged Data
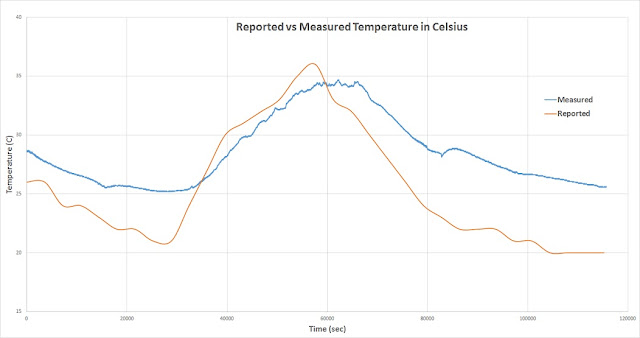
The graph below shows approximately a twenty four hour period of temperature sensor data collection. Shown in blue, is the measurement from the OneWire temperature sensor and the orange line shows the reported local district temperature to a one hour resolution.

Even with the OneWire sensor mounted in a garage, the rise and fall of temperatures resembles the locally reported temperatures.


Temperature measurements, reported against measured
Code Changes
For the purposes of testing, code changes were made to increase the set temperatures to 32 degrees for the trigger and 30 degrees for the reset temperatures. This was required due to the higher temperature of the test area.

Hardware Changes
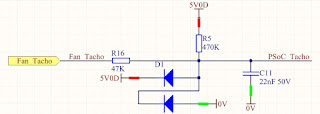
In an effort to reduce the current consumed by the controller, the tacho input was identified as a source of leakage, around 10mA. This was not an issue when optocouplers were used in the original design. The cause was not investigated in detail although appeared to be caused because of the controller input consisting of a 22k pullup to 5V, in combination with the output drive of the Comair fan.

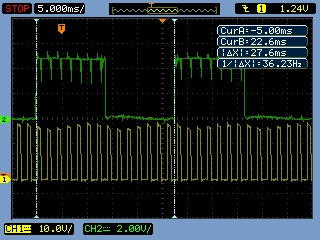
To reduce the current a 470k pullup with a 47k series resistor was used. This changed resulted in a lower current although the PWM switching signal was coupled onto the tacho input, meaning false counts were registered. 

The image below shows the PWM signal in yellow and the tacho input in green. Transitions in the PWM signal can be seen in the tacho input. Both channels shown were set to a vertical scale of 2V.

PWM output and Tacho input false counts

To resolve the issue in the short term, a 22nF ceramic capacitor was added from the PSoC tacho input to 0V. This resulted in rounding of the signal but no further counting issues.


PWM output and Tacho input no false counts
Schematically the change is shown in the capture below.


Revised Tacho input for coupled noise

Temperature and Fan Data
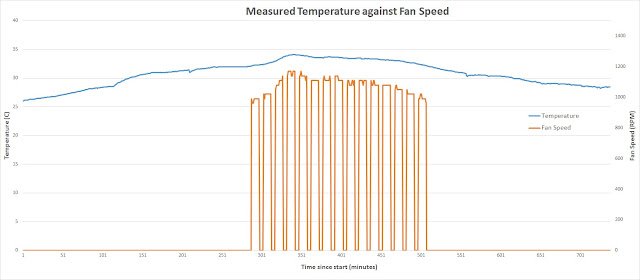
Temperature and fan speed data were then collected over a 12 hour period. A visual representation of the data collected is shown below.


Measured temperature vs fan speed
The plotted data shows the 10 minute blocks where the fan was operational with 5 minute off periods in between. Fan speed can be seen increasing and decreasing with the measured temperature fluctuations. For the final implementation of the controller, in a small temperature test chamber, the off periods could be removed.

With the fan control and PWM cycle operating on the prototype, the I2C communications was checked.

Know Bugs
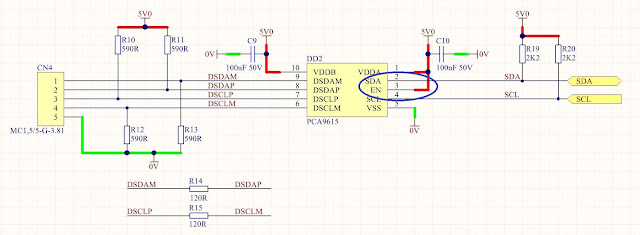
While connecting to the Raspberry PI, the I2C communications did not function properly. The issue appeared to be the Enable (EN) line on the I2C controller (PSA9615) as shown in the image below circled in blue below. This input should not be pulled to the 5V0 supply but driven, in this case from the PSoC device.


I2C Bus Driver Connection (error)
Changes will be made to the PCB artwork and published as a revision two prototype.

Prototype Release
For those wanting to use this project, for similar purposes, the updated revision two schematic and PCB, with the untested I2C fix, are available below.

Bug reports or schematic changes are invited, enjoy!


DC Fan Controller Schematics
DC Fan Controller BOM

DC Fan Controller Gerbers

PSoC Creator 4.1 DC Fan Controller