Showing posts with label parallel. Show all posts

Sunday, 28 August 2022

Paralleling Outputs of High Side MOSFET Drivers

Introduction
This
blog measures the voltage and timing differences during simultaneous control of dual output high-side electronic drivers.

Parallel Dual High-Side Driver Test PCB

Test Device
The electronic component discussed in this blog is the IPS2050H. This device is manufactured by ST Micro. The device is a dual output high-side driver with an operating voltage of DC 8 – 60 V with a current capability of either 2.4 A or 5.6 A.

This ST driver was originally considered for the Interruption Tester project which is detailed in another series of posts. Paralleling the outputs of the IPS2050H for a higher current remained a matter of interest however several characteristics of these devices are not listed in the datasheet. Information such as the difference between channel ON/OFF control voltages or switching times was seen as beneficial.

Paralleling Outputs
Literature
on the subject of balancing currents when paralleling discrete MOSFETs is widely available. One such paper, “Paralleling of Power MOSFETs for HigherPower Output”, by James B. Forsythe of International Rectifier, provides a well-documented explanation of effects and techniques to normalise current sharing between MOSFET devices. In this post, some of the points listed in the International Rectifier paper were discussed and applied to the IPS2050H.

For further reading, Texas Instruments has a similar document "High Side Switches Paralleling Channels"

In a document with similar content, Infineon published an application note showing realistic gate voltage for high current applications "Paralleling MOSFETs in high-current LV drive applications"

Discussion
For those readers looking for an immediate answer to paralleling outputs of high-side drivers with multiple outputs, it is possible however the operation depends on the requirements of the load and driver.

The International Rectifier paper for MOSFETs was used as a guideline to review some aspects of the IPS2050H. Items from Section IV (c) Summary of Recommendations for Balancing Parallel MOSFET Currents were applied where possible.

Manufacturing of the IPS2050H would likely be performed on a single silicon wafer however there is commonly variation in characteristics across the wafer. Screening and parameter matching for the IPS2050H are not practical however, measurements were performed to determine differences between the devices two channels.

Parameter differences between channels were noted for Vin (ON) and (OFF).

IPS2050H Measured ON-OFF Voltages

The delays between input and output switching were measured at room  temperature, approximately 1.96 us for both channels.

IPS2050H Input to Output Switching Delay (No Load)

The measurement for the switching delay was performed based on the
50 % input voltage and 10 % output voltage for the propagation delay as shown in Figure 3 of the IPS2050H datasheet.

Figure 3 Timing from IPS2050 Datasheet (Courtesy ST Micro)

When switching the input of both channels ON simultaneously, without a load connected to either, the turn ON delay between channels was approximately 400 ns.

IPS2050H Turn-ON Delay between Outputs

Next, a load consisting of a 10 R wire wound resistor was added to each channel. The turn-ON delay with the resistor was 17 us for one channel and 18 us for the other. The turn-OFF delay with the wire wound resistor was slightly over 7 us for both channels.

IPS2050H Channel 1 Turn ON Delay with Wirewound Resistor
IPS2050H Channel 1 Turn-ON Delay with Wire Wound Resistor

IPS2050H Channel 2 Turn-ON Delay with Wire Wound Resistor

The output turn-ON delay between channel 1 and 2 with separate wire wound resistors was slightly over 25 us for both channels.

IPS2050H Channel 1 to 2 Output Turn-ON Delay with Wire Wound Resistors

The output turn-OFF delay between channel 1 and 2 with separate wire wound resistors was again slightly over 7 us for both channels.

IPS2050H Channel 1 to 2 Output Turn-OFF Delay with Wire Wound Resistors

A capacitive load of 6800 uf was driven with various output configurations. For the first test, the two outputs were connected in parallel and wired to the capacitor. The charging waveform is shown below.

IPS2050H Parallel Channel 1 to 2 Capacitor Charging

For the subsequent test, the two outputs each had a 3.3 R current sharing resistor fitted before terminating at the capacitor. As expected the capacitor charge time constant increased because of the introduced resistance.

IPS2050H Parallel Channel 1 to 2 Capacitor Charging through 3.3 R Resistors

In the last configuration, two Schottky diodes were fitted to replace the resistors on each output before connecting to the capacitor.
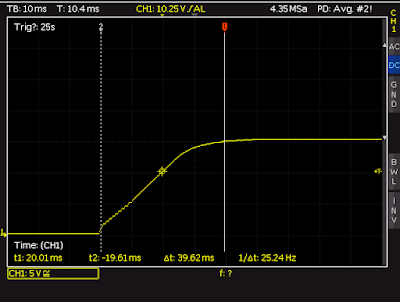
IPS2050H Parallel Channel 1 to 2 Capacitor Charging through Schottky Diodes

The time to charge the capacitor with Schottky diodes was approximately the same as the directly connected paralleled outputs. Note the lower voltage across the capacitor with the diodes due to forward voltage losses.

Each channel of the IPS2050H driver was individually loaded to 1.5 A and the voltage across separate wire wound resistors was measured with both inputs of the device ON. The output voltage at channel 1 measured 15.051 V and channel 2 measured 15.089 V.

The IPS2050H inputs were driven using a square wave with a 90 % duty cycle. The output voltage at channel 1 measured 14.968 V and channel 2 measured 15.015 V.
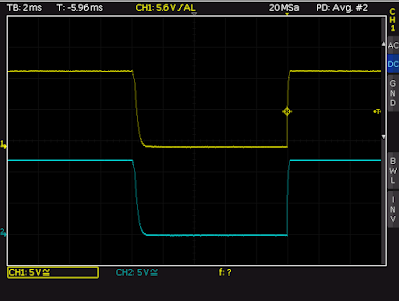
Driving IPS2050H Channel 1 and 2 with a Square Wave

PCB Traces
As stated in the paper by
International Rectifier, the addition of series resistance would not be required for a design with MOSFETs. The traces on the test PCB outputs were duplicated as shown in the image below.

Highlighted Output Polygon Traces on Top Layer of Test PCB
 

Common source inductance was not reviewed in this post. Since the MOSFET gates are not accessible, drive modifications were not possible. The decoupling resistance (gate resistor) would likely be part of the control circuit block in the IPS2050H, as shown in the capture below, therefore this was also not investigated.

IPS2050H Functional Block Datasheet (Courtesy ST Micro)

Final Thoughts
Measurements performed on the IPS2050H indicated there are
minor difference in turn ON/OFF threshold voltages and switching delays. These timing differences may result in one channel of the IPS2050H momentarily handling most of the switching energy at on turn ON and then at turn OFF. This time difference was measured in microseconds for the loads tested, which may be acceptable time for some designs but a hindrance for other designs where high instantaneous currents are required.

For a more comprehensive review, current measurements from each of the parallel outputs in a target circuit would provide clarity on the demand placed on each driver output. Temperature measurements could also prove beneficial to ensure that the device’s maximum operating specifications were not exceeded.

Sunday, 16 July 2017

Paralleling Diodes with Resistors

Summary
This blog demonstrates how diodes can be connected in parallel with a suitable series resistance per diode. These current sharing resistors are required for each paralleled diode primarily to handle the negative temperature coefficient (NTC) effect on diode forward voltage.

Using resistors with multiple diodes may be required for a number of reasons such as design costs, package size, availability of required diode(s) or something as novel as limited space on a printed circuit board (PCB).

The method using current sharing between diodes is particularly useful for designs where space is a premium and adding a thermal mass between diodes is not possible.

Literature
There is documentation relating to paralleling diodes although it can be difficult to locate online. ST Micro published an Application Note AN599: Parallel Operation of Power Rectifiers in 1993 and Application Note AN4381: Current Sharing in Parallel Diodes.

Diode Matching
Diodes bearing the same part number are made with similar characteristics however devices are never identical. Slight variations in diode characteristics such as forward voltage 'Vf', during parallel diode operation, can result in one diode sharing more current than others.

Diode matching, similar to LED binningcan be performed through a process of measurements targeting diode forward voltage drop for various currents (VI curves). Attention should also be made to the diode temperature. The solution of matching diodes may be suitable for low volume specific designs or product prototyping however this is not suited for volume (mass) production.

Diode Testing - No resistance
To illustrate how one diode, in a two diode parallel setup, will eventually end up at a higher temperature than the other a bench test was conducted.


Dual Schottky Diodes in Parallel
Dual Schottky diodes in parallel

Two Schottky diodes (ON Semiconductor parts) were soldered in parallel. A 1.8R 5W resistor was used to limit the 
power supply current. 


Temperature of one Schottky Diodes when operated in parallel
Temperature measurements were performed at regular intervals using a FLIR C2 thermal camera and the power supply used for testing was a Rigol DP832.

The power supply voltage was under 2.5VDC. The total power supply power was limited to 1.3W.

Temperature Measurements: Schottky Diodes no resistor
Temperature Measurements: Schottky Diodes no resistor 
As shown in the table above, one of the diodes began to heat more rapidly in under thirty seconds. After four minutes the test was not continued because the diode junction temperature Tj was approaching the devices specified rating of 125C.

Diode Testing - 0.01R resistance
For the second test the two diode setup was modified to include a 0.01R resistor on the cathode of each of the diodes. This resistor is the standard type used for current sensing.

These resistors were added to test if a small resistance, such as a PCB traces or the resistance in leaded components, would balance the current between the diodes.

Dual Schottky diodes in parallel with serial 0.01R resistors
The power supply power was again limited to 1.3W and temperature measurements conducted.

Temperature Measurements: Schottky Diodes 0.01R resistor
The results above show that the diodes began to heat at a more consistent rate compared to no series resistance until five minutes. After six minutes one of the diodes had begun to heat more than the other and was drawing most of the current.

This test indicated that such as low resistance was insignificant and unable to balance the drop in diode forward voltage caused by the heating of the diode.

Diode Testing - 1.3R resistance
The two diode setup with resistors was modified to use a 1.3R resistor (0805) on the cathode of each of the diodes. These resistors values were guided by the formula shown below.
Measuring each of the diodes forward voltage Vf with a digital multimeter, diode 1 read 0.64V and diode 2 read 0.65V. With approximately 250mA being equally passed by each diode the series resistance calculates to 2.6R, this value was halved to reduce the resistor power dissipation and tested.

Dual Schottky diodes in parallel with serial 1R3 resistors
Resistors with the case size 0805 were fitted as shown in the image above.

Temperature Measurements: Schottky Diodes 1R3 resistor
The test results showed the diode temperature stabilized after two minutes.

The above results however were a brief snapshot of a lengthy soak test which did show that some variation in diode temperature did eventuate. The difference in the temperature of the two diodes was stable and no runaway was seen during testing.

Temperature of one Schottky diodes when operated in parallel with series resistance
When viewed thermally the balance between the diodes can easily been seen when compared to the test where no series resistance was fitted.

Current Sharing - 1.3R resistance
Using a multimeter the forward voltage across the resistors was measured after 10 minutes. One resistor showed a voltage drop of 0.374V and the send 0.363V. 

Using the voltage across the resistors to determine currents showed that 0.289A and 0.279A flowed through each resistor diode legs.

It should be noted that the current through each resistor diode leg is dynamic and should never be considered exact. Additionally the current through each leg should not be thought of as balanced. When the third test was allowed to run for a considerable time a temperature delta of 10 degrees was often seen between the two diodes.

Summary
For the tests conducted in this blog, with a pair of ON Semiconductor Schottky diodes, adding a suitable value series resistor to each of the diodes facilitated current sharing, without the need for thermal bonding.

Fitting the two diodes to a common thermal mass or thermally coupling the diodes may also be another solution to balancing the current sharing although not investigated in the scope of this blog.

Additionally the tests employed a benchtop DC power supply as the source. Other supplies such as AC or pulsing supplies (PWM) with shaped waveforms and parallel diodes may require more specific testing to determine operational characteristics for a parallel diode design.

Design Suggestions
Listed below are some design suggestions when using diodes in parallel.

1. Choose diodes with the lowest forward voltage (Vf) that can be afforded for the design. This aids in reducing heat dissipated which is especially a concern for enclosed spaces.

A single bigger diode is not always a better solution if it is dissipating significantly more heat.


2. For the current and voltage rating of the diode, add an appropriate safety margin suitable for the design.


3. A design with parallel diodes operating with continuous DC current may experience less stress than parallel diodes operating as freewheeling (flyback) diodes for inductive loads and therefore should be rated accordingly.


4. For the current sharing resistor select an appropriately rated device for power dissipation. When designs use PWM at high currents the resistors may also benefit from being rated for pulse withstanding.


5. Test, test and test. Testing does not refer to the product operational or consumer specifications but the working limits of the design. To understand your product it should be tested to failure!