Summary
This blog
details the repair of a downlight (Model LD-18000R) with the replacement of
the LED chip and the creation of a new LED retaining clip.
Fault Symptoms
Following several days of flickering, the LED in the downlight
failed. Only a portion of the full light output was produced. Shown below is the downlight fully powered.

|
|
LED Downlight Failure - Low Output |
Downlight Disassembly
With the LED disconnected from the LED driver, the rear plastic plate of the LED was opened to allow access to the cabling.

|
| LED Downlight Rear Plate Fitted |

|
| LED Downlight Rear Plate Removed |
The two screws allowing pivoting of the downlight in the base were removed. This step was not an essential step for repair as the metal retaining ring was screwed directly onto the aluminium heatsink.

|
|
LED Downlight Base Removed |
The retaining ring was unscrewed from the aluminium heatsink to access the reflector.

|
|
LED Downlight Reflector in Heastink |
The reflector was set in place with a small amount of clear silicone. Using gentle prying the reflector was removed without damage.

|
| LED Downlight Reflector |
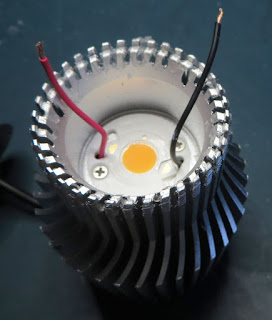
While inspecting the LED fitted to the heatsink, a crack in the plastic retaining clip was noticed. It was not known if equal pressure was applied LED. The capture below shows a hairline crack in the plastic near the top left countersunk screw hole.

|
|
LED Retaining Clip - Cracked |
Replacement LED
To verify failure of the LED, the LED was powered using a benchtop
power supply with approximately DC 32 V. Only a portion of the LED is illuminated in the capture below.

|
|
Damaged CREE LED |
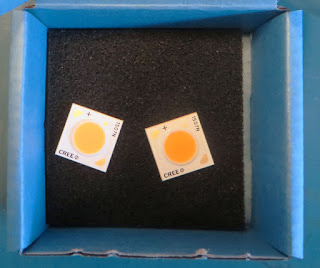
The 36 V Cree LED was marked as a CXA1507N which specifications of a colour temperature near 5000K (cool). Replacement CREE LED’s with a 3000K (warm) temperature were selected due to availability.

|
|
Replacement CREE LED's |
Repairing the plastic LED retaining clip was an option however for longevity a new holder was created using a spare Printed Circuit Board (PCB). For the board used in this blog, the PCB was 1.6 mm thick, FR4 with a temperature grade (TG) 140 Celsius.

|
|
LED Retaining Clip on PCB |
The outline of the plastic retaining clip was traced with a permanent marker onto the PCB.

|
| LED Retaining Clip Tracing on PCB |
Below is the PCB, drilled and shaped then placed against the CREE LED for verification.

|
|
Shaped Replacement LED Retaining Clip |
Due to the PCB sitting physically higher than the previous plastic clip, new longer self-tapping screws were required. The longer screws would hold the PCB and LED to the aluminium heatsink.
The replacement self-tapping screws were slightly larger than the previous
screws meaning these needed to be cut into the aluminium block.

|
|
New Self Tappers for LED Heatsink |
Isopropyl alcohol was used to remove the old heatsink paste and
aluminium swarf.
The positive and negative connections were soldered to the CREE LED. New heatsink paste was then applied lavishly to the rear of the LED.

|
|
Replacement CREE LED with Heatsink Paste |
The replacement LED holder was deburred, cleaned, fitted then screwed down to the heatsink.

|
|
CREE LED with Replacement LED Holder |
A brief power-up test was made to ensure the operation of the LED before reassembly.

|
|
Replacement CREE LED Test |
Reassembly
For reassembly of the downlight, the plastic cover was fitted back to the aluminium heatsink.
 |
| LED Downlight Rear Plate Replaced |
New white silicone was applied around the edge of the heatsink before the reflector was fitted.
 |
| Threaded LED Aluminium Heatsink |
The base and retaining ring were assembled then the aluminium heatsink screwed into the ring.
 |
| Reassembled LED Downlight |
As a final verification of operability, the LED was connected to the LED driver for testing.
Final Thoughts
The cost to replace each CREE LED in the set was less than USD 5.
For the faulty downlight, workshop time was required to create a replacement LED holder. Similar downlights did not have damaged LED holders.
Second CREE Downlight
Taking into account the cost of the LED and workshop materials, the repair cost was less than a new downlight. Furthermore, because the downlights were less than three years old, replacement of the LED’s appeared a reasonable investment.
If the downlights were several years old, purchasing the replacement LED’s may become an issue. The remaining life of the LED driver would also need to be considered carefully before performing the repair.

