Introduction
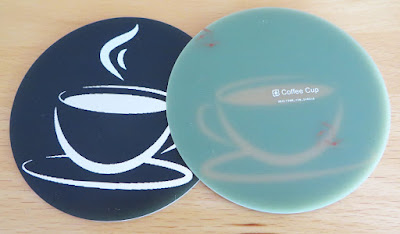
In a previous blog, the circuit board drafting tool Altium Designer was used to create circuit board (PCB) artwork. In this blog, a coffee cup coaster was created using the same technique.
 |
| Coffee Cup Holder Front and Back |
Removing Colour and Changing the File Format
To begin, select the desired clipart image from your preferred site, such as the image used in this post - a coffee cup. All credit to the original designer and provider of the coffee cup.
 |
| Coffee Cup Clipart (Credit Clip Library) |
Import the image into an editing tool such as GIMP, Photoshop, or a free online editor. Remove any colour from the image (black and white) to prepare it for use on the PCB. Increase the thickness of the image as needed to ensure ease of production.
After the image editing is complete, save the updated image in a PNG format. This format allows for easy copying and pasting into Altium Designer.
Creating the PCB
To begin creating the PCB artwork for our coffee cup coaster, a circular arc (mechanical layer 1) with an 80 mm diameter to the PCB. This arc defined the board shape and should be larger than the image. An 80 mm diameter suits cups, a 100 mm to 120 mm diameter would suits most mugs.
 |
| Coaster PCB Shape and Size |
Next, the PNG file contents were copied and pasted into Altium Designer. The imported image is represented by various regions which can be moved as needed.
For the coffee cup, the top copper layer was adjusted using the Properties dialogue box.
 |
| Manual Solder Mask Expansion Setting in Altium |
To ensure a minimum distance between the solder mask and the copper layer, the solder mask expansion of the copper region was manually reduced to zero using the Properties dialog.
The steam seen above the coffee image was changed to a top-layer silk screen using the same Properties dialog in Altium.
 |
| Coffee Cup Coaster in Altium 2D |
PCB Export
To prepare the PCB artwork for manufacturing, the file format (Gerber) needs to meet the requirements of the selected PCB supplier. The format may vary depending on the manufacturer and is usually listed on their website. In this post, the JLCPCB supplier was utilised to manufacture the PCB.
Manufacturing
The final appearance and cost of the coaster can vary greatly based on various factors. These factors include the thickness of the circuit board material, surface finish, solder mask and silkscreen colour.
In this post, the board thickness was maintained at 1.6 mm, the surface finish was lead-free HASL (Hot Air Solder Levelled), the solder mask was changed to black on the top side only and the silk screen was kept as white.
 |
| Coffee Cup Coaster in Altium 3D |
Final Product
Pictured below is an image of the board as supplied by the manufacturer.
 |
| Coffee Cup Coaster on the Bench |
Due to lighting the contract between the silver surface and the white silkscreen is not captured. To increase the longevity of the coaster, a clear epoxy or a hard-wearing lacquer could be applied. This will prevent the HASL coating from becoming tarnished over time.
 |
| Coaster in Use |

No comments:
Post a Comment