Saturday, 3 March 2018

Asus X202E with Lubuntu 17.10

Summary
In a previous blog an Asus X202E netbook was upgraded to Ubuntu Mate, however following the latest updates the netbook appeared to slow for specific tasks such as web browsing. For a comparative test the laptop was changed to Lubuntu.
Asus X202E
Asus X202E

Lubuntu USB Installation Disk
To create the installation USB drive, under Windows 10, the well known software package Rufus 2.18 was utilised.


About Rufus 2.18
About Rufus 2.18

The Lubuntu ISO was downloaded from from the downloads section of the Lubuntu site. Specifically the Lubuntu 17.10.01 AMD 64 ISO release was used.


Rufus Settings
Rufus Settings

With a USB drive installed, Rufus was opened. The Device selected was the USB drive as shown in the above capture.

For the partition type either "MBR partition scheme for BIOS or UEFI" or "MBR partition scheme for UEFI" were suitable for use with the Asus BIOS.

After configuring the File System for FAT32 the downloaded ISO file "lubuntu-17.10.1-alternate-amd64" was selected. 

The start button was then selected to begin the USB drive creation process.

Rufus ISO Hybrid
Rufus ISO Hybrid

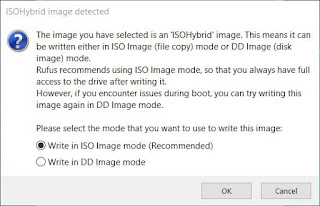
Rufus did download some additional files then displayed a window, as shown above, regarding the ISO image and how it is written to the USB drive. The recommended setting were used.


Rufus Erase USB
Rufus Erase USB

Lastly was the obligatory erase drive confirmation message before the disk creation process was started.


Rufus Copying ISO Files

Once the process was completed, it was over to perform the operating system change to the Asus netbook.


Rufus Completed Lubuntu USB


Netbook BIOS Changes to Boot with USB Install Disk
As mentioned in the previous blog while upgrading an Asus X202E netbook to Ubuntu Mate, the USB with the Linux file system format will not boot with the default BIOS settings. Original details for BIOS configuration and, originally for a Mac install, can be found at this thread www.tonymaxx86.com

In summary the changes that were required with this model X202E are listed below.

1. The Lubuntu USB drive was installed into the netbook while it was unpowered. BIOS was then activated by firstly pressing the F2 key then pressing the power button. The F2 key was only released when the BIOS was displayed on the netbook. Original reference in Asus website FAQ.

2. First change to the BIOS was under the 'Advanced' menu. USB Legacy support was enabled to ensure booting from the external drive was possible. XHCI pre-boot was also disabled.


X202E BIOS Legacy USB Activation

3. Next in the 'Boot' menu settings, Fast Boot and Launch CSM were disabled.

X202E BIOS Boot Settings

4. Additionally the boot priorities were changed so that the Lubuntu USB was the first boot device.


X202E BIOS Boot Priority

5. Moving to the BIOS 'Security' menu, the Secure Boot was disabled to allow non-Windows drives to boot.

X202E BIOS Secure Boot Settings

6. Lastly the BIOS changes were saved and the X202E allowed to reboot with the installed Lubuntu USB drive connected to the netbook.

Installing Lubuntu
Lubuntu booted with the well know GNU Grub bootloader.


Lubuntu Grub Start
Lubuntu Grub Start

The language option was then presented by the installer.


Lubuntu Language
Lubuntu Language

The Country was then selected.


Lubuntu Country
Lubuntu Country

For the subsequent step, which was keyboard setup, the automatic detection was tried by pressing keys specified by the installer. This did not appear to work and was not actually required as the netbook keyboard worked without issues after the installation was complete.


Lubuntu Keyboard Detection

The Lubuntu installer was allowed to complete then the USB was removed.


Lubuntu Desktop
Lubuntu Desktop

After the reboot, Lubuntu booted to the screen as captured above.

Performance - Lubuntu vs Ubuntu Mate
The primary reason for changing between operating systems was to determine if a performance gain could be noticed. Shown below are the differences between the two operating systems using Hardinfo.

Computer
Processor
Intel(R) Celeron(R) CPU 847 @ 1.10GHz
Memory
1857MB (351MB used)
Machine Type
Notebook
Operating System
Ubuntu 17.10


Computer
Processor
2x Intel(R) Celeron(R) CPU 847 @ 1.10GHz
Memory
1860MB (423MB used)
Operating System
Ubuntu 16.10

For bench marking the built-in application Hardinfo was used. Relevant performance metrics for the two operating systems can be seen below. Note the higher scores denoting better performance in green. Looking at the results below Linux Mint mostly outperforms Lubuntu, for this Asus X202E and the setup used.

Benchmarks
CPU Blowfish
CPU Blowfish
Lubuntu - Intel(R) Celeron(R) CPU 847 @ 1.10GHz
2x 1100.00 MHz
18.411
Linux Mint - This Machine
1100 MHz
16.396

CPU CryptoHash
CPU CryptoHash
Lubuntu - Intel(R) Celeron(R) CPU 847 @ 1.10GHz
2x 1100.00 MHz
82.704
Linux Mint - This Machine
1100 MHz
91.171

CPU Fibonacci
CPU Fibonacci
Lubuntu - Intel(R) Celeron(R) CPU 847 @ 1.10GHz
2x 1100.00 MHz
1.835
Linux Mint - This Machine
1100 MHz
4.906

CPU N-Queens
CPU N-Queens
Lubuntu - Intel(R) Celeron(R) CPU 847 @ 1.10GHz
2x 1100.00 MHz
13.559
Linux Mint - This Machine
1100 MHz
19.652

CPU Zlib
CPU Zlib
Lubuntu - Intel(R) Celeron(R) CPU 847 @ 1.10GHz
2x 1100.00 MHz
0.147
Linux Mint – Not Tested


FPU FFT
FPU FFT
Lubuntu - Intel(R) Celeron(R) CPU 847 @ 1.10GHz
2x 1100.00 MHz
7.430
Linux Mint - This Machine
1100 MHz
5.927

FPU Raytracing
FPU Raytracing
Lubuntu - Intel(R) Celeron(R) CPU 847 @ 1.10GHz
2x 1100.00 MHz
9.457
Linux Mint - This Machine
1100 MHz
12.788

GPU Drawing
GPU Drawing
Lubuntu - Intel(R) Celeron(R) CPU 847 @ 1.10GHz
2x 1100.00 MHz
2003.950
Linux Mint – Not tested


System Monitor
The System Monitor for both operating system was captured just after restart. No additional software or updates had been applied to either of the operating systems.


Ubuntu Mate System Monitor

Lubuntu System Monitor
Summary
Additional testing was performed with the Phoronix Test Suite. Phoronix was unable to run on Ubuntu Mate even after some gentle massaging. The error listed below was persistent.

xxx@xxx-X202EP:~$ phoronix-test-suite 

\PHP Fatal error:  Class ambient_temp cannot extend from interface phodevi_sensor in /usr/share/phoronix-test-suite/pts-core/objects/phodevi/sensors/ambient_temp.php on line 23

Some of the test results for Phoronix with Lubuntu are available in PDF at the link below.

Phoronix Lubuntu Test Summary

At the end of of the comparison the test results turned out to be incomplete, therefore testing was inconclusive. 

For day to day operation Lubuntu with the LXDE desktop, in my personal opinion, does feel more responsive and visually cleaner than Ubuntu Mate with default install settings. There however are more tests and metrics that are outstanding for a complete comparison.

Monday, 12 February 2018

Win 10 Serial Terminal software max baud rate

Summary
This purpose of this blog was to identify the maximum baud rate of several Windows 10 serial port terminal programs when used with an FTDI USB to TTL adaptor which had a specified rate of 3Mbaud.

Addendum: PCTerm 3.7 added to test results for testing 3Mbaud.

Test Setup
A Cypress PSoC development kit CY8CKIT-042 was configured with a UART component to repeatedly send the sequence of capitilised letters A to Z. 


PSoC and FDTI Test Setup
The associated transmit output and 0V reference from the development kit were connected to the receive input and 0V on the FTDI USB to TTL adaptor (TTL-232R-RPi).


FDTI TTL-232R-RPi Adaptor
The USB side of the FTDI adaptor was connected to a Windows 10 laptop for the duration of the software testing. Specifications for the laptop are shown below.


Windows 10 Test System Specifications

Validation Criteria
There were only two criteria that the software needed to fulfil in order to be accepted as a pass for this test.

1. Display the characters A - Z on the terminal software in either ASCII or HEX and

2. Terminal software should still be useable - meaning not crash, lockup or become unresponsive for the duration of the test


Test Software
Listed below are the ten Windows terminal applications that were tested.

1. Advanced Serial Port Monitor

2. CoolTerm

3. Hype!Terminal

4. Muterm2

5. Putty

6. RealTerm

7. Serial Port Terminal

8. TeraTerm

9. Termite

10. XShell5

11. PC Term 3.7


Test Results
It should be noted that this test was performed under the conditions detailed below.

1. The various Windows terminal applications were used for receiving characters only,

2. Some of the various Windows terminal applications were used in their trial installation mode or the latest Beta of the application,

3. Some Windows terminal applications did have faster baud rates which were not tested,

4. Only standard baud rates such as 115200, 230400, 460800, 921600 and higher were used while determining the maximum receive baud rate of the Windows terminal applications for this specific hardware setup.


Windows Terminal Software Max Data Rate Test Results
PCTerm was added to this blog, post publishing and it was proven to be the fastest in data rate for displaying ASCII text. RealTerm was the fastest in data rate for displaying data in Hex.

Other notable mentions; Putty, Hype!Term and Advanced Serial Port Monitor.

Test Notes
During testing TeraTerm performed without any issues receiving data at 921600 baud.


TeraTerm Receiving Data at 921600
Similarly with RealTerm the receive window configured to display in ASCII no issues were noted.

RealTerm Receiving Data at 921600 - ASCII Displayed
Changing RealTerm to display in HEX at 921600 resulted in slow performance and issues relating to the onscreen refresh. Reducing the baud rate to 460800 resolved the display issues. Similarly adding a 1us delay between characters at 921600 resolved the onscreen refresh.

RealTerm Receiving Data at 921600 - HEX Displayed
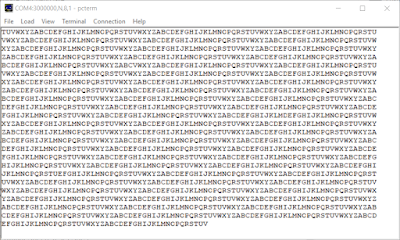
PCTerm 3.7 performed at 3Mbaud without any issues to display ASCII.


PCTerm Receiving Data at 3Mbaud - ASCII Displayed

Test Code
Basic test code with an option to add inter-character delays.

/* ========================================
*
* Example Terminal Speed Test PSoC4
*  
* Revision:    1.00
* Date:        10/02/2018

* 10/02/2018   1.00     Test release
*
* Released as GPL
*
* ======================================== */
#include <project.h>
#include <stdio.h>
#include <stdbool.h>


int main()
{   
    uint8 count_i;                               /* Define for loop counter var */
    uint16 char_delay = 0;                  /* Define intercharacter character delay in ms*/
    
    CyGlobalIntEnable;                      /* Enable global interrupts. */
    UART_Start();
    while (SW1_Read() == true);     /* Wait for button press */
    UART_UartPutString("Start");
    
    for(;;)
    {
        count_i = 65u;
        while (count_i <= 90u) {
            UART_UartPutChar(count_i);
            if (char_delay != 0u) {
                CyDelayUs(char_delay);
            }
            count_i++;
        }
    }
}

/* [] END OF FILE */


PSoC Creator Changes for PCTerm
The default HFClock 'HFClk' for the PSoC Creator UART is 24MHz. As this clock rate results in only 1.5Mbaud, the HFClock was increased to 48MHz.


PSoC Creator HFClk Increase to 48MHz
Using the UART SCB component with an external 48MHz clock resulted in the required 3Mbaud data rate.


PSoC Creator Top Design SCB UART with 24MHz External Clock
The properties of the SCB UART displayed the 3Mbaud UART data rate.


PSoC Creator SCB UART at 3Mbaud

Summary
PCTerm, RealTerm and TeraTerm are noteworthy Windows based serial terminal applications which would serve hobbyists and professionals alike. Personally, i am habitual in installing software such as RealTerm and TeraTerm on computers involved in software or hardware development. Further to the recent addendum testing PCTerm, this application may replace TeraTerm in some instances.

It should be noted that each of the terminal applications mentioned in this blog were tested for the specific purpose of receiving with a high baud rate. When choosing a suitable serial terminal application, each specimen of software should be reviewed under its own merit to ensure its suitability for the intended task.

When a more comprehensive look at data is required then a protocol analyser is usually required. These solutions range from all in one devices such as the Analog Discovery 2 by Digilent to dedicated input only products such as the Saleae Logic devices to high end products from Keysight. From experience, even the low cost Digilent Analog Discovery 2 will efficiently record and display the character test performed in this blog!

Tuesday, 9 January 2018

Prolific USB To Serial Code 10 Windows 10 Networked

Summary
Windows device driver Code 10 issues, with legacy Prolific adaptors or counterfeit chips have been investigated by countless people, there however remains instances where many solutions fail to work. 

This blog contains a step by step guide which aims at addressing the Code 10 issue for Windows 10 networked installations (domain) and possibly earlier Windows versions, when current internet listed solutions or the newer Prolific driver 3.8.18.0 driver may not work.

From experience, either the newer Prolific driver for Windows 10 or the guide detailed in the blog, have resolved the issue on networked Windows 10 machines having the code 10.

Why Another Fix
The first reason for this fix relates to Windows 10 computers on a workplace network (domain) where software and driver updates are applied in a blanket roll out, when a newer driver version is available. This is an accepted process that facilitates software improvements however the process is troublesome when there are either driver or hardware related issues. This issue can be addressed by preventing the driver update of the specific USB device.

The second reason for this blog relates to online software fixes released with little or no explanation as to what software mechanisms are under the hood. Running an executable from an unknown website leaves me personally with an uneasy feeling. Installing some malevolent software on a home computer limits exposure to possibly a few computers. Installing the same software on a workplace network, with possibly dozens or more networked computers, is an entirely different matter.

Certainly there are noteworthy websites with documented / packaged fixes that can be tested if not done so already.

http://www.ifamilysoftware.com/news37.html

http://dronespersonalizados.blogspot.com.au/2014/03/pl2303-error-code-10-how-to-fix-windows.html

http://www.totalcardiagnostics.com/support/index.php?/Knowledgebase/Article/View/92

Description of the Fix
Fixing the driver issue (Code 10) can be achieved in four steps.

Step 1. With the Prolific USB adaptor fitted to the target computer, uninstall the Windows Prolific driver from Device Manager for that USB port.

Step 2. With the Prolific USB adaptor fitted in the same port, install the Prolific driver version applicable to the Prolific hardware used. This step may require some experimentation with earlier Prolific driver versions. Version 3.3.2.102 worked for both my Windows 10 installations. Prolific 3.3.2.102 compressed file here on Google drive. This driver is signed and should not be used otherwise.

Step 3. Repeat steps 1 and 2 for all USB ports on the computer, including any USB hubs or docking stations connected to the computer where the Prolific USB device may be connected.

Step 4. Change the local computer Windows Group Policy settings to prevent updates for only that Prolific USB device. For changes to be applied using the Group Policy Editor, the computer must be connected to the relevant Domain. The Group Policy can then updated to prevent Windows Updates for USB devices matching the Prolific USB VID and PID.

Process Explained
The image below is a capture of the Windows 10 Device Manager showing the yellow icon for the Prolific USB to Serial adaptor.


Device Manager Prolific USB to Serial - Code 10
Step 1.
With the Prolific USB device installed, remove the Prolific driver by opening the Properties of the USB device shown in Device Manager.


Device Manager Prolific USB to Serial - Driver
Navigate to the Driver tab and click the Uninstall Device button.

Step 2.
Install the suitable Prolific driver for computer and operating system. For a Windows 10 installation on a laptop the Prolific driver version 3.3.2.102 was found to be suitable. This version may vary for other hardware types and Windows installations.
Device Manager Prolific USB to Serial - New Driver

Step 3. 
Repeat the process for each USB port associated with the computer.

On the example laptop used for this blog, using the Prolific USB device on a second USB port results in a new serial port enumeration as shown in the image below. 


Device Manager Prolific USB to Serial - Code 10
Again with the Prolific USB device installed, remove all newer Prolific drivers by opening the Properties of the USB device shown in Device Manager.


Device Manager Prolific USB to Serial - Driver
Navigate to the Driver tab and click the Uninstall Device button.


Device Manager Prolific USB to Serial - New Driver

Step 4.

With the computer connected to the computer Domain and the Prolific USB device still installed, open the Properties of the Prolific USB device shown in Device Manager.


Device Manager Prolific USB to Serial - Hardware ID
Navigate to the Details tab. 

From the Property drop down list box select the Hardware ID's item. As the information displayed will be used when configuring the Windows Group Policy this window can be left open.

From the Windows Start open the Group Policy Editor by typing gpedit.msc. If the installation is Windows 10 Home the Group Policy Editor will not be found - possibly disabled in Home editions. 


Windows 10 Group Policy Editor
With the Group Policy Editor open, navigate to the Administrative Templates folder, then System, then Device Installation.


Windows 10 Group Policy Editor  - Device Installation
Windows 10 Group Policy Editor  - Device Installation
Select the Device Installation Restrictions folder then in the Window pane to the right, double click the item Prevent installation of drivers that match any of these device ID's. A new window will be displayed.


Windows 10 Group Policy Editor  - Device Installation Restrictions
Windows 10 Group Policy Editor  - Device Installation Restrictions
Click the Enabled radio button in the top left of the window.


Windows 10 Group Policy Editor  - Device Installation Restrictions Enabled
Windows 10 Group Policy Editor  - Device Installation Restrictions Enabled
Click the Show button to configure the Prolific USB ID.


Windows 10 Group Policy Editor  - Device Installation Restrictions Empty ID
Windows 10 Group Policy Editor  - Device Installation Restrictions Empty ID
Switch back to Device Manager and copy the first entry from the Hardware ID.


Device Manager Prolific USB to Serial - Hardware ID

Paste this information into the Group Policy Editor. Repeat for process for the second line in Device Manager. The result should be similar to the image shown below.

Windows 10 Group Policy Editor  - Device Installation Restrictions Updated ID
Windows 10 Group Policy Editor  - Device Installation Restrictions Updated ID
Close all windows and restart the computer so that the Group Policy changes are applied.

Driver updates should no longer be applied to that specific USB device.

Note on Limitations - Updating Drivers
Should a similar Prolific or other 'grey' USB device with the same VID and PID require a driver change, then the Windows 10 Group Policy Editor  - Device Installation Restrictions must be changed to Not Configured or Disabled.

Attempting to update the driver, without disabling the installation restriction, will result in a window similar to the image shown below.


Device Manager Update Driver - Forbidden System Policy

Hope this fix helps!

Downloads
Prolific driver 3.3.2.102