
Introduction
This post is an aide-mémoire for enthusiasts performing measurements using an oscilloscope on circuits that feature fast rise-fall times.
 |
| Oscilloscope Measurement Ringing |
Background
While reviewing waveforms posted online for Time Domain Reflectometry (TDR) circuits, some waveforms appeared to have ringing that may be a result of excessive lead lengths used during oscilloscope measurements.
Measurements
In this post, the example the rising edge of waveforms were captured using test equipment consisting of a 300 MHz 2 GS digital oscilloscope, a passive probe (calibrated) and a PSoC5 LP for signal edge pulse generation. The PSoC5 output pin was clocked at 4 MHz with a rise time of over 10 ns (Infineon-AN72382_Using_PSoC_3_and_PSoC_5LP_GPIO_Pins-ApplicationNotes-v09_00-EN.pdf, Greg Reynolds, Cypress, Rev H, 2018).
In the subsequent section, example 1 was the worst-case measurement for signal ringing and example 4 was an improved setup and measurement.
Example 1. Long Lead from Probe Tip and Long Earth Connection
 |
| Example 1 - Connections for Measurement |
In this example, the cable lengths connected to the oscilloscope probe contribute mostly to the signal ringing. Other factors such as impedance mismatch were not reviewed as part of this post.
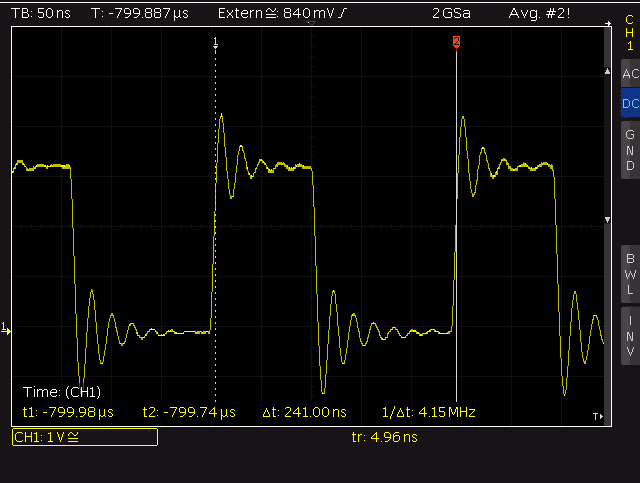 |
| Example 1 - Oscilloscope Measurement |
Example 2. Long Lead from Probe Tip and Leaded Oscilloscope Earth Connection
 |
| Example 2 - Connections for Measurement |
Shorter cable lengths reduced the ringing however ringing was still prevalent.
 |
| Example 2 - Oscilloscope Measurement |
Example 3. Direct Connection to Probe Tip and Leaded Oscilloscope Earth Connection
 |
| Example 3 - Connections for Measurement |
This change to the connections was the largest improvement compared to examples 1 and 2. Ringing was improved with a direct probe connection and a shorter Earth lead although the return path through Earth lead could be reduced further.
 |
| Example 3 - Oscilloscope Measurement |
Example 4. Direct Probe Tip and Ground Spring Connection
 |
| Example 4 - Connections for Measurement |
A further improvement compared to example 3 with minimal lead lengths.
 |
| Example 4 - Oscilloscope Measurement |
Example 5. Long Measurement Trace and Oscilloscope Earth Connection (Slow Edge Rate)
The capture below was made from the same hardware setup as example 1 and the PSoC was programmed for a slow instead of a fast edge rate.
 |
| Example 5 - Oscilloscope Measurement |
Direct Connections
If a direct connection to a circuit board is possible, a board-mounted fixture in an option. These fixtures allow the oscilloscope probe tip to be inserted directly into the fixture. Some examples of fixtures for probing can be sourced from suppliers such as Teledyne, Cinch and Tektronix.
") |
| Example of Circuit Board Fixture (Courtesy DigiKey) |
Summary
Attention to measurement techniques can improve oscilloscope measurements however these are not always practical. While this post touches on one possible change that can be made to measurements, other factors should also be researched and considered depending on the type of signal. Further literature and content including passive probe compensation is available from manufacturers such as Teledyne. Detailed content for oscilloscope measurements can be found from Analog.


