Showing posts with label wifi. Show all posts

Tuesday, 4 June 2024

Arduino Uno R4 Wifi Flash Reprogramming

Introduction 
This short post covers the reprogramming process on the Arduino Uno R4 WiFi (Arduino R4) firmware. The information in this post supplements the content available from the Arduino website with a few additional images. This post is targeted at installations using Windows machines.

The discussions in the Arduino forums for the detection and programming issues on the Arduino R4 can be viewed here.

Reason for Reprogramming the Arduino R4
During software development, a debug message in the Arduino IDE stated that a firmware update was available for the Arduino R4 WiFi. Using the steps below, the module type detected by the Arduino IDE was changed from an Arduino R4 to a WiFiduinoV2 following a firmware update. Reprogramming the
Arduino R4 resulted in incorrect operation.

Steps Resulting in Incorrect Firmware Programming
To begin, the computer running the Arduino IDE was connected to the Arduino R4. The Firmware Updater was selected from the Tools menu in the IDE.

Arduino IDE Displaying Correct Board Type

The Arduino R4 was recognised in the IDE as the correct board.

Arduino IDE Firmware Updater

The firmware update process was initiated in the IDE by clicking the Install button.

Arduino IDE Firmware Selection

Firmware version 0.4.1 update on the Arduino R4.

Arduino IDE Firmware Update of Arduino R4

After updating the Arduino R4 firmware, the IDE recognised the R4 as a WiFiduinoV2. This behaviour has been noted in Arduino forums.

Arduino IDE Detecting Different Board

When attempting to build using the WiFiduino2 this results in various compiler issues. The firmware needed reversion.

Arduino IDE Error with Incorrect Board Type

Attempting to repeat the flash process for the Arduino R4 firmware not possible as the board was not recognised as the correct type.

Arduino R4 not Recognised After Flash Update

Using the ESP32 Flash Tool to Restore the Firmware
Fortunately, the Arduino website provides the firmware and tools to reprogram the ESP32 on the Arduino R4 board to restore the type. Some details are contained on the ESP32 Upload page and the main details are available on an associated page here.

Capture from Arduino Website

The Arduino website describes the steps required to reprogram the Arduino R4 flash which, begins with removing the USB (power).
A jumper was fitted to the 3x2 header on the Arduino R4 board.

Arduino R4 WiFi Header with Jumper Fitted

With the Arduino R4 board reconnected to the computer, the batch file for reprogramming was downloaded from the Arduino website here. When executing the batch file, there was an issue detecting the Arduino R4 board and the batch file operation was terminated.

The ESPflash tool was initiated from the command line following the settings shown on the Arduino website. The results of executing the ESPflash tool are listed below.

C:\********\unor4wifi-update-windows\unor4wifi-update-windows\bin>espflashwrite-bin -b 115200 0x0 
C:\********\unor4wifi-update-windows\unor4wifi-update-windows\firmware\UNOR4-WIFI-S3-0.4.1.bin
[2024-06-01T07:32:00Z INFO ] 🚀 A new version of espflash is available: v3.1.0
[2024-06-01T07:32:00Z INFO ] Serial port: 'COM8'
[2024-06-01T07:32:00Z INFO ] Connecting...
[2024-06-01T07:32:00Z INFO ] Using flash stub
Chip type:         esp32s3 (revision v0.2)
Crystal frequency: 40MHz
Flash size:        8MB
Features:         WiFi, BLE
MAC address:   <hidden>
[00:00:17] [========================================]    877/877     0x0 
C:\********\unor4wifi-update-windows\unor4wifi-update-windows\bin>

Closing the command line and opening the Arduino IDE, confirmed that the Arduino R4 board type was restored correctly. This process mentioned in this post was repeated numerous times during testing without any issues.

If the jumper was left in the Arduino R4 and restarted, the board type is detected as a Deneyap Kart G in the IDE.

Arduino IDE Detecting Deneyap Kart G Board

Sunday, 28 April 2024

Model Rocket Launcher WiFi ESP8266 Part 3

Introduction 
This blog continues from Part 2 of the ‘Wi-Fi-controlled rocket launcher’. In this blog, the software changes to suit the ESP8266 are mentioned. Additionally, a mechanical 'proof of concept' for the rocket launcher is shown using a 3D-printed case.

Bench Test of Rocket Launcher

Code Change Summary
In the earlier version of the model rocket launcher design, a PSoC microcontroller with Bluetooth was selected for communications. When moving to the ESP8266, the Bluetooth communications interface was changed to a Wi-Fi interface. Using a Wi-Fi interface simplified the design when compared to developing in Android Studio.

To support a broader audience using the ESP8266, it was decided to perform software development using the Arduino platform.

/** *****************************************************************************
* @file   main.c
* @version 1.0b
* @date 10/02/2024
* @brief
* 01/03/2023  Moved code from original PSoC version into Arduino
* 13/01/2024  Changed code operation, updated launch state machine
* 24/01/2024  Client connection issues noted during testing
* 10/02/2024  Code cleanup. Changed deprecated server.available() to server.accept()
****************************************************************************** */

#if !defined(ESP8266)
  #error For ESP8266. Check Tools->Board setting
#endif

/*_TIMERINTERRUPT_LOGLEVEL_ from 0 to 4 */
#define TIMER_INTERRUPT_DEBUG         1
#define _TIMERINTERRUPT_LOGLEVEL_     1
#define ENABLE_DEBUG_PRINTS           true

Most parts of the original code from the PSoC, including the launcher state machine, were either updated or rewritten. Code changes were needed for the ESP and targeted toward proper encapsulation.

ITimer.attachInterruptInterval(TIMER_INTERVAL_MS * 1000,TimerHandler);  /* 10 ms system timer */
      

Snippets and libraries from the Arduino community were included in the new launcher code. Specifically, credit goes to Khoi Hoang for Timer Interrupt examples and Martyn Currey for ESP Wi-Fi implementation.

How Software Was Developed
The code was developed using the Arduino IDE. Initial testing for the ESP code was performed using a Windows laptop for the Wi-Fi connection primarily to test the webpage interface. Testing subsequently progress to  an Android phone.

Shown in the image below is the first rocket launcher web page. Additional information such as battery voltage and launch state may be included on the web page in later updates.

Rocket Launcher Webpage
 

Launcher Case
After reviewing the previous enclosure and cost, it was decided to design a 3D-printable enclosure to house a small lead acid battery and a control board. The lead acid battery is only temporary and will be changed to an 18650-cell(s) capable of a high-discharge current.

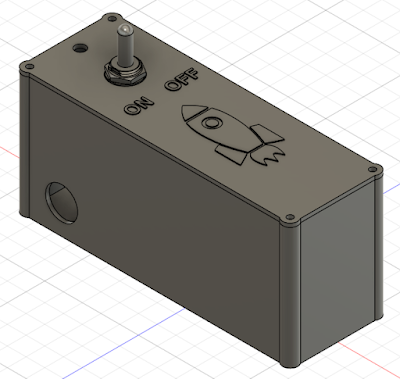
For the 3D-printed case, two mechanical parts were drafted in Fusion 360. These parts comprised of a base and a lid as pictured below.

Rocket Launcher Case (Fusion 360)
 

Launcher Hardware Assembly
With the ESP code allowing the desired launch operation, the circuit board, wiring and battery were assembled and added to the 3D-printed case.

Rocket Launcher Test Assembly

During the assembly, it was noted that the pluggable circuit board headers, although simple to install and use, were expensive and consumed space. On the subsequent revision of the board, as displayed below, the pluggable headers were replaced with through-hole solder pads that suit a larger gauge wire.

Updated Launcher Board

Additionally, the toggle switch used for controlling the power was salvaged from another project. There are no manufacturer markings on the switch to generate a Bill of Materials. More clearance was added around the toggle switch body to suit other types of toggle switches such as the model shown below.

Standard Toggle Switch

Complete Test Assembly
For a bench test, a lamp was used as the igniter as pictured below. A short video of the operational launcher is exampled in the video.


The next post will feature the updated launcher circuit board and field testing.

Sunday, 22 October 2023

Model Rocket Launcher WiFi ESP8266 Part 2

Introduction 
This blog continues from Part 1 of the WiFi-controlled rocket launcher. In this short post, load testing was performed on the igniter's power supply and the output drivers.

WiFi Rocket Launcher Blank PCB

Power Supply
The DC-DC converter, Texas Instruments part LMR50410, was tested for switch ON voltage threshold and response. Since the converter powers an ESP module and output drivers for the igniter, the load current test was set for 300 mA.

Power Supply Portion of WiFi Rocket Launcher
Power Supply Portion of Rocket Launcher

An external power supply was connected to the launcher board. The voltage was increased in increments of 100 mV until the converter activated. For this board, the threshold was 4.1 V. The output switch ON waveform is shown below.

Rocket Launcher Power Supply Supply Turn ON

A resistive load resulting in 330 mA was connected to the 3.3 V supply for testing. The output voltage dropped from 3.3 V to 3.28 V when the load was connected.

Rocket Launcher Power Supply Supply Transient Response

The transient response for the power supply was measured for a 50 % load change. Captured in the image above is the response showing a recovery time of less than 200 ns for the supply voltage to settle back to 50 mV.

Output Drivers
The output driver circuit design had been established from the previous version of the launcher circuit board, which meant the operation was already known.

Rocket Launcher Output Driver Load Testing

To test the output drivers on this board, a 5 Ω resistive load was used. The two output drivers were powered with 12 V to simulate the primary power source. Using the 3.3 V from the converter, the two drivers were activated.
V(supply) = 11.92 at drivers no load, V(supply) reduced 11.79 V with approximately 2.3 A load current because of cable losses.

Measurements were taken with 2.3 A of load current
V(load) = 11.19 V
V(diode) = 401 mV
V(high side driver) = 102 mV
V(low end driver) = 124 mV

In par
t 3, the code for the rocket launcher will be started in Arduino IDE.

Thursday, 6 October 2022

EPEVER WiFi RS485 Adaptor Default IP Address from CLI

Summary
This blog briefly describes the new processor used on the EPEVER WiFi 2.4 GHz to RJ45 Adaptor (Ver 4.0) hardware. The command line interface (CLI) provided by the WiFi adaptor is also described. This interface was used to confirm the default IP address of the unit in AP (Access Point) mode was 192.168.169.2

EPEVER WiFi RS485 Adaptor (V4)

WiFi Hardware

The latest version of the EPEVER WiFi Adaptor hardware with the black plastic enclosure uses a Winner Micro W600-B800 System on Chip (Soc). Also contained on the circuit board is the serial flash required by the SoC, RS485 driver, switch mode supply and associated passive components.

Interface to SoC
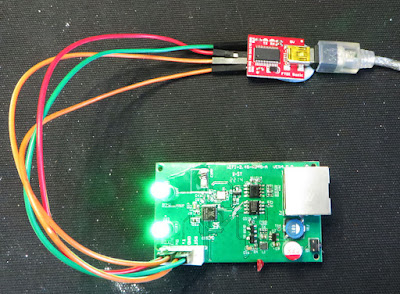
A SparkFun FTDI Basic adaptor was configured for 3.3 V and then connected to the 5-way header on the WiFi circuit board. The other side of the USB to TTL converter was connected to a PC.

EPEVER to USB Converter

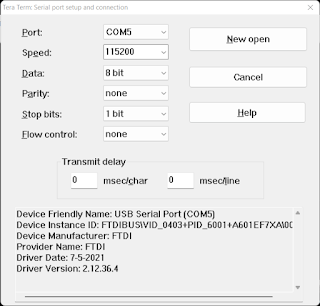
After reviewing the SoC datasheet, serial port settings of 115200, 8, N, 1 were used with a terminal program. The capture below shows the port settings for Tera Term.

Tera Term Communications Settings for EPEVER Debug

WiFi Adaptor Output Log
The output log from the WiFi adaptor SoC shows that the RT-Thread RTOS is used. There is a plethora of reading material on the RT-Thread website including the
tools required for interfacing with the SoC. These software packages were not verified in this post.

In the log shown below, the default IP address of the WiFi adaptor is listed as 192.168.169.2 with a port of 65010 for communincations to the RS485 port.

[SFUD]Warning: Read SFDP parameter header information failed. The norflash is not support JEDEC SFDP.
[SFUD]Warning: This flash device is not found or not support.
[SFUD]Warning: Read SFDP parameter header information failed. The norflash is not support JEDEC SFDP.
[SFUD]Warning: This flash device is not found or not support.
[SFUD]Error: norflash flash device is initialize fail.
[I/FAL] RT-Thread Flash Abstraction Layer (V0.4.0) initialize success.
[E/OTA] (ota_main:41) download partition is not exist, please check your configuration!
[D/OTA] (ota_main:105) jump to APP!
redirect_addr:8010100, stk_addr:20005888, len:851968

 \ | /
- RT -     Thread Operating System
 / | \     4.0.2 build Feb 25 2022
 2006 - 2019 Copyright by rt-thread team
lwIP-2.0.2 initialized!
ERROR: SPI device fl_spi not found!
[I/sal.skt] Socket Abstraction Layer initialize success.
[D/FAL] (fal_flash_init:61) Flash device |w60x_onchip | addr: 0x08000000 | len: 0x00100000 | blk_size: 0x00001000 |initialized finish.
ERROR: Flash device w25q128 not found!
[D/FAL] (fal_flash_init:61) Flash device |norflash | addr: 0x00000000 | len: 0x00000000 | blk_size: 0x00000000 |initialized finish.
[D/FAL] (fal_partition_init:176) Find the partition table on 'w60x_onchip' offse                                     t @0x0000ff88.
[I/FAL] ==================== FAL partition table ====================
[I/FAL] | name       | flash_dev   |   offset   |    length  |
[I/FAL] -------------------------------------------------------------
[I/FAL] | app        | w60x_onchip | 0x00010100 | 0x000d0000 |
[I/FAL] | easyflash  | w60x_onchip | 0x000e0100 | 0x00004000 |
[I/FAL] | filesystem | w60x_onchip | 0x000e4100 | 0x00019000 |
[I/FAL] =============================================================
[I/FAL] RT-Thread Flash Abstraction Layer (V0.3.0) initialize success.
[Flash] (packages\EasyFlash-v3.3.0\src\ef_env.c:152) ENV start address is 0x00000000, size is 8192 bytes.
[Flash] (packages\EasyFlash-v3.3.0\src\ef_env.c:821) Calculate ENV CRC32 number is 0xD6114A34.
[Flash] (packages\EasyFlash-v3.3.0\src\ef_env.c:833) Verify ENV CRC32 result is OK.
[Flash] (packages\EasyFlash-v3.3.0\src\ef_env.c:821) Calculate ENV CRC32 number is 0x78CA81B2.
[Flash] (packages\EasyFlash-v3.3.0\src\ef_env.c:833) Verify ENV CRC32 result is OK.
[Flash] EasyFlash V3.3.0 is initialize success.
[Flash] You can get the latest version on https://github.com/armink/EasyFlash .
<--------------------software: GT100WS142W600T------------------>
tls_fls_init() return 2
init MyFile obj is success.
enter InitHnjdClass() success.
ql_dev_init()=0

<-- lt_sock_para_1()  APP_NV_SYS=,ret=0. ID=00065689.MAC=202205111459122 -->
<--init0 hnjd paraments success  loraSize=0-->
Hnjd_GetImei(), imei:202205111459122;
<--init hnjd paraments success  loraSize=0-->
init gpio class success.
RT-Thread create eventUart2Recv successful
init serial class success.
init logs class success.
Hnjd_GetImei(), imei:202205111459122;
SecCount=-1,SendCount=0
COM<-- 89 D2 D4 D2 D2 D4 CF D3 D3 D3 D0 CF CB D3 D2 D2 00 D4 D4 D4 D4 D4 D4 23 1D A8 88
msh />gpio task running......
serial task2 running......
COM--> 89 D2 D4 D2 D2 D4 CF D3 D3 D3 D0 CF CB D3 D2 D2 00 D2 D4 D4 CC D4 D3 23 1D 9D 88
TEA success.
init system success.
[D/DFS] enter AP mode

[I/WLAN.dev] wlan init success
[I/WLAN.lwip] eth device init ok name:w0
[I/WLAN.mgnt] start ap successs!
[D/DFS] rt_wlan_start_ap(HN_65689,12345678) return RT_EOK.

[D/DFS] main() enter UserMain()

enter InitSockClass()
exit InitSockClass()
[DHCP] dhcpd_start: w0
[DHCP] ip_start: [192.168.169.2]
[DHCP] ip_start: [192.168.169.254]
enter lt_RtuTask()
local ip:0.0.0.0 port:65010

TCPServer Waiting for client on port 65010...
RT-Thread create eventSockSendRecv successful
serial init success. baud=115200,parity=8N1


Should anyone want to delve further, typing help in Tera Term indicated the menus displayed below.

RT-Thread shell commands:
setenv           - Set an envrionment variable.
printenv         - Print all envrionment variables.
saveenv          - Save all envrionment variables to flash.
getvalue         - Get an envrionment variable by name.
resetenv         - Reset all envrionment variable to default.
fal              - FAL (Flash Abstraction Layer) operate.
ntp_sync         - Update time by NTP(Network Time Protocol): ntp_sync [host_name]
list_fd          - list file descriptor
date             - get date and time or set [year month day hour min sec]
sf               - SPI Flash operate.
wifi             - wifi command.
version          - show RT-Thread version information
list_thread      - list thread
list_sem         - list semaphore in system
list_event       - list event in system
list_mutex       - list mutex in system
list_mailbox     - list mail box in system
list_msgqueue    - list message queue in system
list_memheap     - list memory heap in system
list_mempool     - list memory pool in system
list_timer       - list timer in system
list_device      - list device in system
help             - RT-Thread shell help.
ls               - List information about the FILEs.
cp               - Copy SOURCE to DEST.
mv               - Rename SOURCE to DEST.
cat              - Concatenate FILE(s)
rm               - Remove(unlink) the FILE(s).
cd               - Change the shell working directory.
pwd              - Print the name of the current working directory.
mkdir            - Create the DIRECTORY.
mkfs             - format disk with file system
df               - disk free
echo             - echo string to file
ps               - List threads in the system.
time             - Execute command with time.
free             - Show the memory usage in the system.
ifconfig         - list the information of all network interfaces
ping             - ping network host
dns              - list and set the information of dns
netstat          - list the information of TCP / IP
smartconfig_demo - smartconfig demo
reboot           - Reboot System

msh />


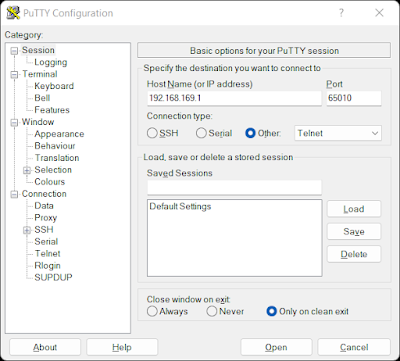
To verify the WiFi adaptor was operating, a computer with a suitably configured WiFi IP address was tested with Putty.

Putty Communications Settings for EPEVER Testing

With the Tera Term debug connection to the WiFi adaptor active, a connection using Putty was established. The packet highlighted in the capture below was received by the WiFi adaptor and appeared consistent with a connection from Putty.

[I/WLAN.mgnt] sta associated mac:bc:09:1b:eb:06:3b
I got a connection from (192.168.169.2 , 51147)
COM<-- FF FB 1F FF FB 20 FF FB 18 FF FB 27 FF FD 01 FF FB 03 FF FD 03


Final Thoughts
The test mentioned in this blog using Putty confirmed that the EPEVER WiFi adaptor worked. A separate test with an Android phone (point-to-point), not mentioned in this blog, did not show the same behaviour.

The access point connection with point-to-point or cloud is not a preferred solution. The WiFi adaptor firmware could likely be reconfigured to operate in station mode. Whether EPEVER is required to rebuild the source, or this option is already provided in the CLI remains to be determined. Station mode is supported by RT-Thread as indicated in the capture below.


[*] Using Wi-Fi framework                /* Using Wi-Fi framework */
(wlan0) The WiFi device name for station /* The default name for station */
(wlan1) The WiFi device name for ap      /* The default name for ap */
(lwip) Default transport protocol        /* Default protocol */
(10000) Set scan timeout time(ms)        /* Scan timeout time */
(10000) Set connect timeout time(ms)     /* Connect timeout time */
(32)  SSID name maximum length           /* Maximum length of SSID name */
(32)  Maximum password length            /* Maximum length of password */
[*]   Automatic sorting of scan results  /* Automatic sorting of scan results */
(3)   Maximum number of WiFi information automatically saved /* Maximum number of WiFi information automatically saved */
(wlan_job) WiFi work queue thread name   /* WiFi work queue thread name */
(2048) wifi work queue thread size       /* wifi work queue thread size */
(22)  WiFi work queue thread priority    /* WiFi work queue thread priority */
(2)   Maximum number of driver events    /* Maximum number of driver events in dev layer */
[ ]   Forced use of PBUF transmission    /* Forced use of PBUF transmission */
[ ]   Enable WLAN Debugging Options      /* Enable WLAN Debugging Options */