In a previous post, command line scripting was used to increment the build number for a PSoC Creator Project. The option to use command line 'cscript.exe' remains supported in Windows 10 although other scripting systems have made significant ingress into the corners of build scripts. This blog illustrates a quick alternative by using trusty PowerShell.
Why PowerShell
Why PowerShell
In companies where software deployment on desktop machines is not micromanaged, PowerShell can be a useful tools for scripting. Certainly Perl, Ruby, JavaScript or similar languages should not be excluded by IT support or software developers. PowerShell is offered for scripting with PSoC Creator as it is been available from Microsoft since 2006 and therefore available on the Windows operating system.
This blog will look only at Windows machines with PSoC Creator and not attempt to review the impact of scripts with virtual machines.
Example Scripts
This blog will look only at Windows machines with PSoC Creator and not attempt to review the impact of scripts with virtual machines.
Example Scripts
The two scripts detailed in the sections below perform the action of copying a 'hex' file to a release directory in a parent folder. For the purposes of illustration the HelloWorld_Blinky program was used from the PSoC Creator examples.
Cscript
The example script below uses the File System Object with a few methods to copy the output file to another folder. If the release folder does not exist then it is first created.
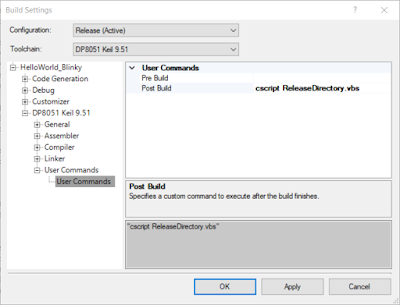
The script ReleaseDirectory.vbs is copied to the PSoC projects directory HelloWorld_Blinky.cydsn. A modification is made in the PSoC Creator project to the Build Settings under the Project menu. For this example the call, cscript ReleaseDirectory.vbs is placed in the post build section.
After the change above to the build settings the Hello World project is built resulting in the output below.
The Output window shown above details the creation of the folder and completion of the file copy.
PowerShell
The example script below uses PowerShell commands to achieve the same functionality as the above Cscript. As this is for illustrative purposes only the operation of the two scripts may not be exact.
Similar to the previous example, the script ReleaseDirectory.ps1 is copied to the PSoC projects directory HelloWorld_Blinky.cydsn. In addition to calling the PowerShell script a parameter is passed to bypass the execution policy, PowerShell -executionpolicy bypass -File ReleaseDirectory.ps1
For this example the call is again placed in the post build section.
After the change above to the build settings the Hello World project is built resulting in the output below.
 |
| PSoC Creator Hello World Blinky Example |
Cscript
The example script below uses the File System Object with a few methods to copy the output file to another folder. If the release folder does not exist then it is first created.
REM Release Directory Example for PSoC Creator

REM Setup file system access
Set fso = CreateObject("Scripting.FileSystemObject")

REM Setup operating parameters
ProjectMainFolder=fso.GetAbsolutePathName(".")
ReleaseMainFolder=fso.GetParentFolderName(ProjectMainFolder)
ReleasePath = ReleaseMainFolder & "\Release\"
SourceFile = ProjectMainFolder & "\DP8051_Keil_951\Release\*.hex"

Sub Create_Folder(intReleasePath)
 If fso.FolderExists(ReleasePath) Then
  WScript.Echo ("Folder exists...skipping")
 Else
  fso.CreateFolder(ReleasePath)
  WScript.Echo ("Folder created")
 End If
End Sub

Sub Copy_File(intReleasePath)
 fso.CopyFile SourceFile,intReleasePath
End Sub

REM Duplicating required files
WScript.Echo ("Duplicating files at:" & ReleasePath &vbCrLf)
Create_Folder(ReleasePath)
Copy_File(ReleasePath)
WScript.Echo ("Completed")
The script ReleaseDirectory.vbs is copied to the PSoC projects directory HelloWorld_Blinky.cydsn. A modification is made in the PSoC Creator project to the Build Settings under the Project menu. For this example the call, cscript ReleaseDirectory.vbs is placed in the post build section.
 |
| PSoC Creator Post Build Cscript |
 |
| PSoC Creator Post Build Cscript in Output Window |
The Output window shown above details the creation of the folder and completion of the file copy.
PowerShell
The example script below uses PowerShell commands to achieve the same functionality as the above Cscript. As this is for illustrative purposes only the operation of the two scripts may not be exact.
' Release Directory Example for PSoC Creator '

' Setup operating parameters '
$ProjectMainFolder=(Get-Item -Path ".\").FullName
$ReleaseMainFolder=(Get-Item -Path ".\").parent.FullName
$ReleasePath=$ReleaseMainFolder+’\Release\’
$SourceFile = $ProjectMainFolder+'\DP8051_Keil_951\Release\*.hex'

function Create_Folder($intReleasePath)
{
    if((Test-Path -Path $intReleasePath )){
        Write-Output "Folder exists...skipping";
    }

    if(!(Test-Path -Path $intReleasePath )){
        New-Item -ItemType directory -Path $intReleasePath
        Write-Output "Folder created";
    }
}


function Copy_File($intReleasePath)
{
 Copy-Item $SourceFile -Destination $intReleasePath
}

Write-Output "Duplicating files at:"
Write-Output $ReleasePath
Create_Folder($ReleasePath)
Copy_File($ReleasePath)
Similar to the previous example, the script ReleaseDirectory.ps1 is copied to the PSoC projects directory HelloWorld_Blinky.cydsn. In addition to calling the PowerShell script a parameter is passed to bypass the execution policy, PowerShell -executionpolicy bypass -File ReleaseDirectory.ps1
For this example the call is again placed in the post build section.
 |
| PSoC Creator Post Build Powershell |
After the change above to the build settings the Hello World project is built resulting in the output below.
 |
| PSoC Creator Post Build PowerShell in Output Window |
In the event that the policy to execute the PowerShell script was not allowed a security error message will be shown in the output window.
 |
| PSoC Creator Post Build PowerShell Error in Output Window |
The execution policy can be checked using PowerShell ISE and amended with due consideration for local machine security and safety.
 |
| PowerShell Execution Policy |
As a side note, some virus or firewall software may detect the invoked script as a potential threat, see the Comodo exception shown below. Exclusions should be made for these scripts only.
Downloads
The downloads available below use the PSoC Creator 4.2 with projects saved as a minimal archive.
 |
| Comodo HIPS Alert Script in PSoC Creator |
Downloads
The downloads available below use the PSoC Creator 4.2 with projects saved as a minimal archive.
 |
| Hello Blinky PSoC Creator 4.2 Project |
 |
| ReleaseDirectory.vbs |
 |
| ReleaseDirectory.ps1 |

No comments:
Post a Comment