Showing posts with label creator. Show all posts

Saturday, 14 March 2020

PSoC Creator gitignore update

Summary
This blog expands on listings shown in several posts which provide details for GIT ignore files for PSoC Creator. When using GIT with an IDE such as PSoC Creator, the .gitignore file defines which files are required for the project and which files can be ignored. Details regarding the use of the ignore feature is available in numerous places, Atlassion being one of them.

Examples shown in this blog cover PSoC 4 and PSoC 6 projects.

Existing Solutions
Below are the links to a few existing GIT ignore solutions for use with PSoC Creator and standard PSoC4 projects.

https://github.com/SorenHN/PSoC-gitignore/blob/master/.gitignore
https://github.com/github/gitignore/pull/2086/commits/7ffe05303d632f226d091f46079f1aa9cff933e9
https://git.2li.ch/various/gitignore/commit/5a355ed010640b689e06c589e38019bff81c9a15

Ignore File Additions
For Bootloadable PSoC 4/5 or PSoC6 projects, some additions were required to the existing ignore files.

# PSoC Creator 4.3
# Updated by  : GregL
# Dated   : 12/03/2020
# Details   : Place this ignore file together with cywrk or alter directories to match the required structure

# PSoC Creator Folders to ignore (PSoC4/5)
*Archive/
*Backup/
*codegentemp/
*CortexM0/
*CortexM3/
*Export/
*Generated_Source/

# PSoC Creator Folders to ignore (PSoC6)
*armgcc/
*CortexM0p/
*CortexM4/
*iar/
*mdk/

# PSoC Creator Non-Bootloadable project files to ignore (PSoC4/5)
*_timing.html
# Bootloadable project files to ignore
**.cydsn/*timing.html
*.svd
*.rpt
*.cyfit
*.cycdx
*.log
*.tmp
*.txt

# PSoC Creator Non-Bootloadable project files to ignore (PSoC6)
*.icf
*.ld
*.scat

# Option for .ctl files used in some PSoC Creator examples
#*.ctl

# Option for .pdf files supplied by some PSoC Creator examples or those specifically created from Creator
#*.pdf
#*_datasheet.pdf

# Optional PSoC Creator Files to ignore (Export to IDE feature)
*.mk
makefile

# PSoC Creator User Files to ignore
*.cyprj.*
*.cywrk.*

# For external editors such as NotePad+++
*.bak

As with many ignore files, some level of customisation is usually required to suit the project.
gitignore file
Testing Summary
To confirm the ignore file operation with PSoC Creator 4.3, three example projects were used from Code Examples in PSoC Creator. Two of the examples were PSoC 4 projects, one a standard application and the other a bootloader bootloadable application. The third test used a PSoC6 example.

Testing with SourceTree (PSoC4)
For a standard PSoC4 project the top folder in Windows may be similar to the example shown below.


Example PSoC4 Project Top Folder
Inside the project design folder are generated files and source folders. There are specific files required for PSoC Creator projects as detailed by Cypress.


Example PSoC4 Project Design Folder
Using the ignore file with PSoC4 project in SourceTree yields the result displayed below.


Example PSoC4 Project in SourceTree using gitignore
Testing with SourceTree (PSoC4 Bootloadable)
For a PSoC4 project with bootloader and bootloadable application, the top folder in Windows may be similar to the example shown below.


Example PSoC4 Bootloader Project Top Folder
Inside the project Bootloader design folder are generated files and source folders.


Example PSoC4 Project Bootloader Design Folder
This is the same for the Bootloadable design folder.


Example PSoC4 Project Bootloadable Design Folder
Using the ignore file with PSoC4 project in SourceTree yields the result displayed below.


Example PSoC4 Bootloader Project in SourceTree using gitignore
Testing with SourceTree (PSoC6)
For a standard PSoC6 project the top folder in Windows may be similar to the example shown below.


Example PSoC6 Project Top Folder
Inside the project design folder are generated files and source folders.


Example PSoC6 Project Design Folder
Using the ignore file mentioned in the previous section with PSoC6 project in SourceTree yields the result displayed below.


Example PSoC6 Project in SourceTree using gitignore
Final Thoughts
Using an ignore file with version control software such as GIT can ensure that only pertinent files to build a project are retained. The ignore file configuration however should be reviewed when projects change and if a new release of the associated IDE software replaces a prior release.

The ignore file provided in this blog for GIT projects is therefore always a work in progress!

Saturday, 26 January 2019

Scripts with PSoC Creator (Powershell)

Summary
In a previous post, command line scripting was used to increment the build number for a PSoC Creator Project. The option to use command line 'cscript.exe' remains supported in Windows 10 although other scripting systems have made significant ingress into the corners of build scripts. This blog illustrates a quick alternative by using trusty PowerShell.

Why PowerShell
In companies where software deployment on desktop machines is not micromanaged, PowerShell can be a useful tools for scripting. Certainly Perl, Ruby, JavaScript or similar languages should not be excluded by IT support or software developers. PowerShell is offered for scripting with PSoC Creator as it is been available from Microsoft since 2006 and therefore available on the Windows operating system.

This blog will look only at Windows machines with PSoC Creator and not attempt to review the impact of scripts with virtual machines.

Example Scripts
The two scripts detailed in the sections below perform the action of copying a 'hex' file to a release directory in a parent folder. For the purposes of illustration the HelloWorld_Blinky program was used from the PSoC Creator examples.


PSoC Creator Hello World Blinky Example

Cscript

The example script below uses the File System Object with a few methods to copy the output file to another folder. If the release folder does not exist then it is first created. 

REM Release Directory Example for PSoC Creator

REM Setup file system access
Set fso = CreateObject("Scripting.FileSystemObject")

REM Setup operating parameters
ProjectMainFolder=fso.GetAbsolutePathName(".")
ReleaseMainFolder=fso.GetParentFolderName(ProjectMainFolder)
ReleasePath = ReleaseMainFolder & "\Release\"
SourceFile = ProjectMainFolder & "\DP8051_Keil_951\Release\*.hex"

Sub Create_Folder(intReleasePath)
 If fso.FolderExists(ReleasePath) Then
  WScript.Echo ("Folder exists...skipping")
 Else
  fso.CreateFolder(ReleasePath) 
  WScript.Echo ("Folder created")
 End If
End Sub

Sub Copy_File(intReleasePath)
 fso.CopyFile SourceFile,intReleasePath
End Sub

REM Duplicating required files
WScript.Echo ("Duplicating files at:" & ReleasePath &vbCrLf)
Create_Folder(ReleasePath)
Copy_File(ReleasePath)
WScript.Echo ("Completed")

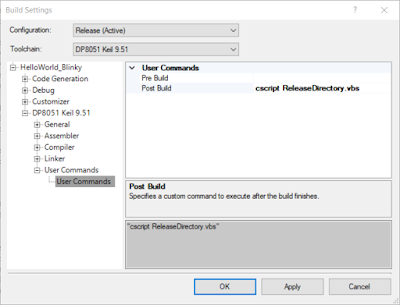
The script ReleaseDirectory.vbs is copied to the PSoC projects directory HelloWorld_Blinky.cydsn. A modification is made in the PSoC Creator project to the Build Settings under the Project menu. For this example the call, cscript ReleaseDirectory.vbs is placed in the post build section.


PSoC Creator Post Build Cscript
After the change above to the build settings the Hello World project is built resulting in the output below.


PSoC Creator Post Build Cscript in Output Window

The Output window shown above details the creation of the folder and completion of the file copy.

PowerShell
The example script below uses PowerShell commands to achieve the same functionality as the above Cscript. As this is for illustrative purposes only the operation of the two scripts may not be exact.

' Release Directory Example for PSoC Creator '

' Setup operating parameters '
$ProjectMainFolder=(Get-Item -Path ".\").FullName
$ReleaseMainFolder=(Get-Item -Path ".\").parent.FullName
$ReleasePath=$ReleaseMainFolder+’\Release\’
$SourceFile = $ProjectMainFolder+'\DP8051_Keil_951\Release\*.hex'

function Create_Folder($intReleasePath)
{
    if((Test-Path -Path $intReleasePath )){
        Write-Output "Folder exists...skipping";
    }

    if(!(Test-Path -Path $intReleasePath )){
        New-Item -ItemType directory -Path $intReleasePath
        Write-Output "Folder created";
    }
}


function Copy_File($intReleasePath)
{
 Copy-Item $SourceFile -Destination $intReleasePath
}

Write-Output "Duplicating files at:"
Write-Output $ReleasePath
Create_Folder($ReleasePath)
Copy_File($ReleasePath)

Similar to the previous example, the script ReleaseDirectory.ps1 is copied to the PSoC projects directory HelloWorld_Blinky.cydsn. In addition to calling the PowerShell script a parameter is passed to bypass the execution policy, PowerShell -executionpolicy bypass -File ReleaseDirectory.ps1

For this example the call is again placed in the post build section.


PSoC Creator Post Build Powershell

After the change above to the build settings the Hello World project is built resulting in the output below.

PSoC Creator Post Build PowerShell in Output Window
In the event that the policy to execute the PowerShell script was not allowed a security error message will be shown in the output window.

PSoC Creator Post Build PowerShell Error in Output Window
The execution policy can be checked using PowerShell ISE and amended with due consideration for local machine security and safety.

PowerShell Execution Policy
As a side note, some virus or firewall software may detect the invoked script as a potential threat, see the Comodo exception shown below. Exclusions should be made for these scripts only.


Comodo HIPS Alert Script in PSoC Creator

Downloads
The downloads available below use the PSoC Creator 4.2 with projects saved as a minimal archive.


Hello Blinky PSoC Creator 4.2 Project
ReleaseDirectory.vbs
ReleaseDirectory.ps1


Wednesday, 11 April 2018

Build Number for PSoC Creator Projects - Post Build

Summary
Recently during development of a PSoC based project there was a requirement to use an automatic incrementing build number. This blog provides an example project with incrementing build number using command line scripting.

The use of a build number may be considered trivial by some and certainly with the use of revision control software such as Veracity, SourceGear's Vault or Fossil this is most likely the case. There are however situations where applying revision control consumes more time and resources than necessary. Providing a programming file, which can be identifiable, can remain a suitable solution for a software developer.

Test Hardware
In order to test the incrementing build number using PSoC Creator, hardware was not compulsory. For demonstration an example project was based around the Cypress PSoC development kit CY8CKIT-042.

CY8CKIT-042
CY8CKIT-042 - Courtesy Cypress Semiconductor

Script
While searching online for a suitable script, I came across a thread on Stack Overflow from user ansgar-wiechers. The example script he listed, which can be seen on StackOverflow, served as a basis for the PSoC Creator script.

So what does this script do.... firstly it looks for a file called buildnumber.h in the PSoC Creator project path. Next, the contents of the header file is searched until the string BuildNumber= is found. Then the integer following the equals sign is incremented by one. The original file, with an updated build number, is then saved back to the original buildnumber.h file.

As can be seen in the script below, there are no checks, no limits, so programmer beware!

Set fso = CreateObject("Scripting.FileSystemObject")

Set re  = New RegExp

re.Global = True


Function IncMaint(m, g1, g2, pos, src)

  IncMaint = g1 & (CInt(g2)+1)

End Function


ProjectMainFolder=fso.GetAbsolutePathName(".")

WScript.Echo ("Build number: Incrementing the build number located at:" & ProjectMainFolder)

rcfile = ProjectMainFolder & "\buildnumber.h"

WScript.Echo(rcfile)

rctext = fso.OpenTextFile(rcfile).ReadAll

re.Pattern = "((?:BuildNumber) )(\d+)"

rctext = re.Replace(rctext, GetRef("IncMaint"))

re.Pattern = "((?:BuildNumber)= )(\d+)"

rctext = re.Replace(rctext, GetRef("IncMaint"))

fso.OpenTextFile(rcfile, 2).Write rctext

Build Number Header File
In the file containing the build number the project major and minor revisions were also included.

/****************************************************************************
* buildnumber.h
*
* Example header file to show usage of BuildNumber keyword and equals signal
*
* The text BuildNumber= can be anywhere in this file
*
*****************************************************************************/
#include "project.h"
const uint8_t MajorRev= 1;
const uint8_t MinorRev= 1;
const uint8_t BuildNumber= 1;

PSoC Creator - Post Build Command
A call is made to the external VBS file under the PSoC Creator menu, Project, Build Settings using User Commands. It should be noted that for the example shown the script was contained in its own folder Scripts and not attached to the PSoC Creator project.


PSoC Creator Post Build Script - Increment Build Number
Shown in the capture below is the the Post Build command to call the VBScriptcscript ${ProjectDir}\Scripts\buildnumber.vbs


PSoC Creator Post Build CScript Call
For this example project the Post Build was used. Depending on the requirement Pre Build may be needed.

PSoC - Build Number Usage
For the PSoC Creator project, the header file containing the build number is accessed in the usual manner using #include "buildnumber.h". For the example project the include was in main.c and the revision and build numbers were written to the serial port.

/****************************************************************************
* Build Number Example
*
* Uses a Visual Basic Script to find an increment 
* the integer associated with the variable BuildNumber

* The script is called as a post-compiler command in
* the Project -> Build Settings menu
*
* Code implementation is a skeleton to illustrate usage of the script, error checking should be implemented

* Credit to https://stackoverflow.com/users/1630171/ansgar-wiechers
* for ideas on the implementaion as mentioned on the following
* blog https://stackoverflow.com/questions/19891195/how-to-increment-values-in-resourse-file-by-using-vbscript
*
******************************************************/

#include "project.h"
#include "stdio.h"
#include "buildnumber.h"
char Version_Char[8];
int main(void)
{
    CyGlobalIntEnable; /* Enable global interrupts. */
    UART_Start();
    sprintf(Version_Char, "Version %d.%02d build %03d\r\n", MajorRev, MinorRev, BuildNumber);
    UART_UartPutString(Version_Char);
    for(;;)
    {
    }
/* [] END OF FILE */

Compiling PSoC Creator
When compiling a project, with the script below added to the Post Build command, a message is echoed from the script to indicate that the Build Number is being incremented.

cscript .\Scripts\buildnumber.vbs
Microsoft (R) Windows Script Host Version 5.812
Copyright (C) Microsoft Corporation. All rights reserved.
Build number: Incrementing just the build located at:C:\...\UART_Example\UART_BuildNumber.cyds

UART Debug
Compiling the example project under PSoC Creator with the major, minor, build number set to 1.1.0, then programming the PSoC development board yields the screen capture below from TeraTerm.


Auto Incrementing Build Number Tera Term Debug
Compiling the project again and programming the development board yields the capture below showing the increment in build number.


Auto Incrementing Build Number Tera Term Debug

Example PSoC Creator Project
The example PSoC Creator 4.1 project and VBScript are available to download below. For comments or bugs leave a comment below, enjoy!


Increment Build Number Example Application PSoC Creator 4.1


Increment Build Number Example VB Script
Increment Build Number Example Script

Saturday, 13 May 2017

DS18B20 OneWire for CY8CKIT-049 PSoC

Summary
This blog utilizes a OneWire component supplied on the Cypress Forums written by Evg Pavlov to work with a Cypress CY8CKIT-049 prototyping board. The original library can be seen on Pavlov's site here. See this Cypress Thread for full details on the OneWire component and project with the Cypress Pioneer prototyping board.

Some minor changes and additions were made to the original Pioneer project. One of the changes allows the PSoC on the 049 to be returned to the bootloader mode using SW1 together with a count down timer.

OneWire Temperature Sensor (DS18B20)
The DS18B20 is a digital thermometer which communicates over a single wire bus to a micro. For this project there are the two additional wires to power the sensor. It shall be noted that OneWire devices can usually be parasitically powered meaning there are also two wire solutions being the communications / power and 0VDC power supply.

For testing of the 049 workspace the Adafruit probe MPN#381 containing the DS18B20 was used.


DS18B20 Temperature Probe
Cypress Forum Project
One of the projects in the forum was targeted at the CY8CKIT-042 prototyping board termed the Pioneer Kit. The PSoC on the Pioneer is a CY8C4245AXI-483. This project contained the all important OneWire example component with other components such as an LCD. The additional components from the original project could have been disabled in the schematics instead a new workspace was created for the Cypress CY8CKIT-049 prototyping board.

CY8CKIT-049 - Courtesy Cypress Semiconductor
CY8CKIT-049 Project
After creating a new workspace in PSoC Creator, the OneWire component was imported from the 042 Pioneer project by selecting the Components tab in PSoC Creator, clicking the Project name and right clicking to show Import Components. The component was then located in the original project and imported.


PSoC OneWire Component

A Timer component was added to the project to service the data collected from the OneWire bus, as implemented in the previous design.


Timer for Data Reporting

For the 049 board it was necessary to add a bootloadable component to the project. The dependency for this bootloadable component was located in the 049 compressed Kit Setup files supplied by Cypress. For completeness the bootloader was added to the new project.


Bootloadable with UART

Lastly the Cypress suggested solution using the on-board switch SW1 to return the bootloadable project to the bootloader was implemented using a countdown timer. This is the relevant PSoC Creator 101 Tutorial. SW1 was also used to start the OneWire process after the 049 board had been powered by the USB, just to ensure no data was missed on power-up.


Bootloadable Reset Option
Project Software
Below is the listing for main.c from the project.


/*==============================================================================
 * Digital Thermometer demo project
 *
 * uses
 * DS18x4: MAXIM DS18B20 Digital Thermometer component (v 0.0)
 * Read temperature simultaneously from up to 8 DS18B20 sensors
 * 
 * 11/05/2017
 * Example project for CY8CKIT-049
 * Built with Creator 4.0
 * Includes timer to monitor SW1 - Resets PSoC after 2 sec, puts into bootloader
 * SW1 is also monitored to initiate the OneWire comms 
 *
 * 17/03/2018
 * Project rebuilt with updated component using Creator 4.1
 *
 * ===========================================================================================
 * PROVIDED AS-IS, NO WARRANTY OF ANY KIND, INCLUDING, BUT NOT LIMITED TO, THE
 * IMPLIED WARRANTIES OF MERCHANTABILITY AND FITNESS FOR A PARTICULAR PURPOSE.
 * FREE TO SHARE, USE AND MODIFY UNDER TERMS: CREATIVE COMMONS - SHARE ALIKE
 * ===========================================================================================
*/

#include <project.h>
//#include <stdio.h> //sprintf

/*
#if defined (__GNUC__)
    // Add an explicit reference to the floating point printf library
    // to allow the usage of floating point conversion specifiers.
    // This is not linked in by default with the newlib-nano library.
    asm (".global _printf_float");
#endif
*/

static volatile CYBIT flag_Timer = 0 ;

/* Function Prototypes */
void Initialize(void);
void ReportTemperature (void);          /* convert temperature code to deg C and send to UART */

//==============================================================================
// Timer Interrupt
//==============================================================================
CY_ISR(isr_Timer)                       /* ISR Timer to report temperature at regular intervals */
{
    flag_Timer = 1;
    isr_Timer_ClearPending();
}

//==============================================================================
// Reset PSoC Interrupt
//==============================================================================
CY_ISR (isr_Reset_Butn)                 /* Made it here then call a sw Reset */
{
    Bootloadable_Load();
}

//==============================================================================
// Init PSoC 
//==============================================================================
void Initialize(void)
{
    UART_Start();                       /* UART start */
    UART_UartPutString("Temperature sensor Maxim DS18B20:\r\n");
    OneWire_Start();                    /* OneWire start */
    Timer_1_Start();                    /* Reset button timer start */
    isr_Reset_StartEx(isr_Reset_Butn);  /* Attach handler */
    Timer_2_Start();                    /* Clock report timer start */
    isr_Timer_StartEx(isr_Timer);       /* Attach handler */  
}

//==============================================================================
// Convert temperature code to degC and 
// Send result to Terminal using UART
//==============================================================================
void ReportTemperature(void) 
{
    char strMsg[80]={0};                /* output UART buffer */
    char buf[8];                        /* temp buffer */
    static uint32 counter = 0;          /* sample counter */
    float res;
    counter++; 
   
/*
    //example using GetTemperatureAsFloat() function
    sprintf(strMsg,"%lu\t %.2f\t %.2f\t %.2f\t %.2f\t %.2f\t %.2f\t %.2f\t %.2f\r\n", 
                        counter,
                        OneWire_GetTemperatureAsFloat(0),   
                        OneWire_GetTemperatureAsFloat(1),
                        OneWire_GetTemperatureAsFloat(2),
                        OneWire_GetTemperatureAsFloat(3)    
                        OneWire_GetTemperatureAsFloat(4),   
                        OneWire_GetTemperatureAsFloat(4),
                        OneWire_GetTemperatureAsFloat(6),
                        OneWire_GetTemperatureAsFloat(7)    //25675 ticks
            );
*/
             
    strcat(strMsg, itoa10(counter, buf)); strcat(strMsg, "\t");
    strcat(strMsg, OneWire_GetTemperatureAsString(0)); strcat(strMsg, "\t");
    strcat(strMsg, OneWire_GetTemperatureAsString(1)); strcat(strMsg, "\t");
    strcat(strMsg, OneWire_GetTemperatureAsString(2)); strcat(strMsg, "\t");
    strcat(strMsg, OneWire_GetTemperatureAsString(3)); strcat(strMsg, "\t"); 
    strcat(strMsg, OneWire_GetTemperatureAsString(4)); strcat(strMsg, "\t");
    strcat(strMsg, OneWire_GetTemperatureAsString(5)); strcat(strMsg, "\t");
    strcat(strMsg, OneWire_GetTemperatureAsString(6)); strcat(strMsg, "\t");
    strcat(strMsg, OneWire_GetTemperatureAsString(7)); strcat(strMsg, "\r\n"); //1910 ticks
    UART_UartPutString(strMsg);
    
}

//==============================================================================
// Main
//==============================================================================
int main()
{
 uint8_t i;
 char c;
    
 CyGlobalIntEnable;                  /* Enable global interrupts */ 
 while(SW1_Read());                  /* Wait for button press to continue (gives you time to switch to a terminal window) */
    Initialize();
    
    flag_Timer = 1;                     /* force first measument instantly */
    
    for(;;) 
    {     
        if(flag_Timer)                  /* read DS18B20 on timer, intervals >1sec */
     {   
            flag_Timer = 0;
            OneWire_SendTemperatureRequest();                                       
        }
        
        if (OneWire_DataReady)          /* DS18 completed temperature measurement - begin read data */
     {   
            OneWire_ReadTemperature();
            ReportTemperature();
        }    
        
    }  
}


/* [] END OF FILE */

Project Hardware
Shown below is the demonstration project with the temperature sensor connected. Physical connections are detailed in the PSoC Creator project.


CY8CKIT-049 with DS18B20 Sensor
The output in TeraTerm is shown below.

Term Term Output
Term Term Output
PSoC Creator Project
An updated build for PSoC Creator 4.1 using new components is available below for download.


DS18x8_demo_CY8CKIT-049-42XX.Bundle01

For legacy below is the PSoC Creator 4.0 Bundle.

DS18x8_demo_CY8CKIT-049-42XX.Bundle00.zip


Project References
Many thanks (Спасибо) once again to Pavlov for the OneWire component!