Showing posts with label script. Show all posts

Saturday, 26 January 2019

Scripts with PSoC Creator (Powershell)

Summary
In a previous post, command line scripting was used to increment the build number for a PSoC Creator Project. The option to use command line 'cscript.exe' remains supported in Windows 10 although other scripting systems have made significant ingress into the corners of build scripts. This blog illustrates a quick alternative by using trusty PowerShell.

Why PowerShell
In companies where software deployment on desktop machines is not micromanaged, PowerShell can be a useful tools for scripting. Certainly Perl, Ruby, JavaScript or similar languages should not be excluded by IT support or software developers. PowerShell is offered for scripting with PSoC Creator as it is been available from Microsoft since 2006 and therefore available on the Windows operating system.

This blog will look only at Windows machines with PSoC Creator and not attempt to review the impact of scripts with virtual machines.

Example Scripts
The two scripts detailed in the sections below perform the action of copying a 'hex' file to a release directory in a parent folder. For the purposes of illustration the HelloWorld_Blinky program was used from the PSoC Creator examples.


PSoC Creator Hello World Blinky Example

Cscript

The example script below uses the File System Object with a few methods to copy the output file to another folder. If the release folder does not exist then it is first created. 

REM Release Directory Example for PSoC Creator

REM Setup file system access
Set fso = CreateObject("Scripting.FileSystemObject")

REM Setup operating parameters
ProjectMainFolder=fso.GetAbsolutePathName(".")
ReleaseMainFolder=fso.GetParentFolderName(ProjectMainFolder)
ReleasePath = ReleaseMainFolder & "\Release\"
SourceFile = ProjectMainFolder & "\DP8051_Keil_951\Release\*.hex"

Sub Create_Folder(intReleasePath)
 If fso.FolderExists(ReleasePath) Then
  WScript.Echo ("Folder exists...skipping")
 Else
  fso.CreateFolder(ReleasePath) 
  WScript.Echo ("Folder created")
 End If
End Sub

Sub Copy_File(intReleasePath)
 fso.CopyFile SourceFile,intReleasePath
End Sub

REM Duplicating required files
WScript.Echo ("Duplicating files at:" & ReleasePath &vbCrLf)
Create_Folder(ReleasePath)
Copy_File(ReleasePath)
WScript.Echo ("Completed")

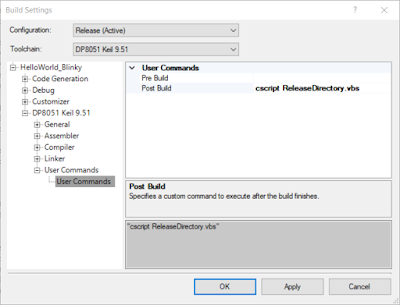
The script ReleaseDirectory.vbs is copied to the PSoC projects directory HelloWorld_Blinky.cydsn. A modification is made in the PSoC Creator project to the Build Settings under the Project menu. For this example the call, cscript ReleaseDirectory.vbs is placed in the post build section.


PSoC Creator Post Build Cscript
After the change above to the build settings the Hello World project is built resulting in the output below.


PSoC Creator Post Build Cscript in Output Window

The Output window shown above details the creation of the folder and completion of the file copy.

PowerShell
The example script below uses PowerShell commands to achieve the same functionality as the above Cscript. As this is for illustrative purposes only the operation of the two scripts may not be exact.

' Release Directory Example for PSoC Creator '

' Setup operating parameters '
$ProjectMainFolder=(Get-Item -Path ".\").FullName
$ReleaseMainFolder=(Get-Item -Path ".\").parent.FullName
$ReleasePath=$ReleaseMainFolder+’\Release\’
$SourceFile = $ProjectMainFolder+'\DP8051_Keil_951\Release\*.hex'

function Create_Folder($intReleasePath)
{
    if((Test-Path -Path $intReleasePath )){
        Write-Output "Folder exists...skipping";
    }

    if(!(Test-Path -Path $intReleasePath )){
        New-Item -ItemType directory -Path $intReleasePath
        Write-Output "Folder created";
    }
}


function Copy_File($intReleasePath)
{
 Copy-Item $SourceFile -Destination $intReleasePath
}

Write-Output "Duplicating files at:"
Write-Output $ReleasePath
Create_Folder($ReleasePath)
Copy_File($ReleasePath)

Similar to the previous example, the script ReleaseDirectory.ps1 is copied to the PSoC projects directory HelloWorld_Blinky.cydsn. In addition to calling the PowerShell script a parameter is passed to bypass the execution policy, PowerShell -executionpolicy bypass -File ReleaseDirectory.ps1

For this example the call is again placed in the post build section.


PSoC Creator Post Build Powershell

After the change above to the build settings the Hello World project is built resulting in the output below.

PSoC Creator Post Build PowerShell in Output Window
In the event that the policy to execute the PowerShell script was not allowed a security error message will be shown in the output window.

PSoC Creator Post Build PowerShell Error in Output Window
The execution policy can be checked using PowerShell ISE and amended with due consideration for local machine security and safety.

PowerShell Execution Policy
As a side note, some virus or firewall software may detect the invoked script as a potential threat, see the Comodo exception shown below. Exclusions should be made for these scripts only.


Comodo HIPS Alert Script in PSoC Creator

Downloads
The downloads available below use the PSoC Creator 4.2 with projects saved as a minimal archive.


Hello Blinky PSoC Creator 4.2 Project
ReleaseDirectory.vbs
ReleaseDirectory.ps1


Wednesday, 11 April 2018

Build Number for PSoC Creator Projects - Post Build

Summary
Recently during development of a PSoC based project there was a requirement to use an automatic incrementing build number. This blog provides an example project with incrementing build number using command line scripting.

The use of a build number may be considered trivial by some and certainly with the use of revision control software such as Veracity, SourceGear's Vault or Fossil this is most likely the case. There are however situations where applying revision control consumes more time and resources than necessary. Providing a programming file, which can be identifiable, can remain a suitable solution for a software developer.

Test Hardware
In order to test the incrementing build number using PSoC Creator, hardware was not compulsory. For demonstration an example project was based around the Cypress PSoC development kit CY8CKIT-042.

CY8CKIT-042
CY8CKIT-042 - Courtesy Cypress Semiconductor

Script
While searching online for a suitable script, I came across a thread on Stack Overflow from user ansgar-wiechers. The example script he listed, which can be seen on StackOverflow, served as a basis for the PSoC Creator script.

So what does this script do.... firstly it looks for a file called buildnumber.h in the PSoC Creator project path. Next, the contents of the header file is searched until the string BuildNumber= is found. Then the integer following the equals sign is incremented by one. The original file, with an updated build number, is then saved back to the original buildnumber.h file.

As can be seen in the script below, there are no checks, no limits, so programmer beware!

Set fso = CreateObject("Scripting.FileSystemObject")

Set re  = New RegExp

re.Global = True


Function IncMaint(m, g1, g2, pos, src)

  IncMaint = g1 & (CInt(g2)+1)

End Function


ProjectMainFolder=fso.GetAbsolutePathName(".")

WScript.Echo ("Build number: Incrementing the build number located at:" & ProjectMainFolder)

rcfile = ProjectMainFolder & "\buildnumber.h"

WScript.Echo(rcfile)

rctext = fso.OpenTextFile(rcfile).ReadAll

re.Pattern = "((?:BuildNumber) )(\d+)"

rctext = re.Replace(rctext, GetRef("IncMaint"))

re.Pattern = "((?:BuildNumber)= )(\d+)"

rctext = re.Replace(rctext, GetRef("IncMaint"))

fso.OpenTextFile(rcfile, 2).Write rctext

Build Number Header File
In the file containing the build number the project major and minor revisions were also included.

/****************************************************************************
* buildnumber.h
*
* Example header file to show usage of BuildNumber keyword and equals signal
*
* The text BuildNumber= can be anywhere in this file
*
*****************************************************************************/
#include "project.h"
const uint8_t MajorRev= 1;
const uint8_t MinorRev= 1;
const uint8_t BuildNumber= 1;

PSoC Creator - Post Build Command
A call is made to the external VBS file under the PSoC Creator menu, Project, Build Settings using User Commands. It should be noted that for the example shown the script was contained in its own folder Scripts and not attached to the PSoC Creator project.


PSoC Creator Post Build Script - Increment Build Number
Shown in the capture below is the the Post Build command to call the VBScriptcscript ${ProjectDir}\Scripts\buildnumber.vbs


PSoC Creator Post Build CScript Call
For this example project the Post Build was used. Depending on the requirement Pre Build may be needed.

PSoC - Build Number Usage
For the PSoC Creator project, the header file containing the build number is accessed in the usual manner using #include "buildnumber.h". For the example project the include was in main.c and the revision and build numbers were written to the serial port.

/****************************************************************************
* Build Number Example
*
* Uses a Visual Basic Script to find an increment 
* the integer associated with the variable BuildNumber

* The script is called as a post-compiler command in
* the Project -> Build Settings menu
*
* Code implementation is a skeleton to illustrate usage of the script, error checking should be implemented

* Credit to https://stackoverflow.com/users/1630171/ansgar-wiechers
* for ideas on the implementaion as mentioned on the following
* blog https://stackoverflow.com/questions/19891195/how-to-increment-values-in-resourse-file-by-using-vbscript
*
******************************************************/

#include "project.h"
#include "stdio.h"
#include "buildnumber.h"
char Version_Char[8];
int main(void)
{
    CyGlobalIntEnable; /* Enable global interrupts. */
    UART_Start();
    sprintf(Version_Char, "Version %d.%02d build %03d\r\n", MajorRev, MinorRev, BuildNumber);
    UART_UartPutString(Version_Char);
    for(;;)
    {
    }
/* [] END OF FILE */

Compiling PSoC Creator
When compiling a project, with the script below added to the Post Build command, a message is echoed from the script to indicate that the Build Number is being incremented.

cscript .\Scripts\buildnumber.vbs
Microsoft (R) Windows Script Host Version 5.812
Copyright (C) Microsoft Corporation. All rights reserved.
Build number: Incrementing just the build located at:C:\...\UART_Example\UART_BuildNumber.cyds

UART Debug
Compiling the example project under PSoC Creator with the major, minor, build number set to 1.1.0, then programming the PSoC development board yields the screen capture below from TeraTerm.


Auto Incrementing Build Number Tera Term Debug
Compiling the project again and programming the development board yields the capture below showing the increment in build number.


Auto Incrementing Build Number Tera Term Debug

Example PSoC Creator Project
The example PSoC Creator 4.1 project and VBScript are available to download below. For comments or bugs leave a comment below, enjoy!

Increment Build Number Example Application PSoC Creator 4.1


Increment Build Number Example VB Script
Increment Build Number Example Script