Summary
This blog offers a solution to generate PSoC header files from
Cypress DAT files using PowerShell scripts. Available Cypress DAT files
are merged and then converted into a single header file.
There
is a thread similar to this post on the Infineon website called ‘JTAG/Silicon ID reference file’.
History
Fluctuations in global chip levels have resulted in a wider range
of microcontrollers seen by companies responsible for programming and
testing electronic hardware.
To accommodate changes in microcontrollers using a more automated process
for creating software header files, the scripts mentioned in this blog
were designed. These scripts are fully functional, however, not without
limitations as this is an initial foray into splitting scripts with this
type of file content manipulation.
The scripts were written in two parts because one script was made to run
in the Program Files directory that contains the relevant DAT files. The
second script was made to run with the merged DAT file.
Installation Requirement
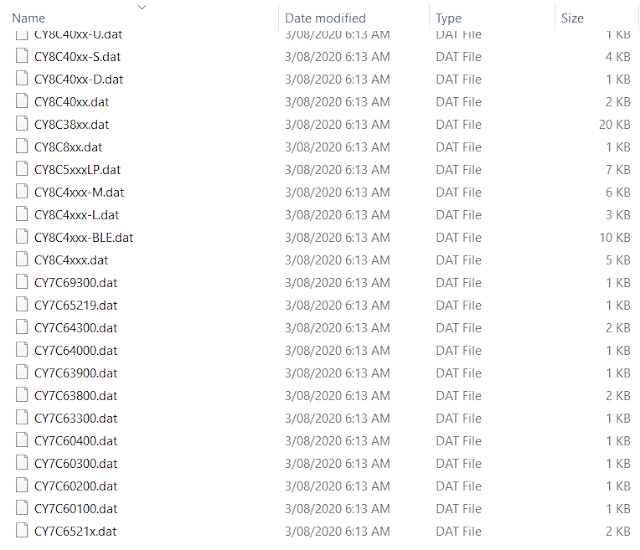
To access the DAT files, the Cypress (Infineon) PSoC Programmer
should be installed. The DAT files are located at the following location -
C:\Program Files (x86)\Cypress\Programmer\Devices
 |
Example of Cypress .DAT File Listing
|
The DAT files
contain various items of PSoC information. Of this, the device name and ID
range are of primary interest.
As an example for PSoC device CY8C4125AZI-473, the entry from file
CY8C4xxx.dat is displayed below.
2,CY8C4125AZI-473, CY8C4125AZI-473, 48, 32768, 3, 04_2B_11_93, 04_2B_12_93, v33
Whether the PSoC ID is utilised to program PSoC devices or other
information such as the size of the flash is needed for programming file
verification, the PowerShell script could easily be adapted to suit these
purposes.
Implementation
The first script called 'dat_merger.ps1' combines multiple DAT
files using the PowerShell add-content command. The script was designed to
handle all DAT files in the Cypress Programmer Devices directory however
the script will also work on a single DAT file.
Additionally, the first row in each DAT file is removed since this is
redundant. To process the file in the next script, the merged file is
saved in CSV format.
$dir = Get-Location
Write-Host "Merging Files"

$source ="$dir\*.dat"
$destination = "$dir\merge.csv"

# Remove first row and merge all files in directory
Get-ChildItem -Filter '*.dat' | ForEach-Object {
Get-Content $_ | Select -Skip 1 | Add-Content $destination
}
The second script dat_parser.ps1 removes any unwanted columns,
selects only the first column of PSoC IDs, adds the text ‘#define’,
formats the ID into a preferred value by stripping the formatting and then
saves the result as a jtag.h file.
$dir = Get-Location
Write-Host "Parsing files in $dir"
# Grab merged csv files
$source = "$dir\merge.csv"
$destination ="$dir\jtag.h"

# Strip columns, add hash define and number format for each line, strip CSV then save as header file
Import-CSV-Delim ','$source -Header a,b, c, d, e, f, g |
Select "b","g" |
ForEach-Object {$_."b" = "#define $($_."b")";$_} |
ForEach-Object {$_."g" = "0x$($_."g")";$_} |
ConvertTo-Csv -NoTypeInformation |
Select-Object -Skip 1 |
# Option for tab instead of spaces
#% { $_ -replace ‘_‘, “” -replace (‘,‘, "`t")  -replace ('"', '')} |
% { $_ -replace ‘_‘, “” -replace (‘,‘, ''.padleft(10, ' '))  -replace ('"','')} |
Out-File $destination -Encoding utf8
Output
The first script would merge DAT files. Two example files were
chosen CY8C42xx-D.dat and CY8C44xx.dat.
Before Script
1,CY8C42xx-D, CY8C42xx-D, 8, 5, 128
2,CY8C4245PVI-DS402, CY8C4245PVI-DS402, 28, 32768, 3, 17_03_11_A7, v17
2,CY8C4245FNI-DS402, CY8C4245FNI-DS402, 25, 32768, 3, 17_02_11_A7, v17
2,CY8C4246PVI-DS402, CY8C4246PVI-DS402, 28, 65536, 3, 17_01_11_A7, v17
2,CY8C4246FNI-DS402, CY8C4246FNI-DS402, 25, 65536, 3, 17_00_11_A7, v17

1,CY8C44xx, CY8C44xx, 8, 5, 128
2,CY8C4A45PVI-481, CY8C4A45PVI-481, 28, 32768, 3, 1C_02_11_AC, v17
2,CY8C4A45FNI-483, CY8C4A45FNI-483, 45, 32768, 3, 1C_03_11_AC, v17
2,CY8C4A45LQI-483, CY8C4A45LQI-483, 48, 32768, 3, 1C_00_11_AC, v17
2,CY8C4A45AZI-483, CY8C4A45AZI-483, 48, 32768, 3, 1C_01_11_AC, v17
2,CY8C4A45FNQ-483, CY8C4A45FNQ-483, 45, 32768, 3, 1C_41_11_AC, v17
2,CY8C4A45LQQ-483, CY8C4A45LQQ-483, 48, 32768, 3, 1C_40_11_AC, v17
After Script
2,CY8C4245PVI-DS402, CY8C4245PVI-DS402, 28, 32768, 3, 17_03_11_A7, v17
2,CY8C4245FNI-DS402, CY8C4245FNI-DS402, 25, 32768, 3, 17_02_11_A7, v17
2,CY8C4246PVI-DS402, CY8C4246PVI-DS402, 28, 65536, 3, 17_01_11_A7, v17
2,CY8C4246FNI-DS402, CY8C4246FNI-DS402, 25, 65536, 3, 17_00_11_A7, v17
2,CY8C4A45PVI-481, CY8C4A45PVI-481, 28, 32768, 3, 1C_02_11_AC, v17
2,CY8C4A45FNI-483, CY8C4A45FNI-483, 45, 32768, 3, 1C_03_11_AC, v17
2,CY8C4A45LQI-483, CY8C4A45LQI-483, 48, 32768, 3, 1C_00_11_AC, v17
2,CY8C4A45AZI-483, CY8C4A45AZI-483, 48, 32768, 3, 1C_01_11_AC, v17
2,CY8C4A45FNQ-483, CY8C4A45FNQ-483, 45, 32768, 3, 1C_41_11_AC, v17
2,CY8C4A45LQQ-483, CY8C4A45LQQ-483, 48, 32768, 3, 1C_40_11_AC, v17
Running the second script on the
merged file output from the first script results in a new file called jtag.h as shown below.
#define CY8C4245PVI-DS402         0x170311A7
#define CY8C4245FNI-DS402         0x170211A7
#define CY8C4246PVI-DS402         0x170111A7
#define CY8C4246FNI-DS402         0x170011A7
#define CY8C4A45PVI-481         0x1C0211AC
#define CY8C4A45FNI-483         0x1C0311AC
#define CY8C4A45LQI-483         0x1C0011AC
#define CY8C4A45AZI-483         0x1C0111AC
#define CY8C4A45FNQ-483         0x1C4111AC
#define CY8C4A45LQQ-483         0x1C4011AC
One of the limitations with the current
implementation is the uneven padding between the PSoC device name and the
ID. The parser code inserts ten white spaces which may not conform with
all programming styles.
Final Thoughts
The PowerShell scripts (under GPL) have been tested on several DAT
files however the outputs should be verified as part of standard practice.
Improvements are welcomed!
Downloads
 |
jtag.h
(Example of PSoC4, PSoC5)
|


