Showing posts with label communications. Show all posts

Monday, 17 April 2017

Beta Layout V2 Controller RS232 to USB Upgrade

Summary
As mentioned in a prior blog involving the Beta Layout V2 Reflow Controller, the on-board RS232 can be removed and USB added using an adaptor such as the Adafruit - CP2104.


Beta Layout V2 with USB

Hardware Required
Beta Layout V2 Controller
Adafruit USB to TTL Adaptor #CP2104
1 x 1k 0805 resistor
2 x M2.5 plastic screws
2 x M3 x 15mm bolts
2 x M3 star washers
2 x M3 flat washers
2 x M3 nuts
1 x plastic L bracket (home made)
3 x small lengths of hookup wire

Opening the Controller
As detailed on a previous blog the Beta Layout case does not use fixing to hold the two part enclosure together. Instead there are a pair of opposing plastic clips on the lid and base, concealed by the ventilation holes, which were released using a flat blade screwdriver to gain access to the controller.

Beta Layout V2 Controller
There are only a handful of components associated with the existing TTL to RS232 driver (MAX232) and these components are all surface mount capacitors for the charge pump or supply decoupling. For more details on the RS232 driver see the Maxim datasheet MAX232.

In the image below the components to be removed are circled in RED.


Beta Layout V2 RS232 Driver
Logic Board RS232 Driver
To unsolder the MAX232 driver it was easier to unscrew the logic board so that the board could be worked on directly. While the 10 way header for the serial port can be unplugged, the Thermocouple wires are soldered directly to the logic board so the connector must be removed from the plastic panel.

To remove the Thermocouple connector from the panel of the unit, the bolt connected to the metal plate is first unscrewed, then the bolt holding the Thermocouple connector together is removed. This allows the connector to come apart allowing the logic board to be removed from the unit.


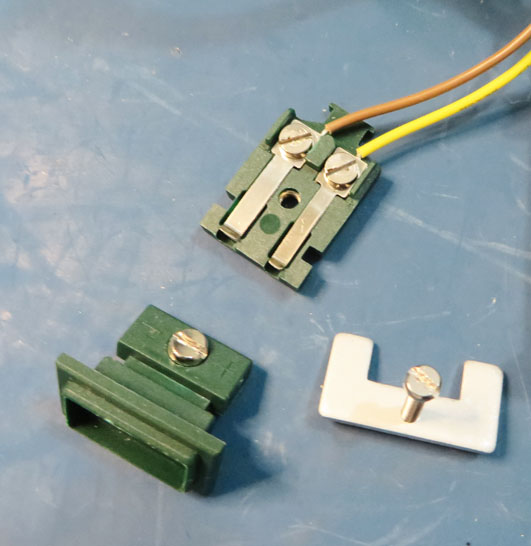
Thermocouple Connector Disassembly
Removing the RS232 Driver
One of the easiest methods to remove the MAX232 driver is to use two soldering irons, unless you have a tool for your soldering iron that can remove SOIC packages! Alternatively a set of side cutters to chop the legs off the driver and solder wick to clean up the mess works wonders if there is no interest in saving the driver.

Beta Layout Logic Board RS232 Driver Removed
Logic Board RS232 Driver Removed
In the image above the driver and four charge pump capacitors were removed. The capacitor to the lower left of the MAX232, for the power supply decoupling, was left on the PCB. For people choosing to use another flavour of USB to TTL adaptor they may find that external 5V power is required. This capacitor, even though small, may be able to provide some minimal power supply decoupling for an alternative adaptor board.

The Adafruit adaptor board which was used in this upgrade, is bus powered, so this decoupling capacitor is not used and could be removed. Below is an image of the changes to the logic board. These are explained below.

Logic Board with Adafruit USB Adaptor
Logic Board Changes
For the image above the changes listed below were made.
  1. Bridge the transmit lines on the MAX232 footprint.

    As shown in the image below there are two pins which need to be linked 'shorted' together. These pins are actually pin numbers 7 and 10 on the actual MAX232 transceiver.

    Bridge MAX232 Transmit Lines
    Bridge MAX232 Transmit Lines

  2. Connect a 1k resistor between the receiver lines on the MAX232 footprint.

    Since the receiver line from the USB to TTL converter can provide enough power to supply the ATMEGA a current limiting resistor was added between the boards. The rail to rail steering diodes inside the ATMEGA cause this phenomenon. See this EEVBlog #831 Episode for a detailed description on YouTube.

    Add 1K Resistor Receive Line
    Add 1K Resistor Receive Line
    The resistor is fitted between pin 12 of the MAX232 and the via directly adjacent to the right between the transceiver pads. As the board via's are untented the resistor can be soldered directly to the via.

  3. Connect TTL transmit, receive and 0VDC to the Adafruit adaptor.

    The original transmit and receive lines on the PCB header were reused for connection to the USB to TTL converter. As shown in the image below the three connections are all made to the inside pins on the header.

    USB to TTL Connections
    USB to TTL Connections
    The transmit connection is the TXD pin, receive the RXD pin and 0VDC is the GND pin on the Adafruit USB to TTL adaptor.

Mounting the Adafruit Board
To mount the Adafruit board a custom L bracket was made from plastic and fashioned to cover the old 9 pin serial connector cut out.


Adafruit USB to TTL L-Adaptor
Since there are only two mounting holes (ID 2.5mm) on the Adafruit board a pair of 2.5mm self-tappers were used to hold the board in position.

Mounted Adafruit Board
To hold the L-bracket in position against the panel of the Beta Layout unit, a pair of 3 x 15mm bolts were used with the usual star washers and nuts on the rear and M3 flats against the outside of the units panel.

Mounted Adafruit in Case
As a dry run the unit was assembled without fixing the power board down to check the clearances.

Final Mounting of USB to TTL Adaptor

Testing the Adafruit Board
To be prudent the USB was connected to a PC running TeraTerm. The unit was powered with the Thermocouple fitted into the connector.


USB to TTL Converter in Device Manager
Running on Windows 7 the drivers installed automatically for the Silicon Labs USB controller. Below is a capture of the USB connection running at 9600 baud.

TeraTerm - USB to Beta Layout V2
The USB to TTL adaptor was working as expected and so the Beta Layout unit was reassembled by fixing down the power board.

Power Board Fixings Under Connectors
Final Mounting 
Note that one of the plastic screws to hold down the power board was located underneath the mounted Thermocouple connector. The second screw was located on the opposite end of the power board underneath the Adafruit PCB. 

Should repairs need to be performed on the power board the Thermocouple connector and USB board would need to be removed to gain access to the unit.

Thursday, 31 December 2015

PSoC to Tracer MPPT 1210RN 2210RN 3215RN 4210RN with Bluetooth and Datalogger

Summary
Although the early EPSolar MPPT Tracer series with remote display have been surpassed by improved MPPT models with inbuilt LCDs, there are plenty of the earlier models that remain in operation. This project is Cypress PSoC 4 BLE based and features connection to the Tracer MPPT, load control, Bluetooth and data logging of the MPPT data.

MPPT
A number of other people have used the EPSolar MT-5 display to reverse engineer the communications protocol, however there was PC software from the same manufacturer which performed all the same functions, possibly more.
EPSolar Tracer RN MPPT
At last glance of the EPSolar website the Tracer series had reached obsolescence and the PC software on the site no longer supports the Tracer series.

Hardware
Initial documentation for the MPPT connections were taken from a site by Steve Pomeroy, another two sites by John Geek. The 8 way RJ connections to the Tracer were drafted with an optional zero ohm link added such that the MPPT could power the project. Buffers were added to the transmit and receive lines, although not a necessity, to ensure some protection for the PSoC from the real world.


EPSolar Tracer RJ45 Connections

For the display an OLED or LCD capable of being powered from 3.3V for both the logic and backlight was selected. In most instances this results in the LCD contrast voltage being negative however this was generated by the PSoC using the circuit shown below.


LCD Connections
LCD Connections
Four momentary push buttons were used instead of the Cypress Capsense feature. This solution using switches was chosen only due to the design of the hardware as the PCB was to be mounted inside a box and away from the lid.


Buttons / User Interface Connections

The power supply regulator was chosen to be small and the usual buck topology. The LMR14203 has been my default single output regulator for some time, certainly there are newer devices with higher efficiency in the low current region of operation. In the event the display that was chosen could not have the backlight operate from 3.3V, a linear 5V regulator was added for testing.


Power Supply Connections

Even though the design incorporated Bluetooth, USB was added for debugging, downloading of data and upgrading of the PSoC. Field upgrades would be possibly by using the PSoC bootloader, a program allowing the active application to be updated some time in the future. The FTDI FT230X was chosen for the USB implementation however for those looking for a similar priced and reliable solution the Cy
press CY7C65213A-32 would also be a good choice.

FTDI USB Connections

The PSoC selected was the CY8C4247LQI-BL483, which features a 48MHz System Clock, 128K FLASH and the all important Bluetooth. Although the PSoC4 libraries did not support SD at the time of writing, there are a few alternatives from the PSoC Community.


PSoC Connections and Supply Filtering
Lastly bringing all the sub-sheets together is the top sheet as shown below.


Project Top Sheet
Project Top Sheet

PCB Enclosure
The PCB was designed to fit into a plastic enclosure with a clear lid, no bells no whistles. A Ritec case from a local supplier was used, the Altronics H0324.


Altronics H0324 enclosure

With the enclosure size selected the PCB dimensions were set to 98mm (W) x 75mm (H).

PCB Design
For the schematic and board design Altium was chosen since the board was mixed logic with RF. This combination was always in my mind a four layer board. The board layer stack would follow the usual two middle power planes and signals on the outside layers.

There were a number of parts added to the component database although none more interesting that the meandered inverted-F antenna (MIFA) to suit the PSoC4 BLE part. The antenna design was well documented in the Cypress Application Note - AN91455. This antenna was implemented as described on Page 10 of the Application Note.


PSoC4 BLE MIFA
PSoC4 BLE MIFA 
The board shape was drawn and a work guide added for the position of the four push buttons, then all components were place on the PCB.

Tracer MPPT Interface Board
With some quick shuffling of parts then an idea of the layout could take place.

Tracer MPPT Interface Board Parts Placement
Parts positions were changed on the PCB with some connectors and the SD card moved to the bottom layer.


Tracer MPPT Interface Board Final Part Placement
A few hours later the final route is shown below.


Tracer MPPT Interface Board Final Route
The board in 3D shows the stacking of the LCD and logic board.

Tracer MPPT Interface Board with LCD
PCB Prototype
The PCB was hand populated for both top and bottom layer. Some last minute modifications were made to the LCD connector and backlight control because the four line LCD had to be changed to another manufacturer. LCD supply pins were swapped.


Top Layer MPPT PCB Populated
Bottom Layer MPPT PCB Populated
To mount the LCD to the MPPT board, a male pin header was soldered to the bottom side of the LCD. To space the LCD and MPPT board 12mm tapped metal spacers were used.


Spacers for MPPT PCB and LCD

USB Check
Two of the hardware connections that were used for debugging this particular project were the Cypress MiniProg3 programmer and the USB port. Certainly the LCD or on-board status LED could also be useful although the background debugger and serial port usually work sufficiently.

With the USB connected between the MPPT board and a Windows PC, the FDTI chip was configured using the FTDI application FT Prog. This application was used to disable three unused CBUS pins and reconfigure the fourth for USB bus voltage detection.


FT Prog Scan
FT Prog Scan
The Scan command was issued the the FTDI device was located.


FT Prog Default CBUS Settings
From the list shown in the Device Tree pictured above, the 'Hardware Specific' item was expanded and the 'CBUS signals' entry was selected.


FT Prog Updated CBUS Settings
The settings were modified as shown above which enabled voltage sensing for the USB - VBUS_Sense. All other CBUS pins were unused and therefore tristated.


FT Prog Program
FT Prog Program
To save the CBUS settings changes using FT Prog, the 'Program' command was used. As shown in the capture above a 'Program Devices' dialog allows for confirmation of the Program process then subsequent programming.


RealTerm Loopback Test for MPPT Board
In order to test the USB a dummy PSoC application was made to loopback the Tx and Rx pins, P0.4 and P0.5 respectively. RealTerm was then used to test the loopback at 921600 - no issues were noted.

Software - Prototype
After the initial hardware checks of the boards power rails some initialisation code was written to check the LCD, buttons and communications. Below is an example of the initialised LCD.


Initialised LCD for Testing

A prototype project, certainly with some bugs, is available for download below.
Prototype Tracer PSoC MPPT Interface
The prototype project implements communications to the Tracer MPPT and display of current MPPT readings to LCD. Some of the current MPPT readings are also sent to the USB port for logging.

Serial Data Logging
The data logging 'USB output' was rather raw code with the sole purpose of providing a console output capable of being imported into Microsoft Excel. The UART Update function was called every minute and send some basic information to a terminal application.

void UART_Update() 
{
    char UART_Buf[20];
    uint16_t UART_temp;

    UART_UartPutString(LINE1_PV);
    UART_temp = MPPTPanelVoltage;                           /* Temp memory to modify for display */
    sprintf(UART_Buf, "%d.%02d%s%c", (UART_temp/100), (UART_temp%100),"V",0x9);
    UART_UartPutString(UART_Buf);
    UART_UartPutString(LINE1_BV);
    UART_temp = MPPTBatVoltage;                             /* Temp memory to modify for display */
    sprintf(UART_Buf, "%d.%02d%2s%c", (UART_temp/100), (UART_temp%100),"V ",0x9);
    UART_UartPutString(UART_Buf);   
    UART_UartPutString(LINE2_BI);  
    UART_temp = MPPTBatteryCurrent;                         /* Temp memory to modify for display */
    sprintf(UART_Buf, "%d.%02d%s%c", (UART_temp/100), (UART_temp%100),"A",0x9);
    UART_UartPutString(UART_Buf);
    if (System.MPPT_Load_Is_On == true)
    {
        UART_UartPutString(" Load On\r\n");
    }
    else if (System.MPPT_Load_Is_On == false)
    {
        UART_UartPutString(" Load Off\r\n");
    }
}

Shown below is an example of the data output to a terminal application.
MPPT Example UART Output
The output panel voltage displayed in the terminal window was also used to verify the position and angle of the solar panel. Moving the solar panel a few degrees off axis to the sun appeared to make no appreciable difference in the readings.

MPPT Protocol
The protocol was verified and confirmed in another of my blogs which can be found at http://electronicmethods.blogspot.com.au/2017/03/tracer-mt-5-to-mppt-communications.html

SD Card
The SD card implementation was scheduled to use the Element 14 community project #50 implementation for the PSoC4, which uses a modified version of the Segger / Cypress EmFile. In early part of '18 an article appeared Hackser.io with an implementation using Segger libraries by Hima from Cypress allowing SCB (Serial Communication Block) or UDB's (Universal Digital Blocks) for communications to the SD card.

Downloading and compiling the example from Hackster illustrated how easily the project could be changed between SCB or UDB's. Another feature buried in the API's are related SD card functions which are non-blocking. For full details see the Hackster.io site with credit to Hima. Note the Segger library license requirement.

In the capture below, are the two additional directories for adding the SD Card libraries to the MPPT project.


PSoC4 SD Card Libraries Compiler Entries
Similarly the Linker references one additional directory.


PSoC4 SD Card Library Linker Entry
To test the SD Card the appropriate File System header file was included and blocking writes were made to the SD card - a snippet is shown below.

#include <FS.h>
...
...
if ((pFile) && (SD_Removed_Read() == false))
    {      
        UARTCrLf[0] = 0x0a;UARTCrLf[0] = 0x0d;

        FS_Write(pFile, PV_string, strlen(PV_string));
        FS_Write(pFile, "," , 1u);
        FS_Write(pFile, BV_string, strlen(BV_string)); 
        FS_Write(pFile, "," , 1u);
        FS_Write(pFile, BI_string, strlen(BI_string)); 
        FS_Write(pFile, "," , 1u);
        FS_Write(pFile, TE_string, strlen(TE_string));
        FS_Write(pFile, "," , 1u);
        FS_Write(pFile, LOAD_string, strlen(LOAD_string));
        FS_Write(pFile, UARTCrLf , strlen(UARTCrLf));
    }

The rather inelegant code above was for testing opening of the log file written to the SD card, by Excel, Libre Office or another similar application with CSV capabilities. Shown below is a sample of the log from the SD card.

0.00V,13.34V,0.00A,25C,OFF
0.14V,13.34V,0.03A,25C,ON 
0.14V,13.32V,0.02A,25C,ON 
0.14V,13.32V,0.02A,26C,ON 

Next up scheduling control of the SD card....