Showing posts with label monitor. Show all posts

Tuesday, 8 November 2022

EPEVER MPPT to PC using RS485 or WiFi

Introduction
This blog provides two methods for connecting an EPEVER MPPT with RS485 capability to a Windows PC running Solar Station Monitor.
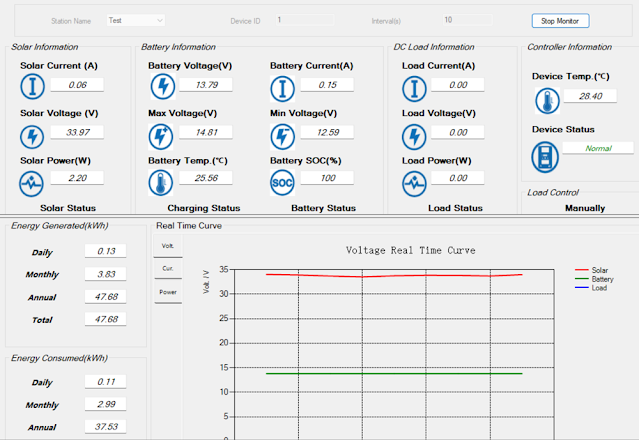
EPEVER Solar Station Monitor

Direct Connection
Direct connection utilises hardware consisting of an FTDI USB to RS485 adaptor, part USB-RS485-WE with an RJ45 male to screw terminal adaptor to connect to the EPEVER MPPT.

Details for the various connections using the FTDI adaptor are pictured below.

RS485 connections A, B and 0 V were used; no termination resistor was added to the circuit.

FDTI RS485 to EPEVER MPPT

Wired USB FTDI to RJ45 adaptor.

FDTI RS485 to RJ45 8-Way Screw Terminal for EPEVER MPPT

FTDI adaptor wiring from USB-RS485-WE manual.

USB-RS485-WE Connections (Courtesy FTDI)

 Pinout for RJ45 connector.

RJ45 Pinouts
RJ45 Pinouts (Courtesy Huawei)

There were no requirements to change the Windows setup for the FTDI adaptor. This device appears as a standard COM port. This COM port was then selectable in the EPEVER Solar Station Monitor application.

Wireless Connection
The wireless connection makes use of an Elfin EW11A. This device bridges RS485 and wireless station and or access point.
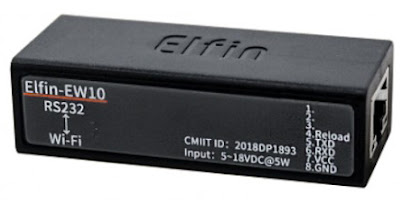
Elfin EW11A (Courtesy Hi-Flying)

Also used in the hardware solution was the optional Elfin adaptor cable. For connecting to the EPEVER MPPT, an RJ45 male to screw terminal adaptor was utilised. Since the EW11A requires DC 5 V, an further connection to a power supply is also required.
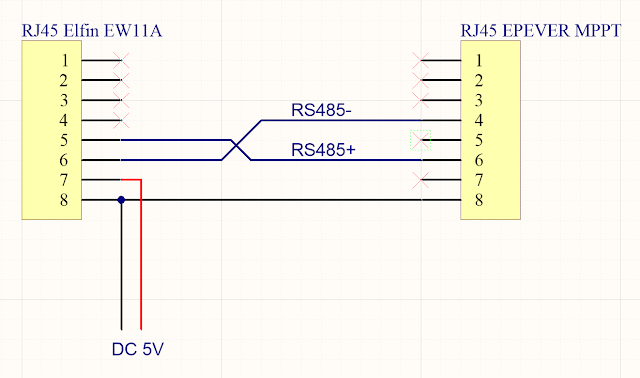
 

Elfin EW11A to EPEVER MPPT

Elfin EW11A to RJ45 8-Way Screw Terminal

The computer running EPEVER Solar Station Monitor required a software Ethernet to COM port bridge. The HW Virtual Serial Port application from HW-Group was used.
Side note. The EPEVER WiFi 2.4 G RJ45 A adaptor was tested separately however because WiFi Station mode was required, the EPEVER was not suitable.


Elfin EW11A Setup

This tests in this blog were geared towards verifying that wireless communications with the MPPT were practicable. The final goal was to interface the EPEVER with Home Assistant.

Using the I.O.T Workshop application from High-Flying, the EW11A was configured for station mode, TCP server and the port settings were configured for consistency with Home Assistant. Ethernet port number 8899 (MQTT) was used. The Comment and Application Guide from Eniris was used as the primary reference document.

Removed from the screen capture below are the login details (admin and password), wireless station ID and associated password.
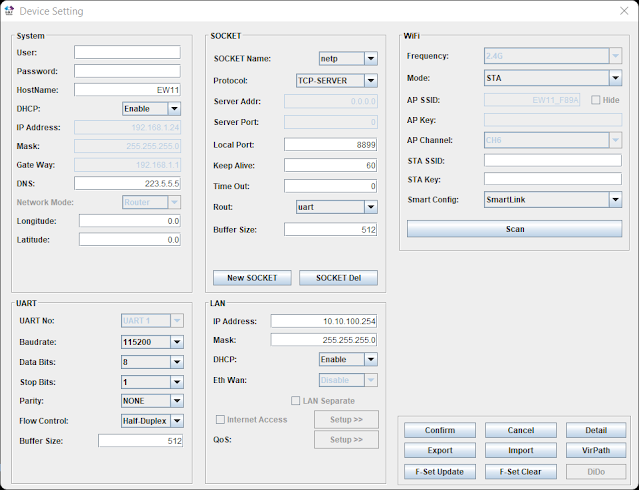
EW11A Device Setup for EPEVER MPPT Using I.O.T Workshop

No UART protocol was selected. Telnet was disabled and web interface was kept enabled.

EW11A Device Detail for EPEVER MPPT Using I.O.T Workshop

The UART settings 115200, 8, N, 1 were left as default.
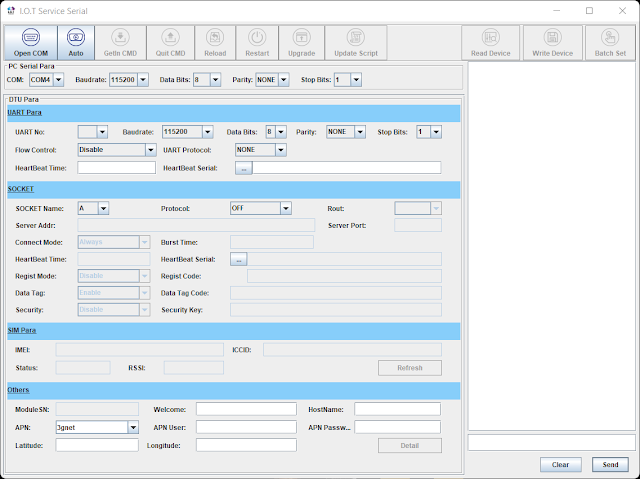
EW11A Serial Setup for EPEVER MPPT Using I.O.T Workshop

Virtual Serial Port
For this blog the
HW Virtual Serial Port application from HW-Group was used. The default configuration of the application required changes. For example, if the option Network Virtual Terminal (NVT) was enabled, communications with the EPEVER MPPT were sporadic or only specific values were received correctly. Other tools offering an Ethernet to COM virtual com port may offer similar configuration options which should be validated.

HW Virtual Serial Port Settings for EPEVER MPPT  and Elfin EW11A
HW Virtual Serial Port Settings for EPEVER MPPT and Elfin EW11A

Shown on the Virtual Serial Port page is the IP and port for the Elfin EW11A.
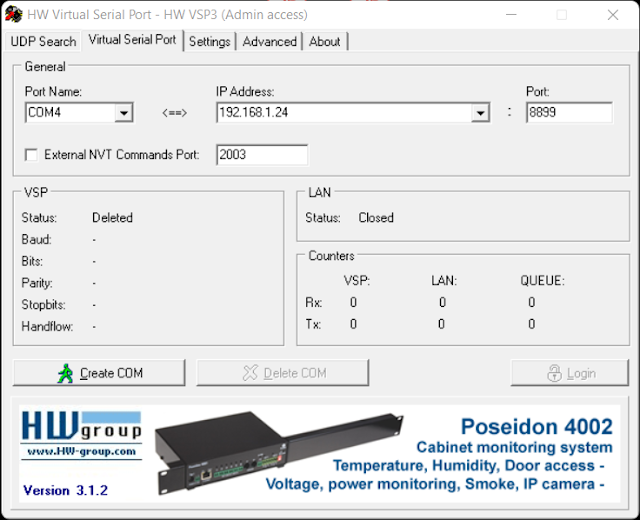
HW Virtual Serial Port Page for EPEVER MPPT with Elfin EW11A

With the Elfin EW11A configured and powered, clicking Create COM in the virtual serial port application established the Ethernet link. Shortly after COM4 appeared in Windows Device Manager.

Serial Port Created Using HW Virtual Serial Port

With a connection established to the EW11A and the EPEVER MPPT, the EPEVER application could communicate with the MPPT. This was indicated by the change in counter values (Rx and Tx).

HW Virtual Serial Port Connected to EPEVER MPPT with Elfin EW11A

Solar Station Monitor
No changes were made to the setup of the EPEVER Solar Station Monitor application other than configuring the required COM port to communicate with the Virtual COM port.
The default port settings were used.
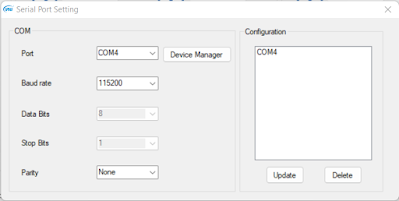
EPEVER COM Port Settings
 

After clicking Start Monitor in the application, data was exchanged within a few seconds.

The capture below was taken after sunset with the MPPT load active.

EPEVER Solar Station Monitor (Load Active)

The capture below was taken during sunlight hours.

EPEVER Solar Station Monitor (During Daylight)


For the capture below, the EPVER monitoring tool was restarted to capture the transition between load OFF and ON.

EPEVER Solar Station Monitor Graphed Data Showing Load ON

EPEVER Solar Station Monitor Graphed Data Showing Load OFF

Final Thoughts
This post offered two methods for connecting an EPEVER MPPT with a Windows PC running Solar Station Monitor application. The WiFi connection and subsequent testing using the Elfin EW11A served as preliminary work to develop a dedicated circuit board to bridge the EW11A with the EPEVER MPPT.

Thursday, 22 November 2018

Salvaging electronic parts - Part 3 BenQ GL2430 Monitor

Summary
This blog continues a series of salvaging electronic parts, this time focusing on a BenQ model GL2430 monitor and what components could be salvaged. 


GL2430-B  BenQ Monitor
GL2430-B  BenQ Monitor
The monitor build date was from early 2011.


GL2430 Name Plate
GL2430 Name Plate

Salvaging
The dismantling process for the monitor was skipped. The two major and two smaller printed circuit boards (PCB) removed from the monitor were: Flat panel driver board, Power supply board, Backlight driver board and Audio breakout board.

Flat panel driver board
Shown below is the flat panel driver board, single sided multilayer circuit board. This board contains the Realtek flat panel driver IC boxed in blue. Realtek part RTD2483RD. 


GL2430 Flat Panel Driver Board Top Side
Boxed in red of the image are a mixture of five serial memory devices ranging from ST Micro 24C02 EEPROM to a Winbond 2Mbit Flash W25X20. These devices are usually very easy to salvage.

Boxed in yellow are some of the numerous inductors on the board.

The semiconductor in the top right hand corner of the image is a Diodes Inc PAM8603 - 3W stereo class D amplifier. Possibly not worth salvaging as there are parts available with lower distortion ratings.

In the bottom left hand corner of the board are a pair of TVS arrays from the manufacturer InPaq 1045QU. Again probably not worth salvaging.

The crystal on the board is common video 14.318MHz type and could be repurposed if any crystal frequency is suitable.

Remaining on the board are a mixture of connectors, passives and unidentified semiconductors. If you were really scratching to find a MELF diode or 220uF Lelon Electrolytic then this board could be added to the spare parts box.

Power supply driver board
The power supply board is populated with components on both sides, double sided with a single layer PCB design. Heavy through hole components on the top side of the PCB and smattering of glued surface mount components on the solder side.


GL2430 Power Supply Board Top Side
Boxed in red is the mains common mode choke and towards the centre of the board, the switching transformer. Both these devices are manufactured by a Taiwanese transformer manufacturer. These parts can come in handy for research and design projects and a worth salvaging.

The green boxes highlight a few resistors which could be extracted for the spares bin. There are no signs of overheating or other physical damage which may have been caused by a fault on the PCB.

In the blue boxes are the diodes and bridge rectifiers. The bridge rectifier is listed as an obsolete part on supplier's websites such as Mouser so may be good for the spare parts box. The two larger axial diodes are Vishay part UG4B; a reputable brand worth salvaging once properly tested.

The two devices on heatsinks are the mains side switching MOSFET K4101 and secondary side dual rectifier diode FMX12S. At least one of these devices has discolouration in the PCB surrounding the heatsink. Heatsinks could be salvaged for other purposes.

Remaining on the top side of the board are various connectors, mains voltage rated varistors and mixture of capacitors. Usually components which have been operating at mains voltages for an unknown amount of time can left on the PCB if the operational state of these parts is unknown.


GL2430 Power Supply Board Bottom Side
Shown above is the solder side of the power supply board. To the left of the image is the switch mode controller. Across the board are a number of other parts, all glued down with epoxy. Using epoxy to glue surface mount components in order to simplify the assembly process is standard practice. The epoxy can make repair and salvaging parts difficult.

Backlight driver board
Below is an image of the backlight driver board. The main LED driver, boxed in red, is an MP3389 from Monolithic Power. Device is worth salvaging or even the entire board itself as it is a self-contained unit which could easily be reused.


GL2430 Backlight Board Top Side
Boxed in blue is an unbranded inductor which is always good to have in the spares box.

Shown in the yellow box is a SinoPower MOSFET APM1110 which was not located on the company website. Specifications are nothing to be excited over although part would be worth salvaging for prototyping.

The remaining passives such as the radial capacitors are from Lelon making the remainder of the board a contender for the spares box.

Audio Connector board
Lastly is the small 3.5mm audio connector board. The connectors are a standard pinout and could be salvaged or the entire board repurposed for a bespoke project.


GL2430 Audio Connector Board Top Side

Design Notes
A section of the power supply mains input section was chosen for some brief notes on PCB design.


GL2430 Power Supply Board Main Input Section
Boxed in white, top left hand corner of the above image, is the one of the mounting holes with exposed long pads coated in solder. This is a good feature for eliminating star or copper washers however the electrical resistivity can suffer due to the smaller contact area and surface oxidisation of the solder. It should be noted that on the component side of the board is a through hole nut allowing direct access to the mains earth connection.

In the orange boxes are several slots on the board to improve the creep distance between component pins. Slots in the board are an effective and cheaper solution to conformal coating.

Shown in the blue box is attention to detail by the PCB designer. A small pullback was applied to the copper surrounding the two mounting holes for the IEC mains connector.

Boxed in purple is a section of silk screen showing the isolation plane between mains AC and isolated DC voltages. The silk screen for the isolation plane and most components is present on both sides of the PCB making component identification and servicing easier.

Lastly the red box shows three cascaded surface mount resistors used in series to discharge the mains input capacitor connected between active and neutral. The PCB designer was mindful of creep distance and to some degree spacing between these components.