Monday, 27 December 2021

Salvaging Motorola MBP11

Summary
This blog performs a teardown of the Motorola MBP11 baby monitor, comprised of a transmitter and receiver unit, for the purpose of salvaging electronics.
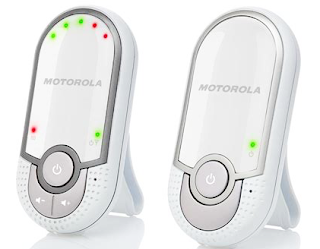
Original Image Motorola MBP11
Original Image Motorola MBP11 (Rights reserved)

Dismantling
The receiver unit of the MBP11 was commonly battery powered by a small NiMH battery. Removing the battery cover allowed access to two plastic screws holding the two-part case together. Whilst the battery could be salvaged, the battery chemistry and capacity may limit use.
For the MBP11 transmitter unit, the two plastic screws holding the case together were accessible from the rear of the unit.
Removing one side of the plastic housing provided access to the circuit boards as shown below.
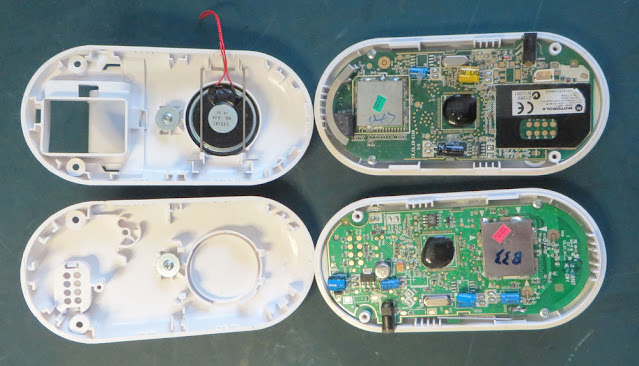
Opened Cases of Motorola MBP11 Units

Receiver Unit
Holding the receiver circuit board in position were additional plastic screws. The speaker connections were disconnected when the half plastic cases were brought apart.

Located on the circuit board were only a handful of salvageable items. The processor was the usual ‘blob’ solution and the RF was all handled in a metal can fitted to a castellated daughter board.

The orange box in the image below shows the 13.842 MHz surface mount crystal used by the unit.

Identified in the yellow box, a serial memory device. The FRAM serial memory part FM24C16B would be worth salvaging especially due to the long data retention of FRAM.
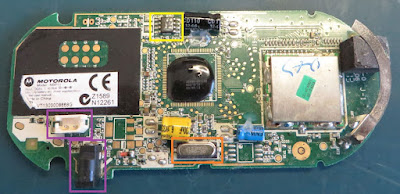
Motorola MBP11 Receiver Circuit Board

Connectors shown by the purple box may come in handy if the battery or external DC 6 V plug pack were used for another purpose.

Out of curiosity the metal can on the castellated RF board was removed.
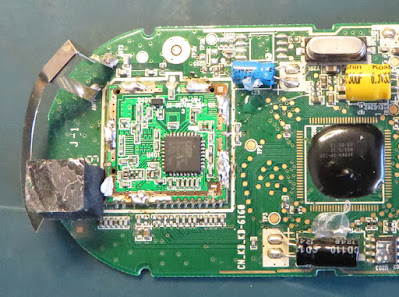
Under the RF Can on the MBP11 Receiver Circuit Board

Under the metal can was an RF chip, DE 19RF 19CNC, from a chip manufacturer called DSP Group. No immediate datasheet could be located for the chip.

Although the RF chip may not be worth salvaging, the implementation behind the castellated daughterboard is a good example of what can be achieved especially with RF.

There are a few takeaways for new circuit board designers attempting castellated boards including items such as the castellated pad spacing, RF shielding and component placement. As an example, shown by the red box in the image below, the power rail (one side) was decoupled on the main circuit board immediately after the via, then at the RF chip itself.

Decoupled Power Highlighted for Receiver Castellated Circuit Board

There were seven LED's on the rear of the circuit board that could also be salvaged. Five LED's provided visual feedback for the sound level detected and the remaining indicating connectivity and power. Worth salvaging just for prototype boards.
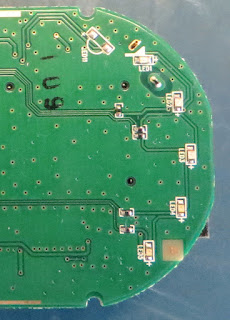
LED's on MBP11 Receiver Circuit Board

Transmitter Unit
Similar to the receiver unit, the transmitter circuit board was held in position were two additional plastic screws.

The same ‘blob’ solution and RF in a metal can was present on the transmitter board with no castellated circuit board.

The orange box showed the same 13.842 MHz surface mount crystal as the receiver and the yellow box shows the same FRAM device.

Identified by the purple box was the power connector jack.

Motorola MBP11 Transmitter Circuit Board

Highlighted by the black box, the solitary surface mount capacitor. Manufacturer unknown.

Additionally, a linear regulator was present on the transmitter. The red box shows the LM1117. This device could be salvaged also.

The metal can was removed to show the same RF chip as the receiver unit, DE 19RF 19CNC.
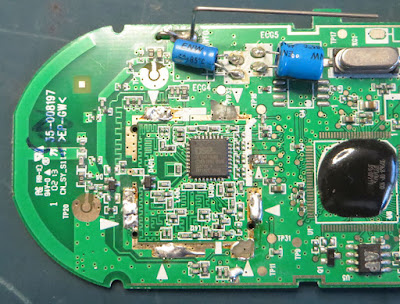
Under the RF Can on the MBP11 Transmitter Circuit Board

For both boards, the leaded electrolytic capacitors showed no signs of wear and could be salvaged if needed. All manufacturers of these electrolytic capacitors are not well known. However, some devices are rated to 105°C. Similarly, there are dozens of passive components on the board that could be pried off if required.

Additional Salvaged Items
 

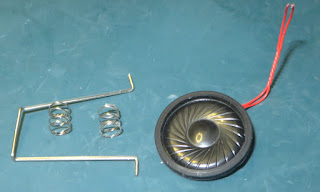
There were additional items such as the PCB mount microphone, external speaker, metal clip and springs that could come in useful for a variety of jobs.

Final Thoughts
There were further items to keep in mind regarding the technology used by these circuit boards such as the gratuitous use of test points, the practical use of via stitching in the RF area and associated power traces.

One item of caution however was the lack of Lead-Free marking on the circuit boards. For the intended target market of the Motorola MBP11, Lead-free would be no less than expected. However, as Lead-free was not noted on the circuit boards, for those salvaging from this or any such device, the appropriate preventatives should be taken.

Tuesday, 30 November 2021

Example Lids as Circuit Boards (PCB)

Summary
This short blog
lists a handful of drawings for lids/plates of instrument cases that were replaced with circuit boards.

Example Project using 3D Printed PCB Panel (Multicomp MC002212)

Front Plates as Circuit Boards
The lid or plate on an instrument case is commonly manufactured as a plastic such as ABS, diecast aluminium or steel. These can be readily be replaced with a circuit board. Some of the benefits and drawbacks of using the circuit board are listed below.

  1. Customised appearance and colour in a single process (no separate decal or printing),
  2. Electronics can be added to the circuit board providing additional real estate,
  3. Circuit board may have benefits for EMC compared to standard plastic items (not metal screened),
  4. Minimal to no machining or manufacturing work for the circuit board,
  5. Iterating circuit board designs may end up faster than updating CAD for metal lids or plates,
  6. Plastic or metal lid or plate becomes waste or at best recycled if not used,
  7. Reworking a circuit board for mechanical purposes is not always possible,
  8. Circuit boards usually require more processes to recycle.

Example Lids as Circuit Boards
Shown below is a generic plastic enclosure called a jiffy box with a 3D plastic lids designed in Altium. 

A clearance of at least 0.1 mm per edge was chosen however the clearance should be adjusted as required due to variations in manufacturing.

Jiffy Box with 3D Printed PCB Plate

 
For verification, the Altium Designer files were saved as STEP files, converted to STL files then 3D printed. The files below were generated as DXF files using the Export feature in Altium designer. These DXF files can be imported into an Altium PCB, using a measurement in millimeters with the board shape defined on Mechanical-1.

PCB Lid DXF for Jiffy Box UB3


PCB Lid for Hammond (Eddystone) 27969PS


PCB Lid for Multicomp (Element14) MC002212


Sunday, 31 October 2021

Salvaging Swann DVR SWDVR-81500H

Summary
This blog details the salvaging process of hardware from a Swann DVR, model SWDVR-81500H and an associated dome camera.

Swann DVR
Swann DVR
DVR
The Swann DVR unit was factory supplied with an external power supply and several dome cameras. This unit in this post was a superseded model.

Swann DVR Rear Plate

On the backplate of the DVR were inputs for the dome video cameras, audio inputs, video out, power, LAN and USB connections.

Swann DVR Internals
Swann DVR Internals

To open the DVR unit, four plastic screws in the base were removed. Upon sliding the metal plate away from the ABS case, the controller card and hard drive were visible.

The white ABS case was relatively sturdy and could be repurposed for another custom project. Similarly, the metal frame could be repurposed.

Hardware
The hard drive was held on with an additional four screws and easily removed. Manufactured by Western Digital, for this model DVR a
500 GB HDD was fitted. The drive could be reused; reformatting and standard SMART hard drive tests would be recommended.

Short Hard Drive Cables

The hard drives short serial ATA cable and power could be salvaged for another Single Board Computer (SBC) project.

To remove the controller board the screws in the metal base and backplate were removed.


Controller Card Components
Depending on the requirements of the salvager, most of the connectors from the controller board could be repurposed. The BNC connectors were sturdy and come with the right angle PCB mounting brackets. Most of the connectors were unbranded so cross-referencing against standard PCB footprints would be recommended for consistency and availability.

DVR Controller Board
 
Other parts such as the Piezo buzzer and CR1220 surface mount battery holder (yellow box in the above image) are readily salvaged.

Some of the electrolytic capacitors close to the DC input power jack were showing early signs failure with bulging at the top of the can.

The crystals, inductors, processor heatsink and LED's can readily be removed for salvage.

The controller was manufactured by HIKVision and the associated DDR3 memory (128M x 16) was from Samsung, part K4B2G1646F-BCK0 (blue box).

Processor Heatsink
Processor Heatsink

The controller was manufactured by HIKVision and the associated DDR3 memory (128M x 16) was from Samsung, part K4B2G1646F-BCK0 (blue box).

HIKVision Processor Cover

These parts were not worth removing unless required to repair another unit or similar DVR; the usual removal method would be via a hot air tool.

For the video decoding, an Intersil (Renesas) TW2968 8-channel video/audio decoder (orange box) was used by the DVR, likely not useable.

Ethernet communications utilised the Realtek 10/100 PHY, RTL8201F (purple box). Similar part here. The Ethernet chip supports the standard communications modes except RGMII. Could be salvaged using the correct tools however Gigabit devices are more common.

For timekeeping, an NXP RTC PCF8563 on the rear of the board was used. The RTC has a standard SOIC footprint which is worth salvaging with the battery holder (yellow box ) for a project requiring an RTC.

Lastly, the DC 12 V 2 A plug packs powering the DVR were in reasonable condition, with a larger style DC jack; worth keeping as spares.

Camera Hardware
The associated DVR dome camera presented as a sealed unit. The body of the camera was produced from diecast aluminium.

Dome Camera
Dome Camera

After removing the dome camera from the plastic roof mount, three screws were visible on the rear of the camera. Removing the screws on the rear allowed the cover containing the glass window to be taken off.

Dome Camera Opened
Dome Camera Opened

Looking at the internals of the camera, the LED ring is immediately visible. Removing the two retaining screws and the connecting cable allowed the LED ring to be removed.

Dome Camera LED Ring

The twenty-four IR LED’s fitted to the PCB could be salvaged. However, the board is a self-contained circuit, with a light sensor and LED driver which may suit a project requiring IR illumination without modifications.

Dome Camera LED Ring Rear

Holding the camera board to the diecast aluminium base were M2.5 bolts and M2.5 x 13.5 mm Hex metal spacers. The two halves of the dome camera could be repurposed for another camera project.

Dome Camera Board
Dome Camera Board

The camera board contained a day-night switch which was achieved using a mechanical assembly.


Camera Day-Night and Lens Assembly

This assembly also contained the camera lens. Driving the day-night switch solenoid was a Unisonic reversible motor driver BA6208.

Camera Board Front
Camera Board Front

Removing the camera chip would be possible, however desoldering all four sides of the device usually requires dedicated equipment or patience.

Camera Board Rear
Camera Board Rear

Interfacing to the camera chip and controlling the solenoid for day-night operation was an ST microcontroller, part STM8S003F3P6. With 8k of FLASH memory and a small amount of EEPROM, this could also be salvaged.

The switch-mode power supply manufacturer was not identifiable.

The remaining parts such as the 27 MHz crystal, inductor and surface mount connectors (reasonable quality) could also be salvaged.

Other items such as the BNC adaptors and interconnecting cables between the DVR and dome cameras were not worth salvaging.


Sunday, 26 September 2021

Micron Soldering Station Clean and Repair (T2440)

Summary
This blog covers the cleanup and minor repairs to an original Altronics (T2440) 60 W Micron temperature controllable soldering station.

Repaired and Cleaned Micron Soldering Station

Details
Purchased many years ago, the only repair or maintenance performed on the soldering station has been the replacement of the soldering iron element.

Since some of the plastic insulation around the mains power and handpiece cables was looking neglected, it was decided to perform a routine cleanup and repair of the unit.

Micron 60 W Soldering Station

Following the removal of loose dirt, the soldering station was disassembled. Four plastic screws secured the lid on the soldering station. Three plastic screws secured the heating element in the handpiece.

Disassembled Micron Soldering Station

The damaged cable from the soldering iron handpiece was cut off at the entry point into the soldering station.

Damaged Cable Entry Points
 
Isopropyl alcohol was used to clean the outside of the handpiece and connecting cable. The black plastic at the entry of the handpiece had become brittle and was replaced with two layers of black heat shrink.

Heater Element and Cable

Both the soldering element barrel cover and soldering tip were polished using a light cutting compound on a buffing wheel.

Heater Barrel Cover (Before)

Heater Barrel Cover (After)

Soldering Tip (Before)

Soldering Tip (After)
 
A bath of white vinegar (5 % solution) was used to clean the top case and soldering iron stand. These items were left to soak overnight.
 
Replacement of the black plastic around the handpiece cable was again made with black heat shrink.


Repaired Soldering Handpiece

The repaired handpiece was wired back into the soldering station.

Soldering Station Control Board

For the main cable, this was replaced with a newer style plug. Black heat shrink was fitted around the main cable at the entry point into the soldering station.

Replacement Mains Plug

The mains plug and cable were rewired into the station. As with any mains wiring the typical disclaimers and directions apply; be careful!

Rewired Mains Connection

 
Any remaining small items were firstly cleaned in an ultrasonic bath which was followed up with a liberal application of Isopropyl.
Large items such as the yellow/cream cover for the soldering station required hand cleaning with a general-purpose paste type liquid cleaner. This was required to remove ingrain flux, dirt or other burnt miscellanea.

The soldering station was reassembled and tested.

Operating Soldering Station

Soldering Iron Tip Holder (3D Printed)

Summary
This short post provides the file for a 3D printable version of the tooltip holder created in a previous post.

3D Printed Soldering Iron Tip Holder

Details
The file in the Downloads section below is a close representation of the wooden tool tip holder. Fusion 360 was used to draw the model; available on request.

Soldering Iron Tip Folder Model

Verification of the model was performed by converting to GCode and printing on a 3D Printer (Ender 3) using PLA with a 10 % fill, no bed adhesion and default wall and base thickness. The printed dead weight of the tooltip holder may be too light for some users; an additional weight on the base may be required.

Downloads 

Soldering Iron Tooltip Holder (STL)

Sunday, 29 August 2021

Soldering Iron Tip Holder

Summary
This blog covers the build of a soldering iron tip holder using demolition site lumber.

Soldering Iron Tip Holder


Build Process
For the build, a piece of lumber (Jarrah) was salvaged from demolition scrap several months ago.

Demolition Site Salvaged Lumber

Without access to a lathe to create the required shape, a 64 mm diameter hole saw was utilised to create the round shape of the holder. The hole saw was drilled from opposing sides of the lumber to achieve the necessary depth.

Holder Cut by Hole Saw

Sanding of the holder was performed with 120 Grit on a belt sander then followed by 240 Grit on an orbital sander. The finished diameter of the holder was around 60 mm and the height was 72 mm.

Sanded Soldering Iron Holder Form

A paper template was printed to assist in locating and marking positions for the Hakko T-12 type soldering iron tips. The six positions could be increased to eight or ten without overcrowding.

Holder with Tip Position Template

Holes for the soldering iron tips were drilled with a 6 mm bit to a depth of 35 mm. The shaft diameter of T-12 tips is marginally larger than 5.5 mm.

The central hole created by the hole saw was glued and plugged with a wooden dowel.

Holder with Six Drilled Tip Positions

After the glue had cured, the dowel was finished flat with the surface of the holder. A 16 mm Forstner bit was drilled to a depth of 35 mm. The 16 mm diameter of thr bit suits Stannol PCB flux pens.

Holder with All Drilled Positions

All the holes were deburred with a 5 - 10 mm countersinking bit and the holder given a final sand.

Three coats of primer (
Rust-Oleum flat white Primer) were applied to the holder with sanding using Grade 000 steel wool between each coat. Rolled sandpaper was used for the drilled holes. 

Soldering Iron Tip Holder with First Coat of Primer
Holder with First Coat of Primer

For the final colour of the holder, Rust-Oleum Blue Diamond was chosen. The colour was applied in three coats with sanding using Grade 000 steel wool after the initial two coats. A fine bristle paintbrush was used to paint inside the holes.

Soldering Iron Tip Holder with Final Coat of Paint
Holder with Final Coat of Paint

Shown below is the soldering iron tip holder with tips and flux pen mounted.

Soldering Iron Tip Holder with Tips and Flux Pen
Holder with Tips and Flux Pen
 
Summary

While the primer and colour spray paints achieved a descent finish, for longevity of the holder a harder two-pack or epoxy-based paint may be preferred.